Regions Tools - Layer Menu
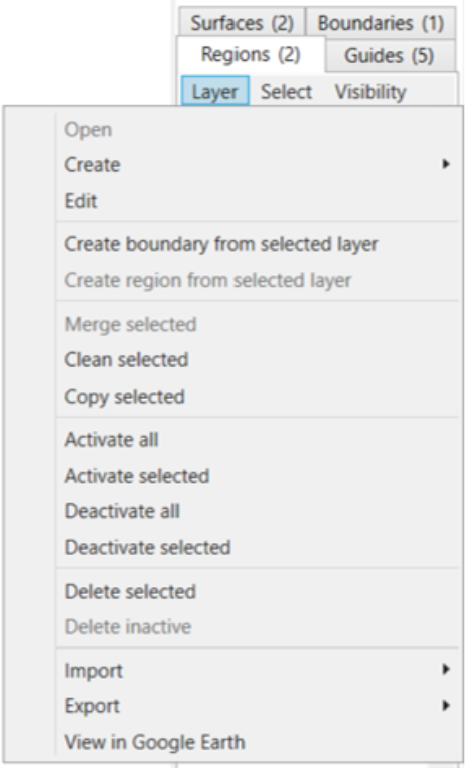 Open
Open - Create >
- Create from saved surface
- Create from selected surface
- Create from saved boundary
- Create from selected boun
- Edit
- Create boundary from selected layer
- Create region from selected layer - this will draw a region around the most outer points of the selected surface and will populate a new region in the Region tab
- Merge selected - (ensuring you have 2 or more boundaries selected) this will create a combined boundary, removing the initial boundaries
- Clean Selected - See below
- Copy selected - this will duplicate the selected boundary
- Activate all - this will activate all the boundaries so they are visible on the Working Area. This is shown by the checkbox being selected.
- Activate selected - this will activate the boundary which is selected (shown by the tile having a blue highlight around it) so it is now visible on the Working Area. This is shown by the checkbox being selected.
- Deactivate all - this will deactivate all boundaries
- Deactivate selected - this will deactivate the boundary which you currently have selected (shown by the tile having a blue highlight around it)
- Delete selected - deletes the boundary that is selected (shown by the tile having a blue highlight around it)
- Delete inactive - deletes all inactive surfaces (i.e. those without a tick in the checkbox)
- Import >
- Import Shapefile
- Import KML
- Import Multiplane Boundary
- Import DXF points/linework
- Export >
- Export selected to Shapefile
- Export selected to KML
- Export selected to Text Columns (CSV, TSV, etc)
- View in Google Earth - this will open the selected surface in Google Earth
NOTE: You must have Google Earth Pro installed on your PC for this to work.
Clean Selected explained
Clean selected attempts to simplify and clean the regions by combining points that are very close together (<1mm). It also occurs when dragging nodes and splitting.
In general splitting and editing regions will attempt to reduce the number of points in the region by detecting points that end up close to each other. This can be really helpful when creating internal voids in a region. To do so, add 3 points on the edge of a region, then drag the middle one to where you want your void. Add points near the middle point to go around the void. Then drag the last point you add right on top of the 'middle' point (you may need to zoom in to get it close enough). When you are prompted to simplify/combine, choose Yes. Combine the two points at the edge in the same way. Now you have an internal void.