The Main Pages
Main Page
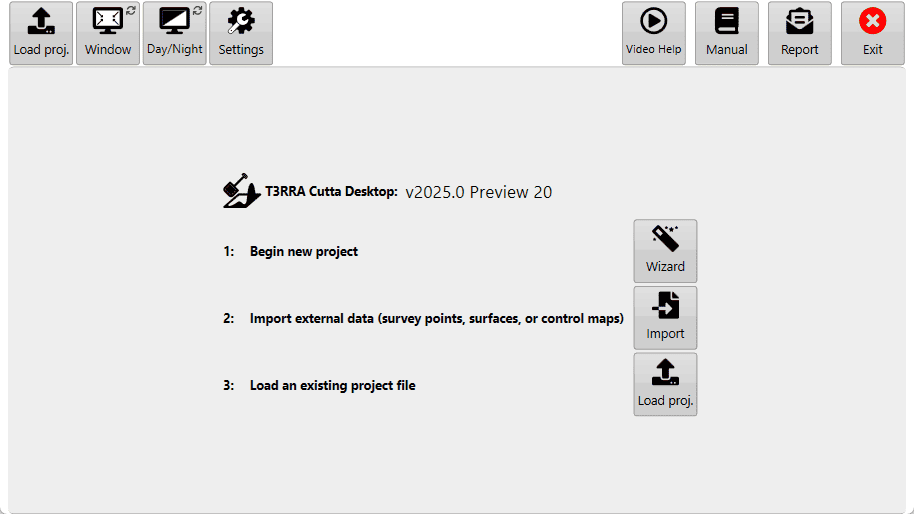
When T3RRA software is first opened this will be the first screen you see. This screen is also shown when you press the ‘New Project’ button on a Wizard page (discussed in the Wizard section).
Points to note:
-
The file name currently loaded will be displayed at the top of the screen if you are not using ‘Full Screen’ mode.
-
The name of the software will be displayed.
-
The version (v2023.2) will be displayed.
In the center
When you open T3RRA Cutta Desktop anew, you'll usually want to choose one of these three options. You can start a new project in the wizard, jump straight to importing data, or load an existing project.

Wizard - Tap this to enter the wizard and start collecting data for a new project. It leads you through the process of collecting, surfacing, design and applying the new design.

Import - Tap this to import external data from any of a variety of sources. This could be from files like CSV and LandXML, or John Deere Ops Center. For more information, see the Import page.

Load proj. - Tap this to load a previously saved T3RRA project (*.TCI). This allows you to continue where you left off last time. For more information, see Loading Projects.
Along the top

Window - this option allows you to switch T3RRA software between full screen mode or windowed mode. This is helpful if you need to be looking at other pages on the tablet or computer at the same time as using the T3RRA software. If a keyboard is attached you can use the shortcut of F11.

Day, Night, & High Contrast modes - These are different color schemes for the software.
Day mode (1): Classic white (the mode used in the manual).
High Contrast (2): Is an inverted version of classic white.
Night mode (3): Has a black background and a green foreground.


Settings - After the T3RRA software has started the first step is to confirm the correctness of your software configuration. The different settings and how they operate will be covered in the next section. For more info on the settings page refer to the Settings article.

Manual - The ‘Open Manual’ button will download a digital copy of the manual and install it on your device. After the manual has been downloaded, pressing the same button will open the manual.

Report - The report button opens up a bug report/feature request window (shown below) allowing you to report issues to T3RRA. The name and email address fields of this window are automatically filled using the details linked to the software licence. You must be connected to the internet for this to work.

Settings

Settings can be found at the top of the screen when not viewing a map or exporting. This page has many options to control aspects of T3RRA Cutta Desktop, including map appearance, units, the size of buttons, etc.
Application Tab

‘Language’ – Changes the language
‘Length’ - Changes unit of distance measurement.
‘Area’ - Changes unit of area measurement.
‘Volume’ - Changes unit of volume measurement.
‘Estimated Cost’ - Set an estimated cost per volume of dirt moved. To customize the currency format, click the button to the right. You can enter custom text before and after the amount. An example is shown on the right. This allows you to put your currency code and other information before and/or after the value.

‘Surface Grid’ -Determines whether or not to show the grid lines on the map. By default the grid changes size to best fit the size of the field. Dimensions for the grid size are displayed in the lower right corner of the scanned area.

‘Lock grid size to’ – Users can adjust grid size manually. Leave empty to auto-size.
‘Cut/Fill Color Style’ – Set colors used for Cut/Fill to Magenta/Green or Red/Green/Blue. (Magenta as cuts/Green as fills, or Red as cuts/Green as neutral/Blue as fills)
‘Surface Color Style (Low,High)’ - The surface color style allows you to change which colors represent your highs and lows. (this is limited to selecting from a drop down menu)
‘Slope Display’ – Show slope as a Percentage or as a Ratio. (0.1% or 1/1000)
‘Show screen keyboard’ - Choose to have the keyboard automatically open when needed.
'Show Project Swapper button'- Shows the project swapper icon.
‘Estimated Cost’ – Cost per cubic meter, or cubic yard (this is calculated for cuts only). Currency is based on the current language.
'Download Updates' – Choose to update to the latest version when connected to the internet.
'Show update log' – lists software update details.

Project Tab

Settings made in the project tab will not be represented in a project that is open when the settings are changed.
Surface Pixel Size - The default pixel size of 2 meters (~6 feet) should be adequate for most purposes. In some situations, it may make sense to decrease pixel size to 1 meter or even 0.5 meters (primarily to facilitate small interval contour creation, or to get good definition on drain batters/backslopes).
A field surface is represented using a “raster”. This is a grid of elevation heights. The individual cells in this grid are referred to as “pixels” and have a uniform edge size. The smaller the pixel size, the more pixels needed to cover a given area, and the more precise the elevation surface is.
Points of interest
-
If pixel size is too large then the field surface will not appear smooth, and short range changes in elevation may not be adequately represented.
-
If the pixel size is too small, then the computer will have to work harder to process the data. Dividing the pixel size by two increases the amount of pixels by four.
Advanced Settings Tab

‘Enable diagnostic data’ - It is highly recommended to keep this enabled because the data collected is valuable for us in assisting you if any issues should occur.
‘Open Task Manager’ will open the computer's task manager tool. This will display all current systems running on the computer.
‘Explore error logs area’ will open the folder on the tablet that contains all error log files. If you encounter an issue we recommend you send us the latest file so we can find the cause and correct it quickly.
‘Version Manager’
It allows you to revert back to a previous version.
‘Reset to Default’ This will reset all settings to Default.
‘Automatic backup frequency’ This drop down menu allows you to change the frequency at which the T3RRA Software backs up your work. The different timing options are:
Never = never backup save
Low = backup save every 20 min
Medium = backup save every 5 min
High = backup save every 2 min.
‘Terrain model Quality’ This setting is set to High by default most visible when looking at surfaces in 3D. When lowering the setting some details may appear to smooth out, the details and depressions are still there but are not represented in the 3d display.
‘Map update rate’ This will alter the rate of the map updates during Surveying and Implementation.
New Project Options


Collect and process elevation data into a control map. When starting a new job this is the usual place to start.

Use an elevation data file from an external source. Various file formats are supported.

Load an existing T3RRA control file from disk or the cloud.
Save Project
Saving a project allows you to return to it at a later time and ensures that you have a copy of the data in case of accidents. We STRONGLY recommend periodic saving of your projects in order to guard against data loss.

The ‘Save project’ button can be found in the top left corner on any of the main wizard pages.
The 'Save proj.' button presents you with a screen that allows you to save using the following structure (see right).

You can enter:
-
Grower
-
Farm Name
-
Field Name
-
Project Name
Or you can choose a previously saved value in any of the fields from the drop down list.
Pressing the final 'Ok' will save the project and add the file T3RRA’s structured file saving area.
'Manually Choose Location' allows you to select an alternate location to save to.

When manually choosing the save location there are two ways of navigating to where you would like to save the file.
-
You can use the left portion of the window to navigate through folders to find the desired save location.
-
Using the main section in the center of the window you can navigate to the desired file save location.
NOTE: Project files are normal Windows files and can be stored anywhere on the computer. We recommend that you regularly copy your files to a location off the in-cab tablet in order to have them stored safely in case anything happens to your tablet or PC.
Autosaving
T3RRA software autosaves project data at approximately 5 minute intervals. This is to assist in case of accidentally closing the software, or software or hardware failure.
Autosave files have the same name and location as the open project, with the additional suffix ‘.backup’.

When a project is loaded a check is made to see if a backup exists for that project. If it does and the backup has a newer date/time stamp associated with it, you will be given the option of loading it.
An autosave file has the same format as a regular project. From within Windows Explorer you can rename the autosave file and remove the .backup extension in order to keep both the original file and the autosaved version.
Loading Projects
The ‘Load proj.’ button is used to load any saved T3RRA projects. T3RRA projects can be loaded in several different ways, allowing you to load files saved directly to your tablet or from external sources such as USB’s.
To load a project press the 'Load proj.' button in the top left corner or bottom center of the Main Page. It will then present you with a page like the below.

Select the project that you wish to load from the desired field and press 'OK'
The ‘Grower/Farm/Field’ file structure allows for projects to be easily organized. For more information on these profiles and how they are set up see later in this section.
Next to each file there are 3 buttons:
 The left button with an image of a pencil and paper is a file renaming option.
- The center button with a trash can is a delete option allowing you to remove that file. Deleted files are moved to the Windows Recycling Bin.
- The right button with the image of 2 folders is a file moving option, this brings up the same window you have when saving a file in T3RRA software allowing you to move the project to a new location.

Choosing 'Show all files' will start a scan of your computer's C: drive. A list of the T3RRA Cutta project files will be populated once the scan has been finished.
Entering text in ‘Search’ will limit the displayed projects to only with matching file names.

Progress bar in the lower right indicates scanning in progress
Once the desired file has been found in the list, select the file and press ‘Ok’.

Click 'Browse file location' button to open selected file location in File Explorer.
 'Find manually' can be used when files are not saved in the default T3RRA folder structure. Project files are normal Windows files and can be stored anywhere on the computer.

Use the file explorer to find the T3C project file, then select the file and press the ‘Open’ button.

Clicking 'Download project' will open JD Ops Center browser to show projects in JD Ops Center.
Select project and Click ‘Load project’ button.
Once a file has been selected and loaded, the wizard page should appear and show the stage that the project is up to.

Import page
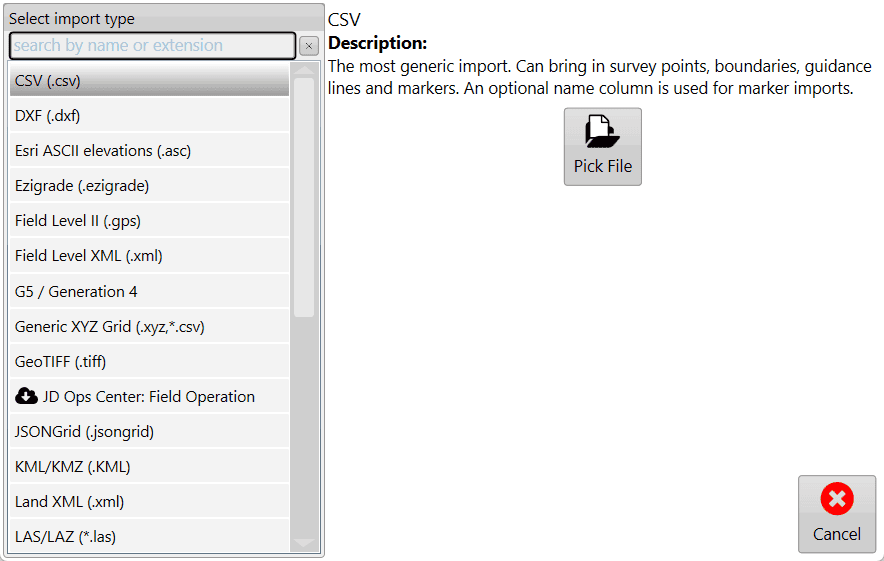
When you have collected your elevation or design data with an external tool, importing is the way to go. You can get here from the Main Page or from the surfacing step in the wizard. When you first open the import page, you'll be presented with a list of import types.
Don't import a TCI file - Load it instead. See Loading Projects for more information.
If you see the one you want, tap it, but you can also search for the import using the text box at the top. Once you've selected your import type, tap the Pick File button on the right and navigate to your file(s).
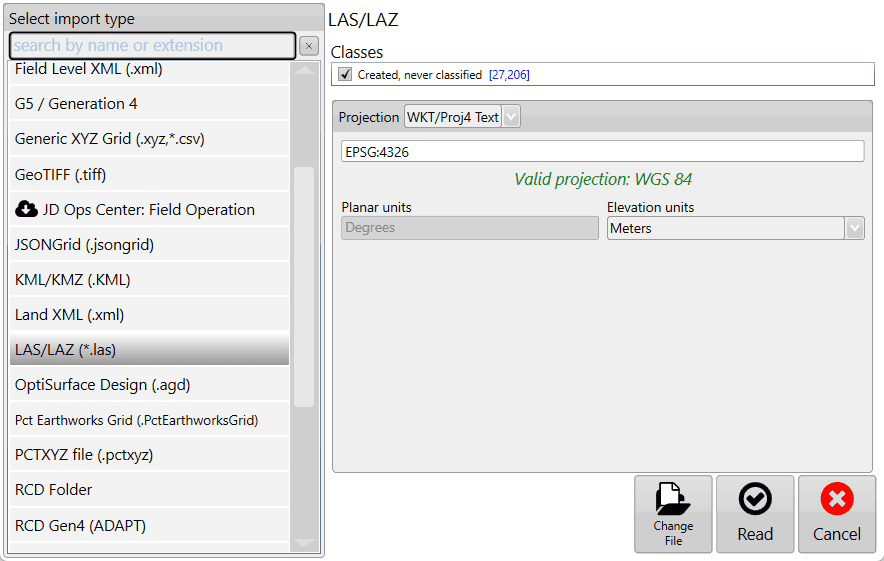
Once you've selected the file(s) to import, if any more information is required, more options will be presented. In this case (LAS/LAZ), it gives you an opportunity to filter point classifications and the projection. If you picked the wrong file, tap Change File, otherwise, tap Read to continue with the import.
The file(s) are then read and the contents available for import are listed. It's here that you can edit the details about each item found. For surfaces, you can mark them as Elevation or Design, and for points, you can mark them as surveys, drains, linework, markers, or boundaries. Once you're satisfied with your edits, tap Import, and you'll be able to work with your data.
