
5.5 | Pre-designed Projects & Data
Pre-designed Projects allow Level COMMAND to grade using surfaces that have been created outside the application. These projects are typically prepared by a dealer, surveyor or designer before being transferred to the machine.
Compared with Plane Projects, imported projects can contain significantly more information, including surveyed terrain, finished design surfaces, boundaries, linework, markers and benchmark locations.
Preparing Design Data
Before importing a project, verify that the supplied design includes the information required for the intended grading operation.
Where possible, imported projects should include:
Benchmarks should be placed in locations that:
Following these practices makes future verification and re-zeroing significantly easier.
Supported File Types
At the time of writing, Level COMMAND supports importing T3RRA project files:
Additional import formats may be supported in future software releases.
Loading an Existing Level COMMAND Project
To load an existing Level COMMAND project:
The selected project immediately becomes the active grading project.
Insert Load Project screenshot.
Importing External Design Data
To import new design data into Level COMMAND:
Insert Import Data screenshot.
Imported data becomes part of a Level COMMAND project and can then be used like any other project.
Imported Project Features
Depending on how the project was created, imported data may include:
The available information depends on the design software used and the data exported.
Working with Imported Projects
Once loaded, imported projects are operated in the same way as any other project.
The operator may:
Although imported projects may contain complex design information, the grading workflow remains exactly the same as described throughout this manual.
Operator Tip: If possible, review imported project data before arriving on site. Confirm that the expected design surface, benchmark locations and project features are present before beginning work. Discovering missing benchmarks or incorrect project data is far easier before the machine enters the field.
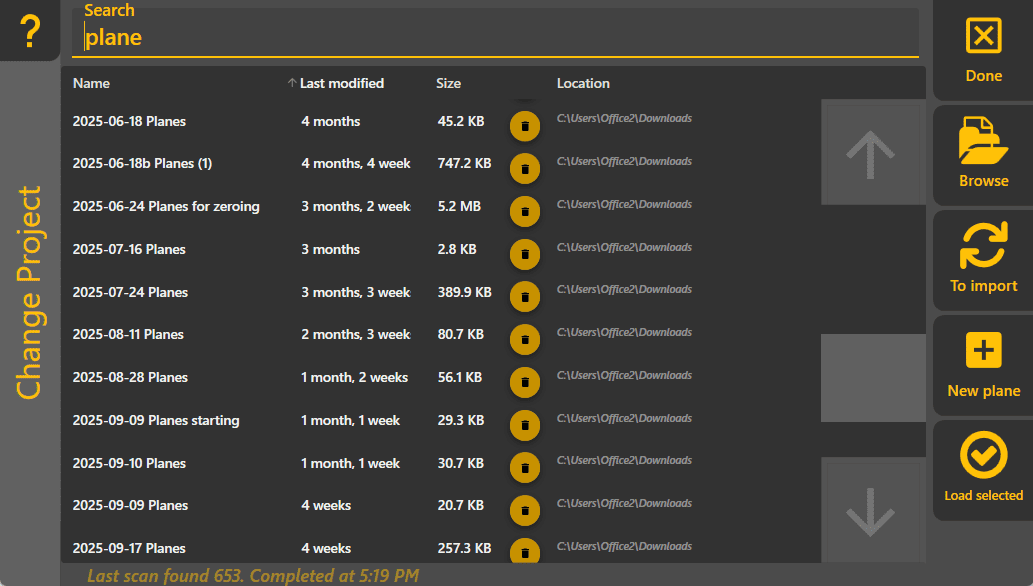
To change the loaded project, tap the Change Project button on the Apply View or in the More menu. Tapping it will show a full page (see below), listing all projects that can be found on your computer. To load a specific project, tap it, then choose Load selected on the bottom right (double-tapping a project also works). To filter the projects to a specific one, tap the search field at the top and type in a search term.
Done: Closes the page, going back to the Apply View.
Browse: Opens a file selector so you can navigate to a specific project. Select your file then tap Open to start loading it.
To import: Switches to list files that can be imported into Level COMMAND. Select an importable file from the list and then tap on the Import selected button in the bottom right. Press this button again (it will now say To Load) to switch back to loading Level COMMAND projects.
New plane: Starts a new plane project. Use this for creating planar designs and start moving dirt quickly.
Load selected: Loads the project selected in the main list. Once the project is loaded, it will show the Apply View.
Allows you to save a 2nd copy of your project. It also lets you choose a prior version for compatibility with earlier releases of Level COMMAND.
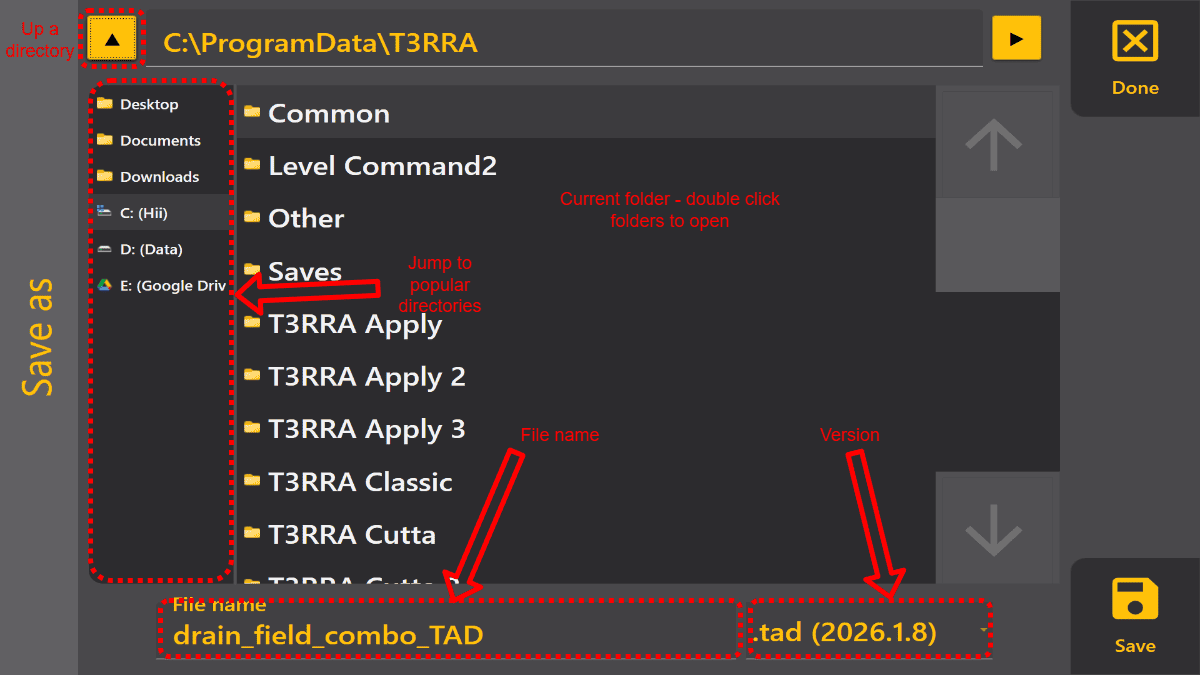
How to use
It works similarily to the native save dialog, but is optimised for touch. You can choose where to save by tapping on the locations and folders on the left or in the main view. Tapping on a folder shows its contents in the main area, so it's easy to navigate to sub-folders. If you go to deep into the folders, tap the ▲ button the top left to go up one level. If you want to explore the folder contents using Windows Explorer, tap the ▶ button in the top right. Once you've found your location, enter the new project name at the bottom.
Leave the version as default UNLESS you are trying to send a file to and older verison of Level COMMAND that errors when loading the most recent version. The error message will tell you which version is supported by that Level COMMAND. This is because using older versions of the project format can lead to loss of information.