# 7.17 | Terrace Design
'Terraces' allows you to create Guidance curves to mark terraces for erosion control.
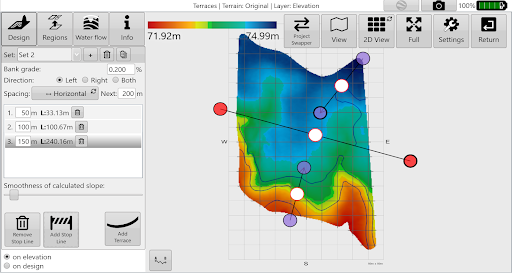
When you first enter the terraces tool, a start line is displayed on the map. This is where your terraces will start from. There are a few parameters for terraces:
- ‘**Bank grade**’ allows you to control the slope of the terraces. This will affect how quickly water flows down each terrace.
- ‘**Direction**’ controls how terraces flow from the start line. To the left, right or to the left and right (both) of the start line. If you want the terraces to flow towards the start line, make the bank grade negative (e.g. 0.2% to -0.2%).
- ‘**Spacing**’ controls whether the starting positions of the terraces are controlled by Vertical distance (elevation drop) or Horizontal distance (distance travelled along the start line). Each time a terrace is added (with the \[Add Terrace\] button in the lower right of the design pane), it updates the ‘Next’ distance on the right.
- Each terrace added is listed in the center. In the list, you can change each terrace’s start distance, or delete it. It also shows you how far the terrace extends.
- ‘**Smoothness**’ controls how much the surface irregularities are smoothed out. If your terrace lines are too jagged, you may increase this slider. Note, however, that high smoothing will lead the terraces to not follow the ‘Bank grade’ as closely. This may lead to wet spots and/or require earth moving to ensure drainage.
- ‘**Add Stop Line**’ adds a new black line to the map with large red circles at each end. Position one or more stop lines using the red circles to terminate terrace lines at the right location (e.g. a waterway).
Once you’ve created terraces with one start line (also called a ‘set’), you may use the smaller Plus button at the top to add a new start line. You can add as many start lines as desired. To switch between start lines, use the ‘**Set**’ drop down, or simply tap on one of its purple circles on the map. If you want to remove a start line (including the full terrace set), select it and click the delete button at the top.
Once you’re done creating and laying out the terraces, you may export them as guidance lines, etc.