It’s an old maxim but a good one. You can do as many designs as you want in T3RRA software before you ever put your tractor into gear. Use our 3D visualization and rainfall simulation tools to carefully examine the effect of any design. Evaluate the volumes of dirt being predicted and ensure that they are within expectations. Catching a design error in the software is much less painful than having to redo many hours of dirt moving.Remember that computers are fallible. Never blindly follow a design you are given. Critically assess whether the computer output matches what is happening in the real world. It is not a given that it will!Try to start small with simple designs and little fields. Mistakes, and the lessons learned from them, build your experience and capability - but it is far better to do your learning on small jobs!If you are in doubt, please seek the advice of a professional irrigation designer or engineer. The design step is not compulsory and can be skipped if desired. HOWEVER this is not recommended unless you have a specific task where only a copy of the surveyed data is required.
##
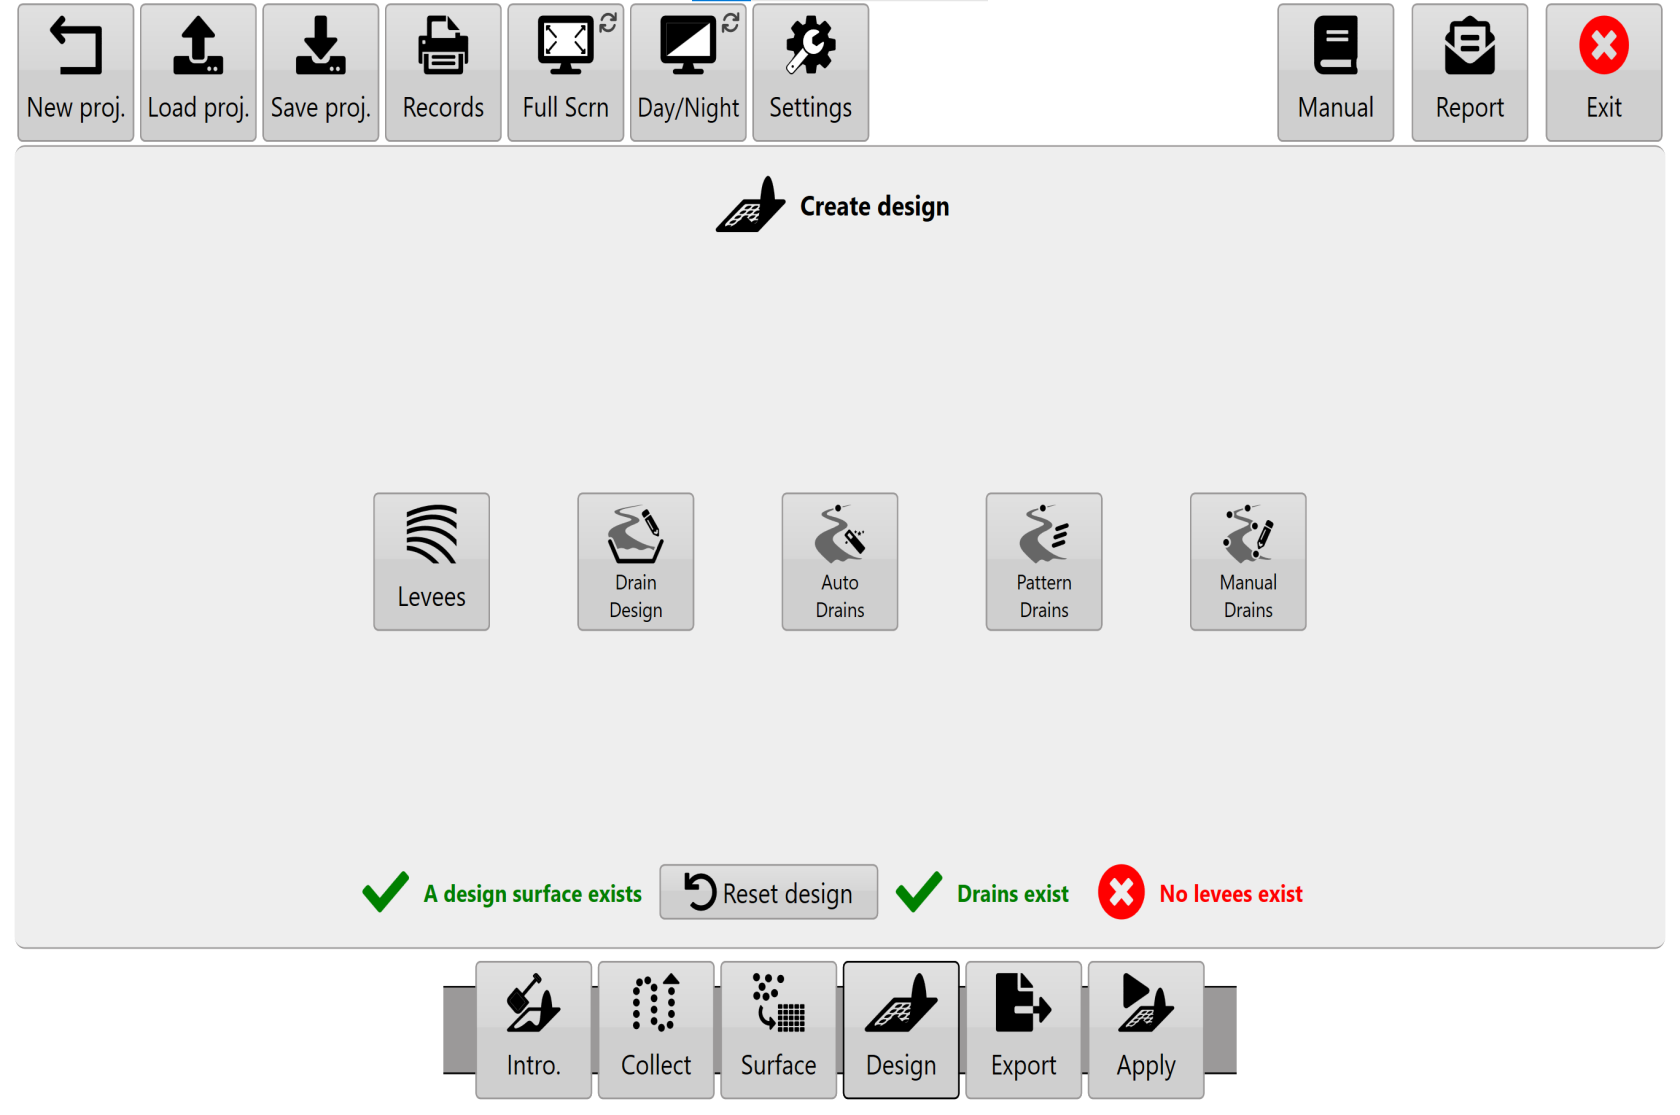
## **Design capabilities present in different T3RRA software packages**The ‘**Create design**’ page is presented to you when you advance to the ‘**Design**’ wizard step. The tools you will see differ based on the specific T3RRA software you are using. This is because each package is aimed at a certain user type and market segment.A surfaced elevation map is the starting point for creating a new field design. Determining an optimal terrain design is very specific to the conditions that exist on an individual farm. Cropping practices, existing topography, soil types, costs, available machinery, and many other factors apply. Even if you are not intending to do full field land forming (such as is the case when only creating ditches) we still see great value in fully surveying a field. All of our packages allow you the capability of doing this. All of our design tools show you the surface in 3D and can run a rainfall simulation on it. In general, the design aims of each package are explained over the next few pages:T3RRA Cutta provides tools for GPS based land-forming, ditching, and levee creation.In order to provide solutions that are as broadly applicable as possible T3RRA Cutta includes a variety of design methods:
- Single or dual best-fit planes
- Multi-fit optimization
- Smoothing
- Offsetting
NOTE: A powerful capability of T3RRA Cutta is the ability to “chain” designs together. As well as performing designs on the original field surface, you can also perform designs on an existing design. For instance, after performing a multi-fit design, you can then go and use the '**Smoothing**' tool to smooth the multi-fit design. Use this capability methodically and with care - it is easy to get confused!T3RRA Ditch provides tools for ditching and levee work
- Drain profile and cross section design
- Automated drain path creation
- Pattern drain design
- Levees (including regions)
- Manual drain designT3RRA Plane provides tools for laser based levelling and ditches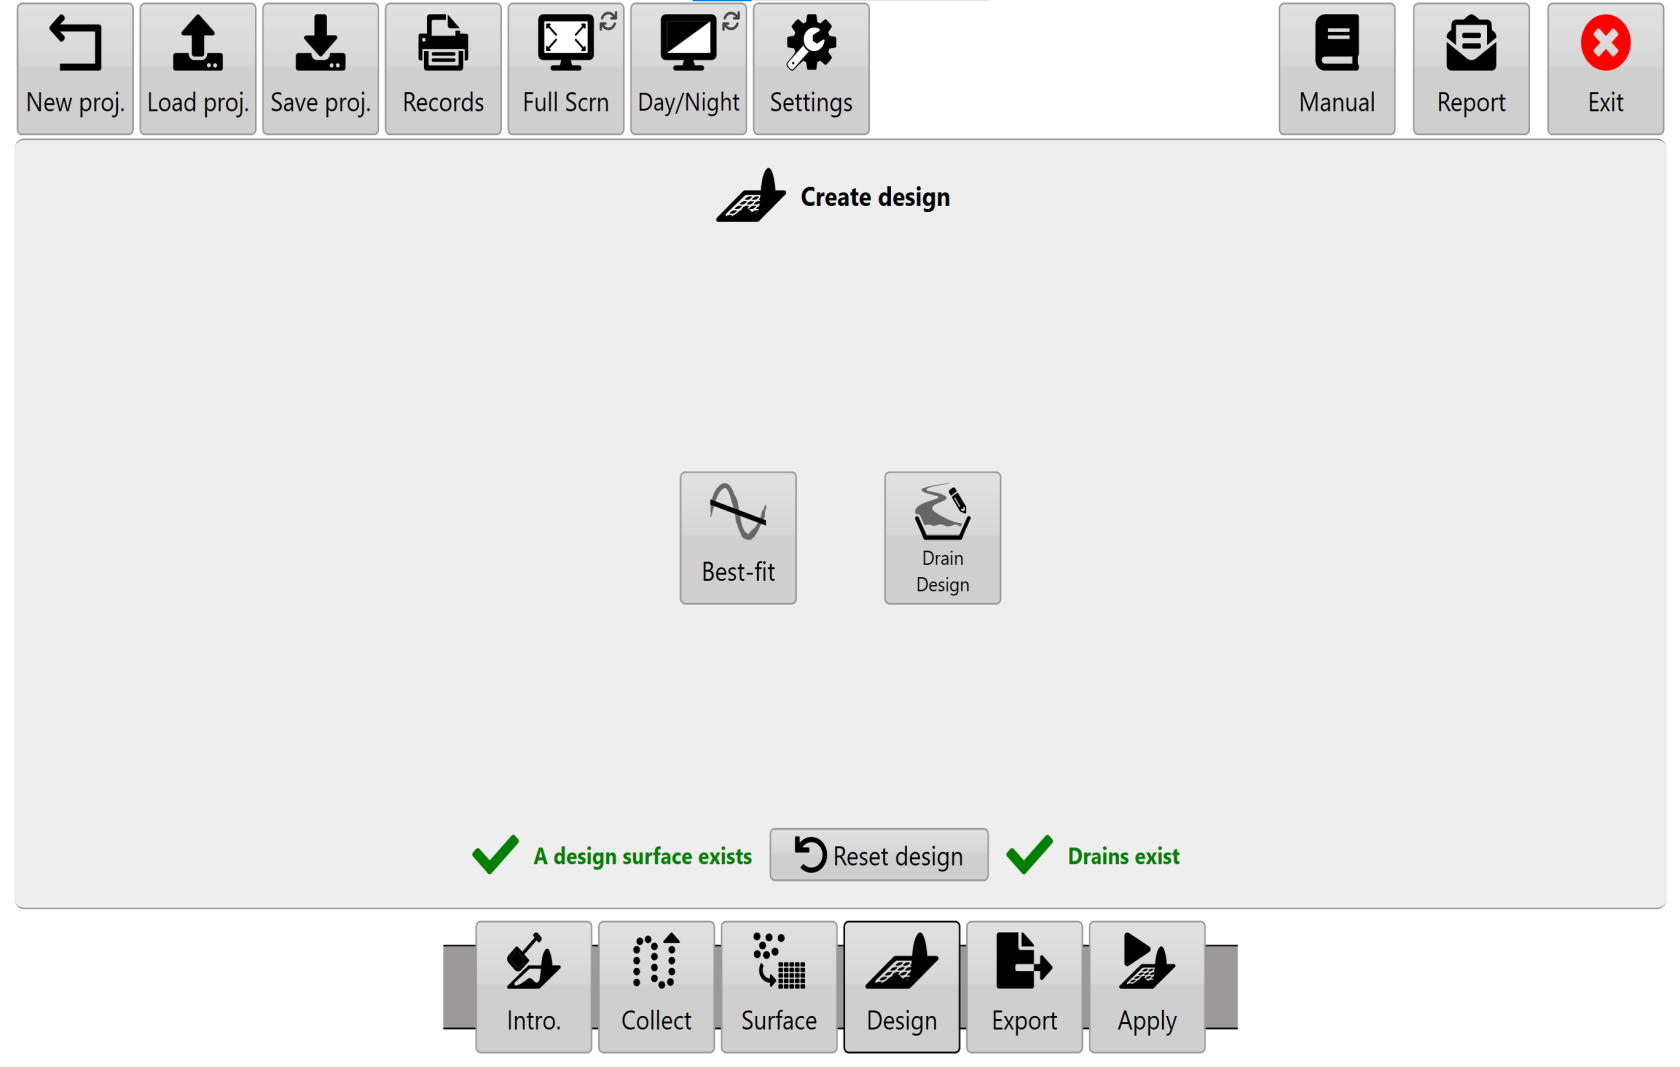T3RRA Plane can’t do non-linear surface designs. But we wanted to make sure that it can do anything you can do with a laser level.
- Single or dual best-fit planes
- Linear Drain profile and cross section design
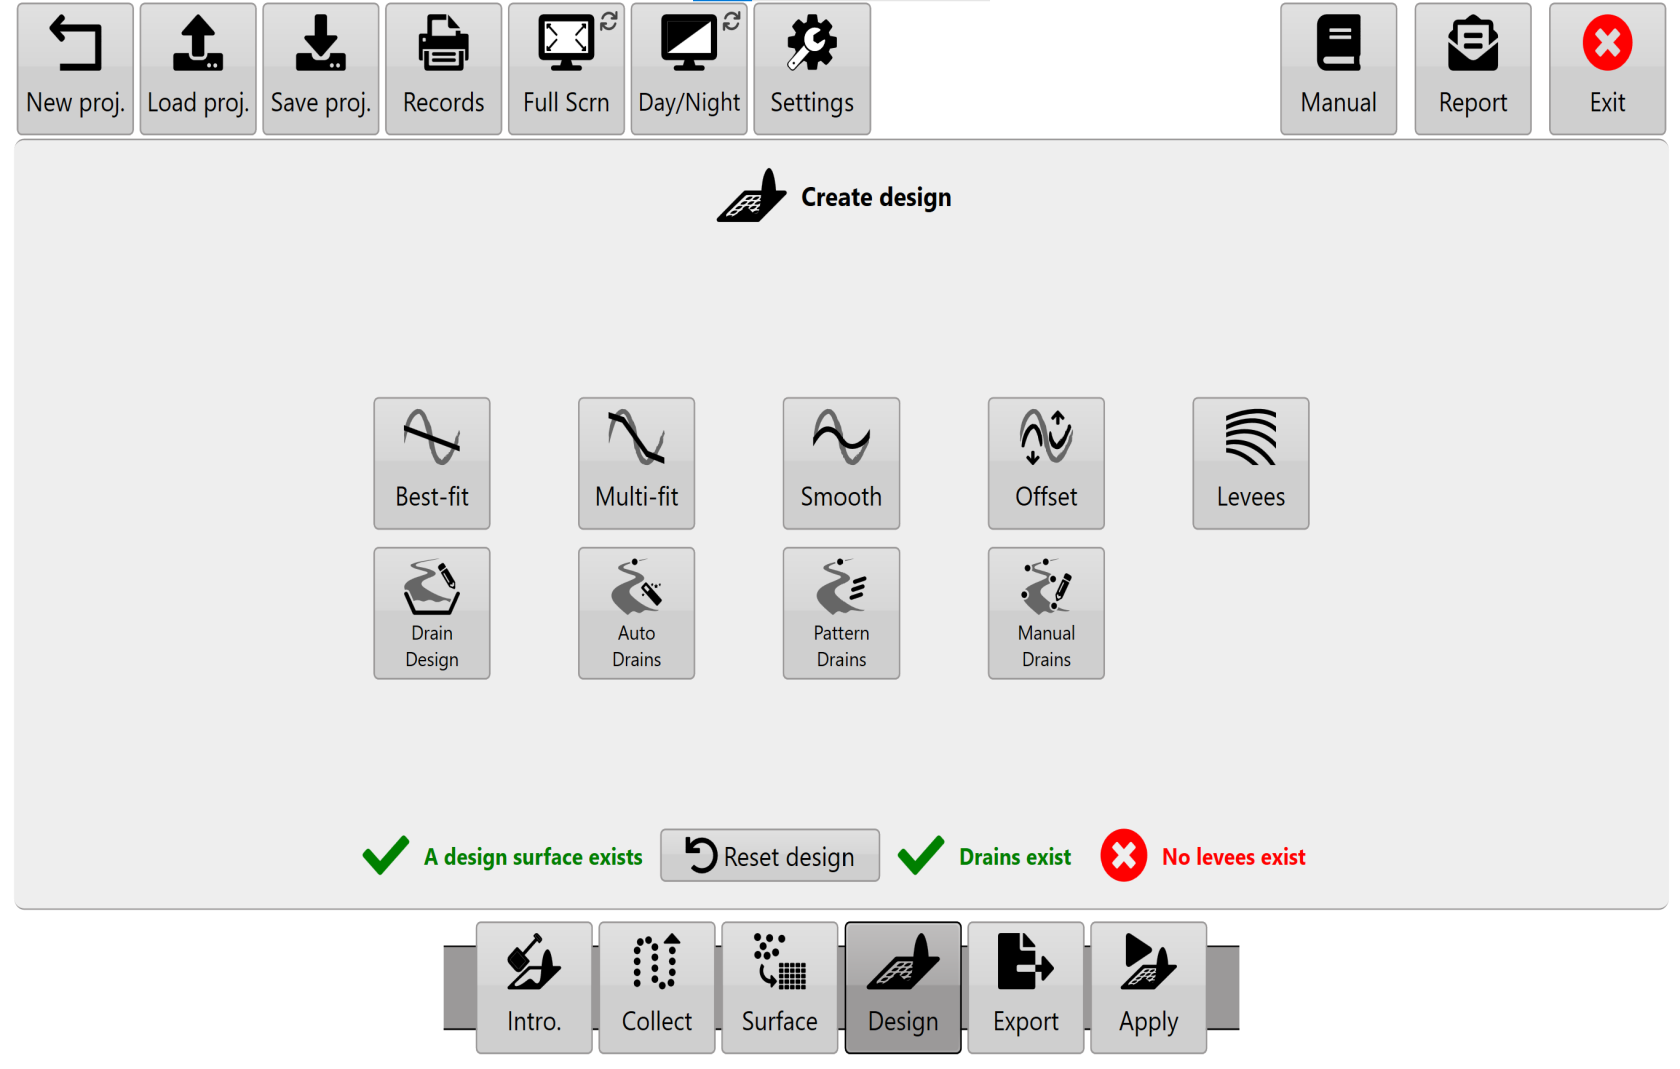
**Design icons.**T3RRA software attempts to divide design functionality into discrete tools.
- Select Best-fit, Multi-fit, Smooth & Offset to design a field surface area.
- Select Auto-Drains or Pattern Drains to place drain paths on the surface.
- Select Drain design to design the profile and cross section of drains.
- Select Levees to add levees to the surface. NOTE: If you have a drain/field combination to design, always design the field first and the drain second.

# Rainfall Simulator
One of the many unique features of the T3RRA product suite is our inclusion of a rainfall simulation tool. This allows a very visual and easily relatable analysis of how a field surface affects water runoff and ponding.It should first be used after a survey and prior to any design being placed on the field. The intent of this is twofold:
1. *To verify that the created surface does in fact truly represent the field*. By looking at the water flow, a person familiar with the field will usually be able to say “Yes, that is the normal pattern of water runoff I would see”. In this case the operator can be confident that the survey has created an accurate model of the field. On the other hand, if the simulation produces results that are not expected it may be wise to critically revisit the survey and perhaps collect more data.
2. *To compare the design with the original surface*. It is expected that the design will result in a pattern of drainage different to the original. Analyzing the design will quickly tell you if the new surface is going to have the effect on drainage that you expect.The rainfall simulator **cannot** tell you *how long* a field will take to drain. There are simply too many variables, such as the soil type, the soil moisture level and the soil depth before reaching hardpan. Such a calculation is beyond the scope of this software. It can however provide you with an indication of how much faster one design will be over another. You can do this by comparing the iteration counter value of two different designs at a given drainage % value. Even so, be aware that the timing information of the simulation is qualitative in nature, not quantitative.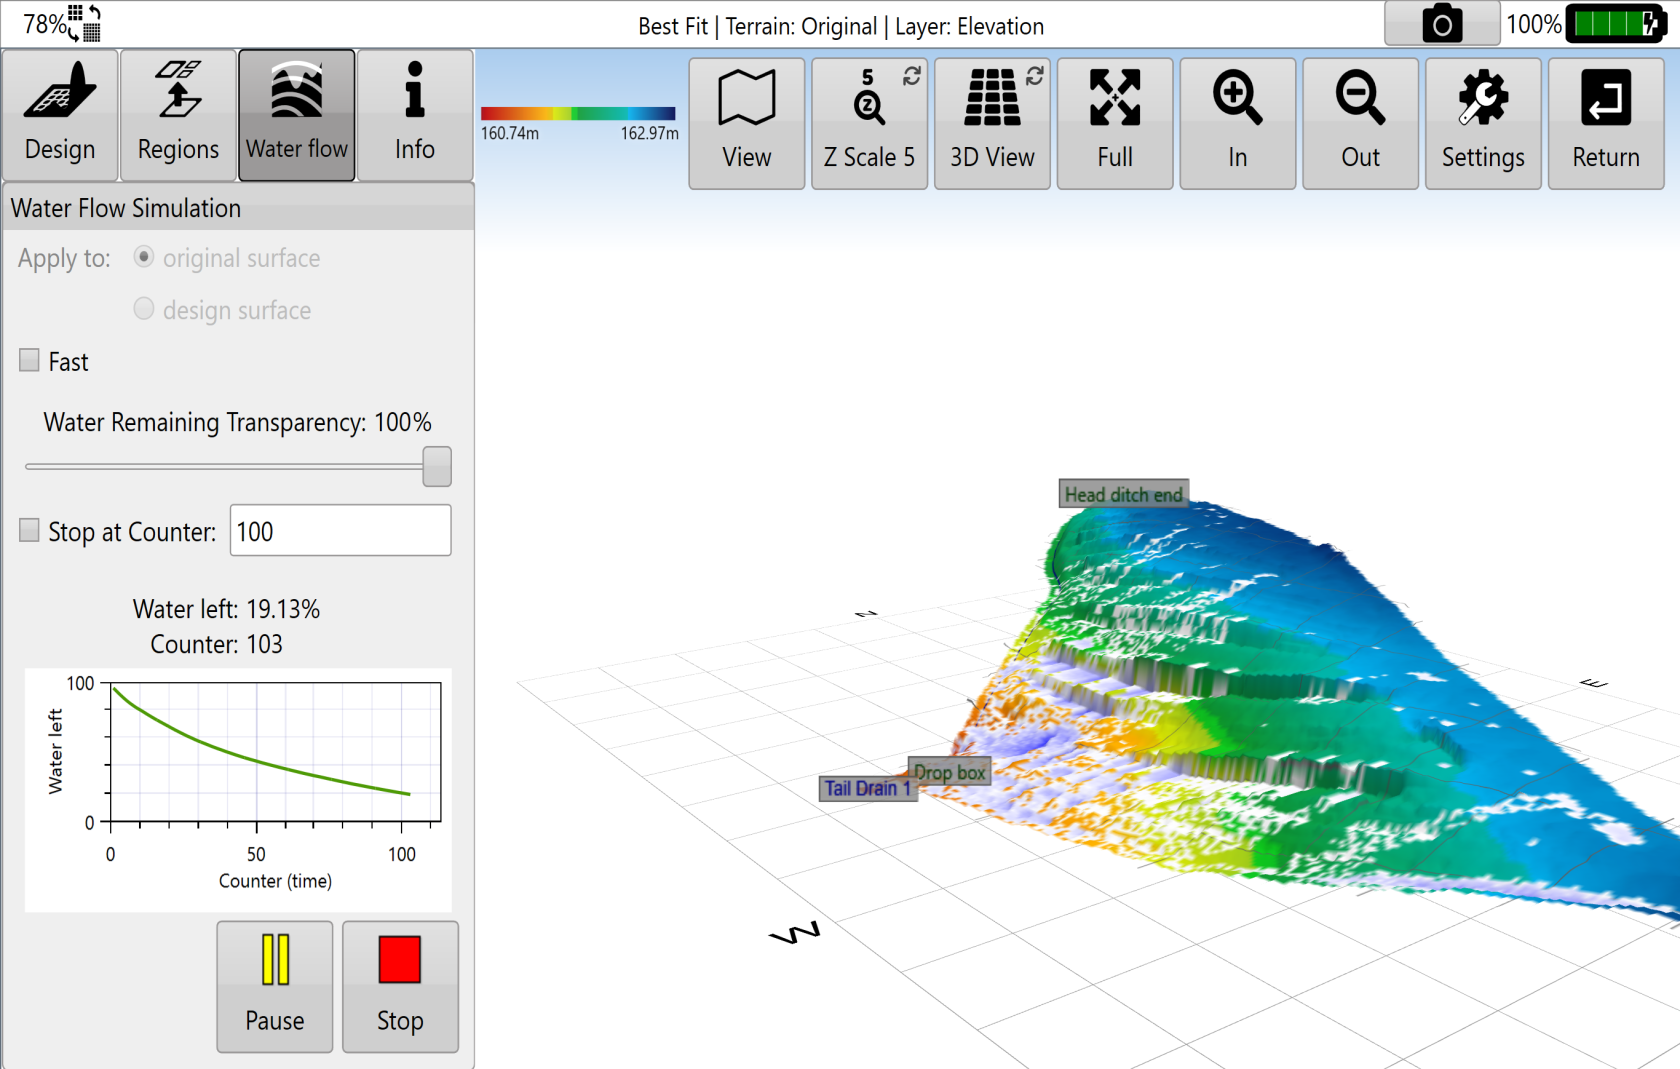Alternate between design surface and original surface to view changes in water flow.Counter is used for comparing drainage time differences between design and original surfaces.View simulation in 2D or 3D.
# Regions
To create regions, press the ‘**Regions**’ button (regions are not available in drain related functions).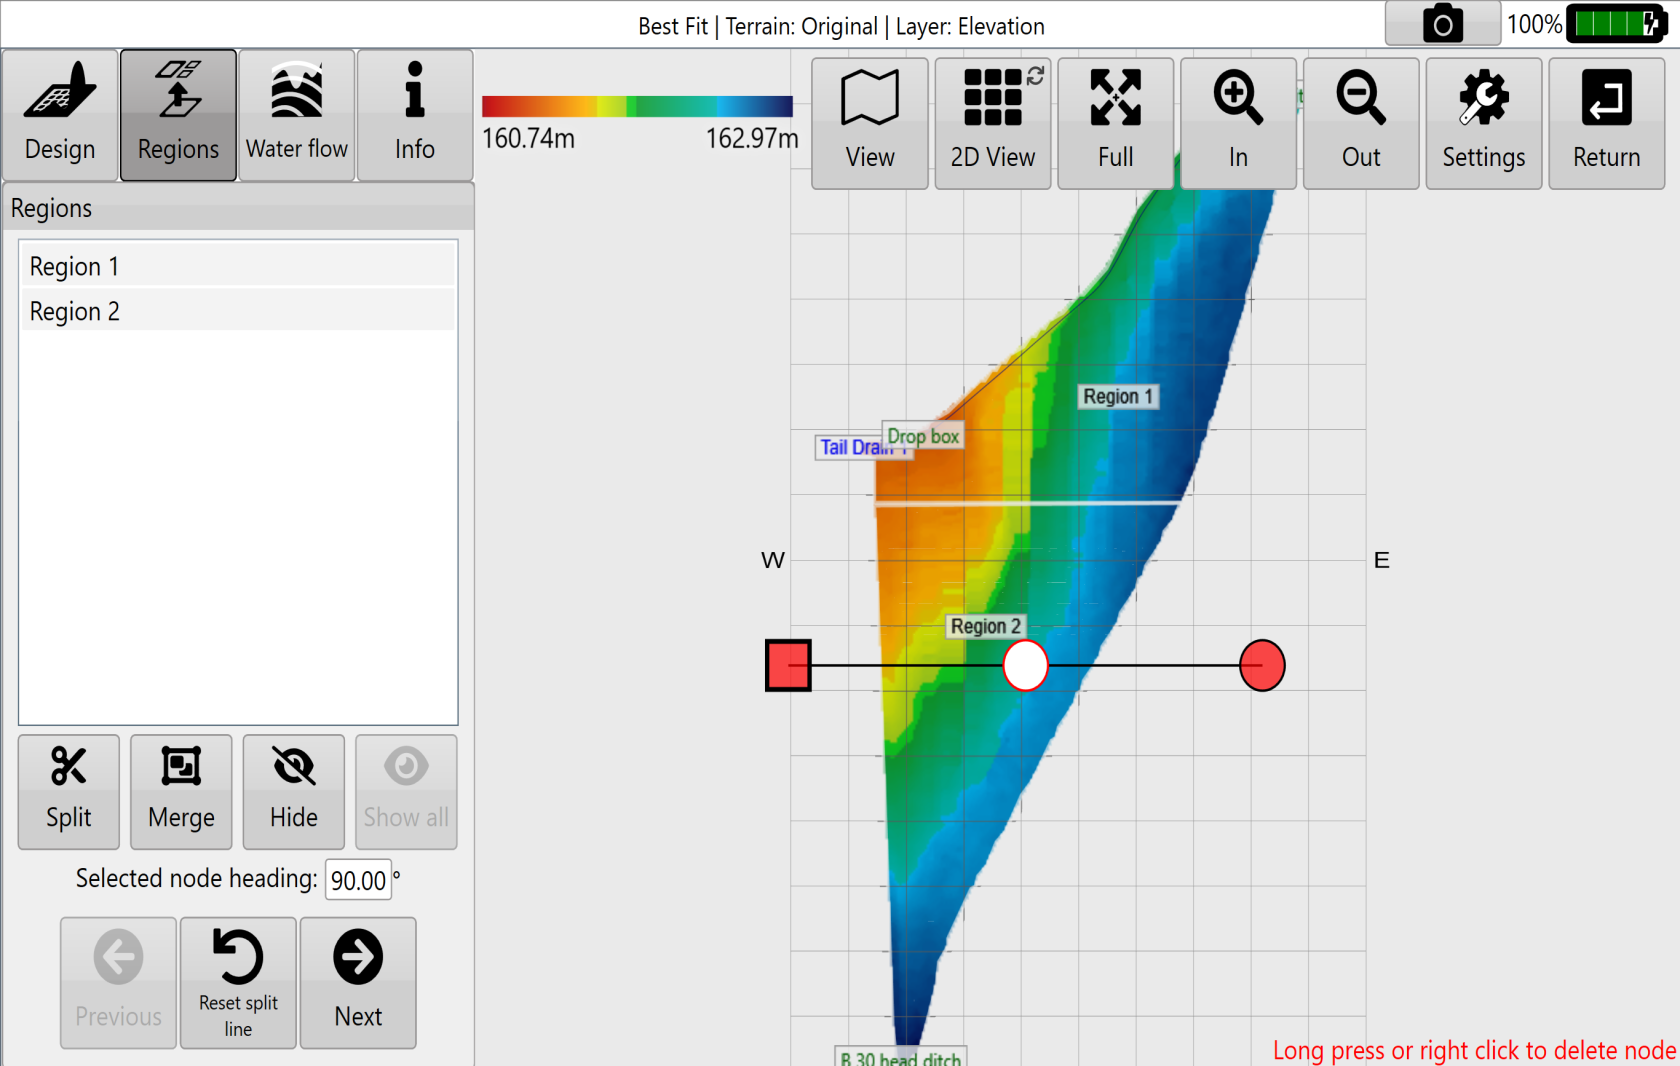The ‘**Regions**’ tool is used to split a field into multiple workable areas. Different design options can be applied to multiple different regions. For example, you can apply different primary and secondary slopes, or different levee designs in each region.NOTE: It ispossible to create different design types in different regions. You can have a best-fit plane in one region, and a multi-fit surface in another, for instance.Regions are created by moving a splitting line across two edges of an existing region, or whole field if no regions exist. The split line is set by moving **Point A** and **Point B** into position. The line can be positioned by pressing the **up**, **down**, **left**, or **right**arrow buttons or moving the points directly using the touchscreen. The split lines straight, but by using the white nodes on the line or merging regions it is possible to achieve region boundaries that are not straight.
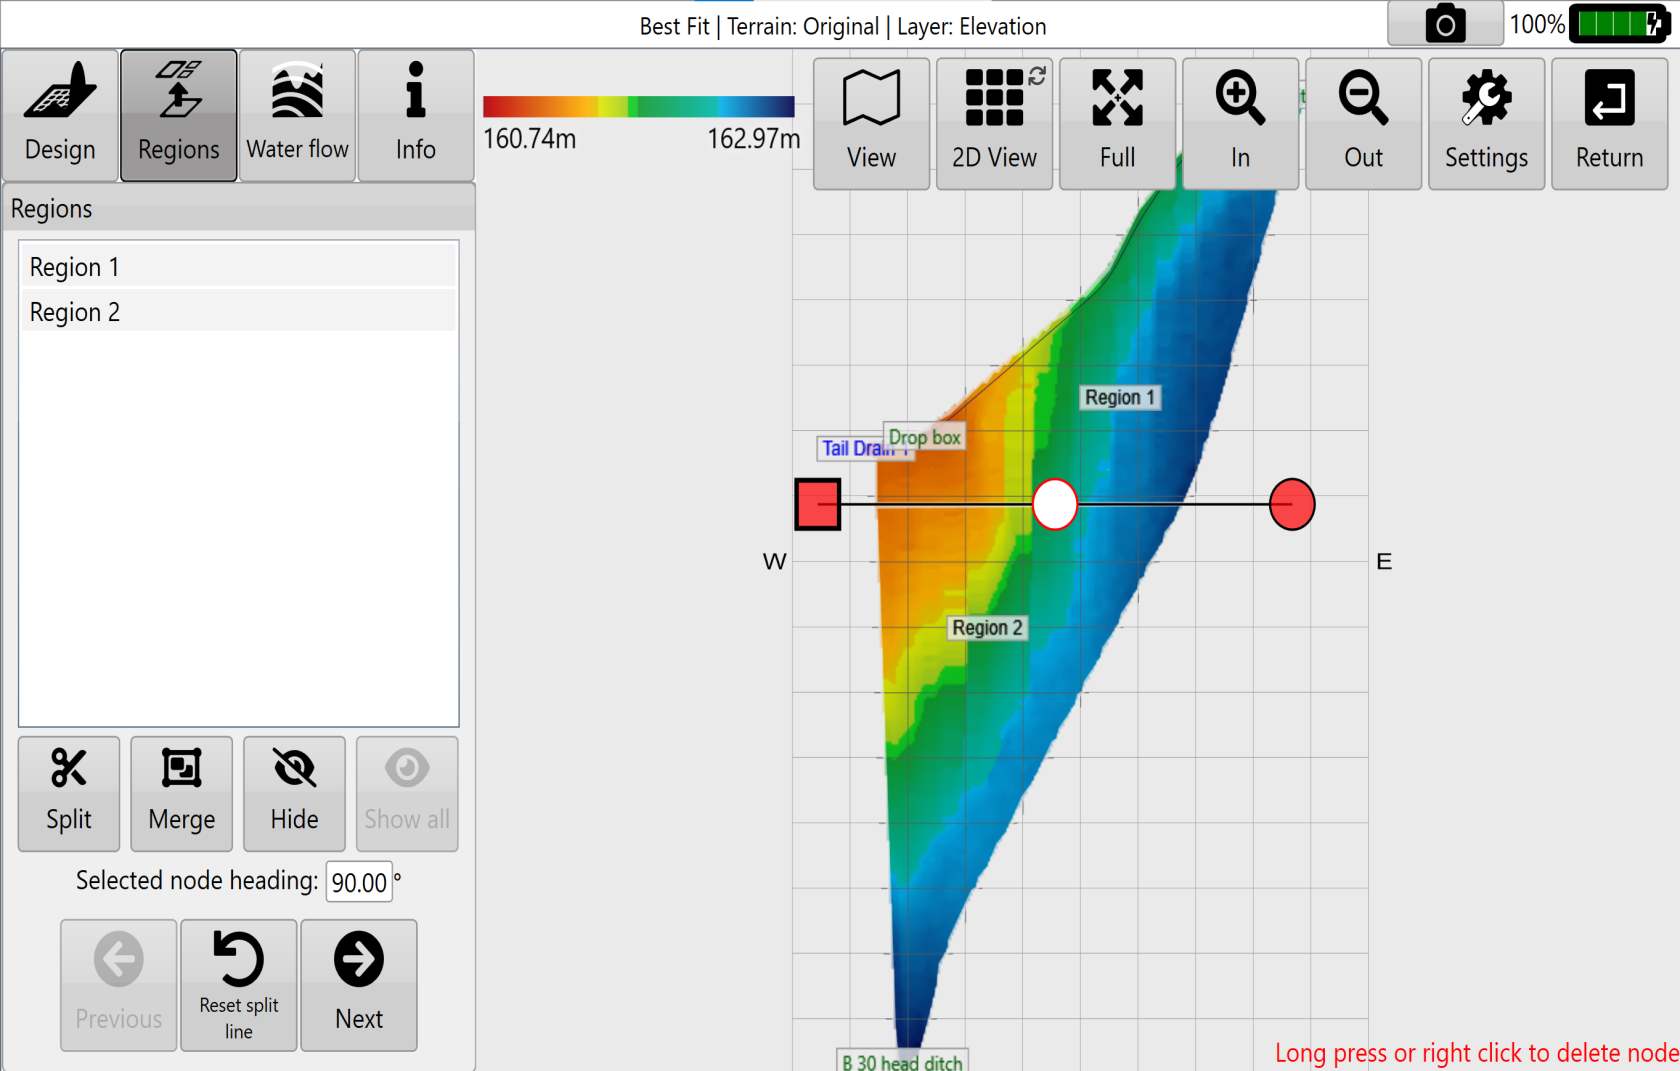
The '**Split**' button confirms the “split” on the selected area.The '**Merge**' button will merge regions selected in the list into one region.The ‘**Hide**’ button will delete whatever design exists with the selected region(s). At this point the region will not exist as a separate area that can accept designs. It can still have full-field designs applied to it.The ‘**Restore**’ button will restore all deleted regions.To create non-linear split lines first create multiple splits that intersect, and then merge the regions that are not wanted. See below for an example.Press the '**Back to Design**' button when you have finished adding your regions. In certain design functions (multi-fit, best-fit, smoothing, and levees) different regions can be selected from a drop down menu allowing you to make design changes to only the selected region.
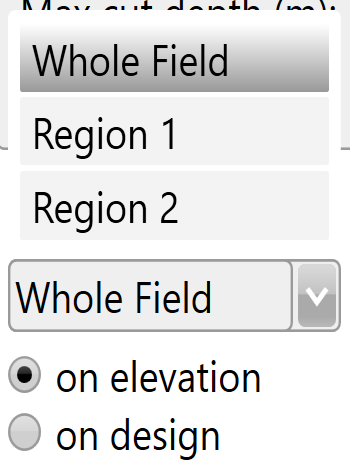
Choose to apply your design to the original elevation surface or to the design surface.
# Earthworks information
Press the 'i' button to view earthwork details.
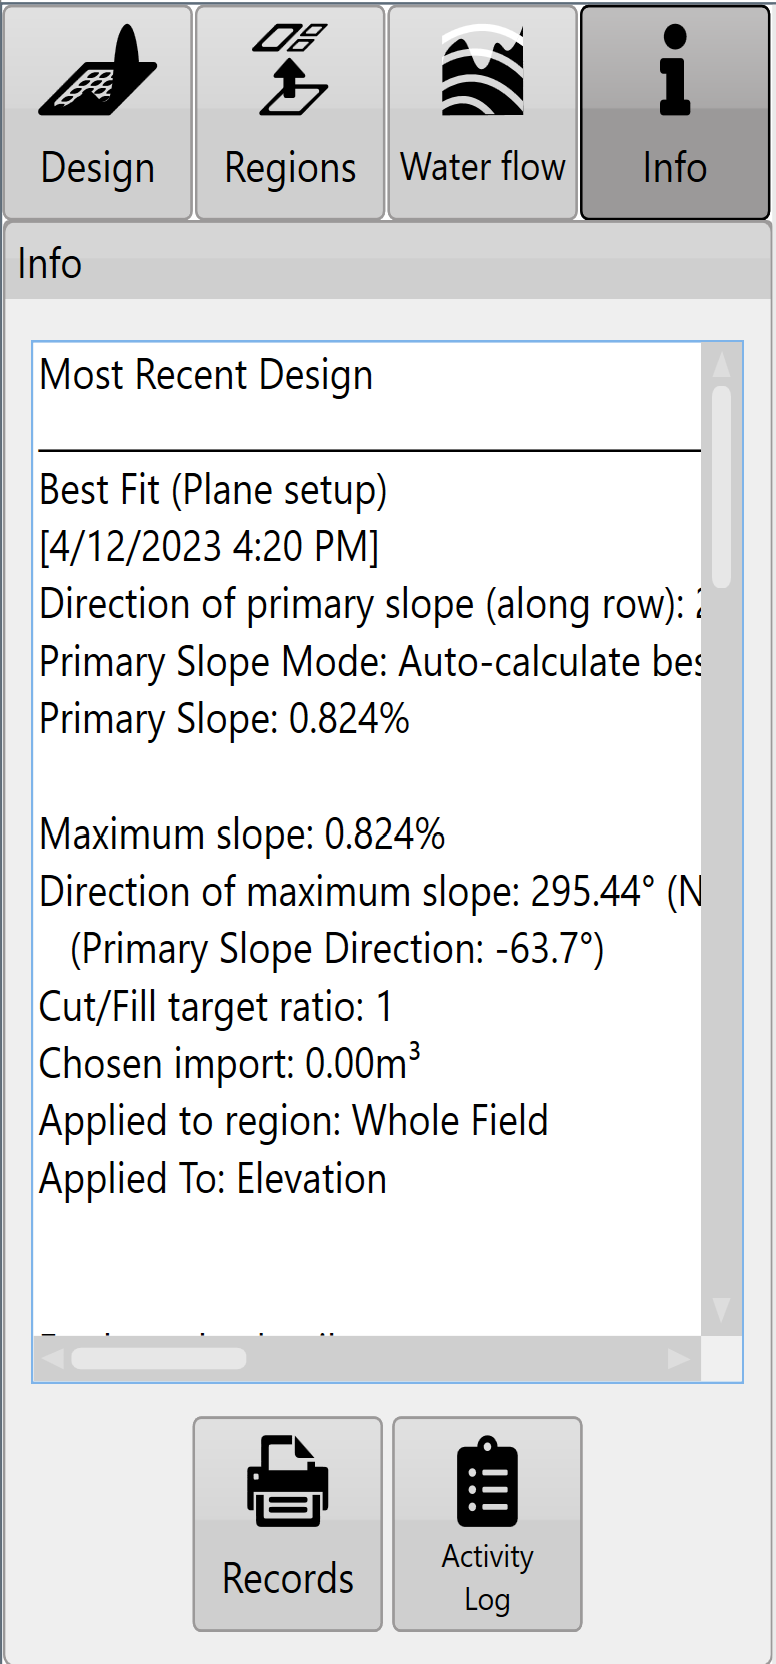Note: pressing within the ‘**Info**’ text box will expand the view to full screen.Each region will have its own set of earthworks details and cut/fill summary.Press the '**Records**' button (shown as a printer) to save design details (in PDF format) to a folder for record keeping and documentation purposes.Press the '**Activity Log**' button (shown as a clipboard) to view the activity that a file has undergone. This includes things like file save times and when/what design functions have been applied to a file.
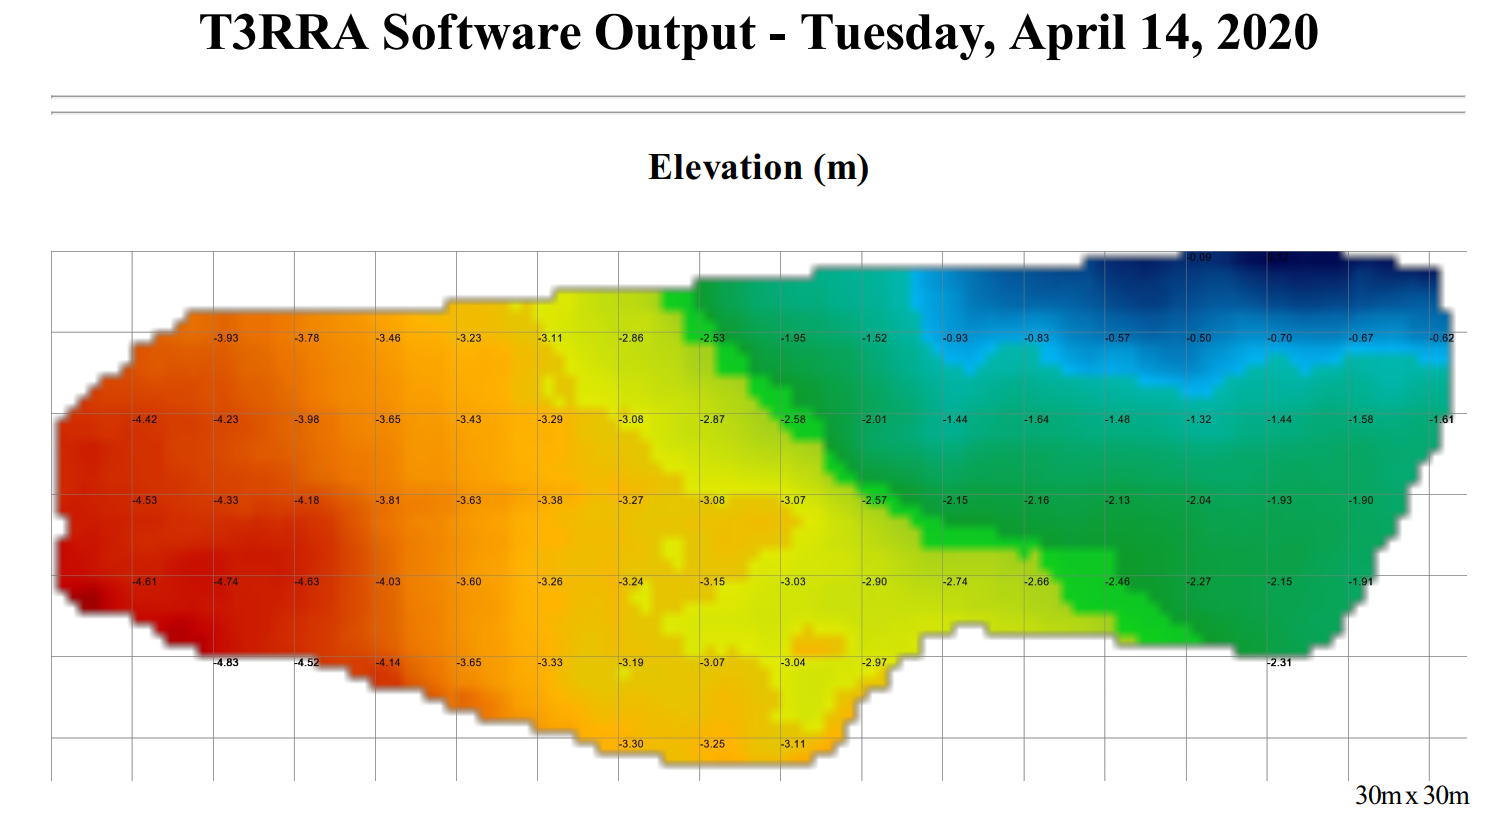
##### Notes on printing recordsThe ‘**Records**’ feature in T3RRA software creates a PDF document and saves it to the hard drive. This document is meant to give an overview of the operation being performed by the software. It is suitable for record keeping purposes, or for supplying to field managers or clients.It includes the following:
- Map of the original surface
- Map of the design surface
- Map of Cut and Fill areas
- Statistics relating to the earthworksThe maps created in the report will include a grid overlay showing data values.
Notes on the Activity Log
##### The ‘**Activity Log**’ is designed to provide a history of the user actions that were performed in a project. It keeps a sequential history of the design actions that have
##### been performed. This is helpful in understanding what methods were used in order to go from the original design surface to the final design surface. Where possible a record of slopes, directions, and design tools utilized are kept. As we allow designs to be performed on existing designs and differently in different regions, the steps and actions taken to go from the original surface to the final design surface can be quite complicated. The ‘**Activity Log**’ also keeps a record of the results of a design action (in the form of the resulting dirt balance statistics).If the user is in doubt about steps taken or parameters used, they can refer back to this log. The log entries include a date and time in order to remove confusion about when the actions were performed.The log can also be used to compare two or more design options. Because the results of each design operation are kept in the log it can be easier to simply compare them there rather than trying to remember them, or write down the results.If you want to save or email the log you can copy it into the clipboard using the ‘**Copy**’ button. Then paste it into any other application.
# Calculator
In some tools that require a value to be input a calculator will be available.The purpose of the calculator is to take some of the stress away from creating field and drain designs.In addition to being able to calculate, the calculator comes with a function to add quick values.These are helpful if you are not wanting to find the exact value and just want to get moving as quickly as possible.
# Best-fit Design
 Select the 'Best-fit' button to create a plane of best fit for a field.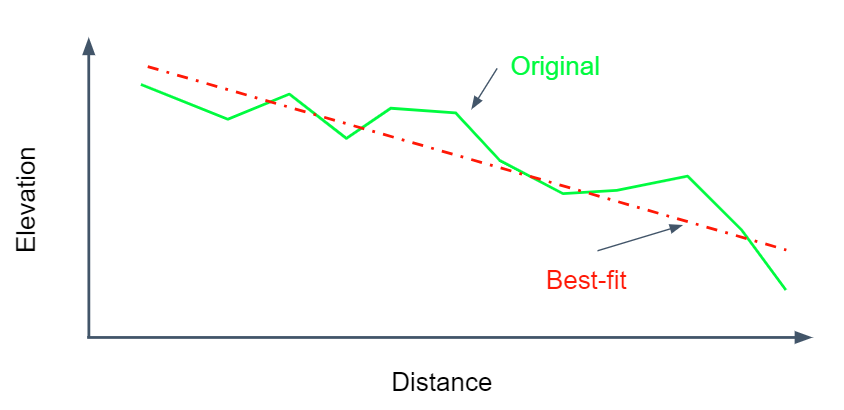
- A Best-fit design provides a single plane that most accurately fits the existing topography. Using a Best-fit plane ensures that you move the least amount of dirt possible to create a single plane for a field. Note that this can still result in large amounts of dirt being moved.
- Tip: Dividing the field into regions, then fitting single planes to each region can help to decrease dirt volumes.Enter design details to create a plane, or instruct the T3RRA software to auto-calculate your design details.
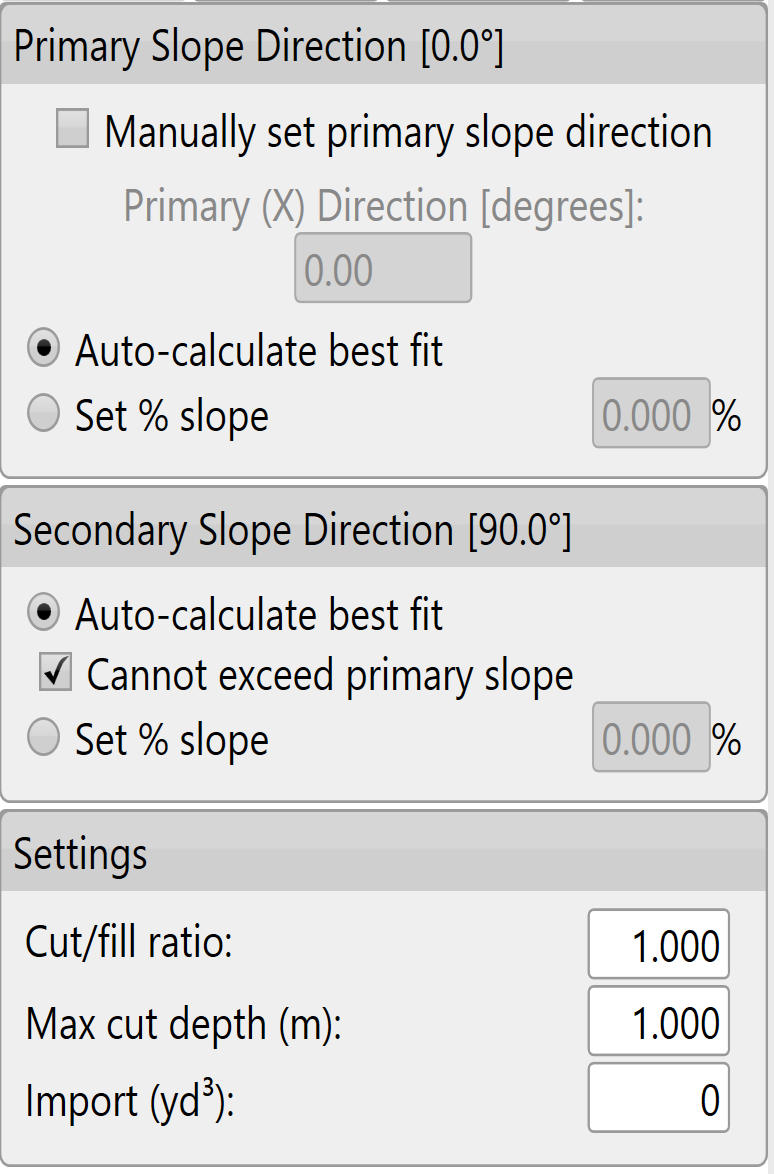
**Setting slope parameters**The software will try to find the most appropriate line of best fit, however the primary and secondary slopes can also be manually set.(It is recommended that only users with a good understanding of Laser Plane systems use manual settings) To manually set the primary slope direction check the box labeled '**Manually set primary slope direction**'.
When in doubt, consult an irrigation engineer. Cut/fill ratio, Max cut depth, & Import can be set in 2 locations. The defaults that will be applied to new projects can be set in the Project tab of settings (see section B) or in the lower left corner of the Best-Fit (and Multi-Fit) page.
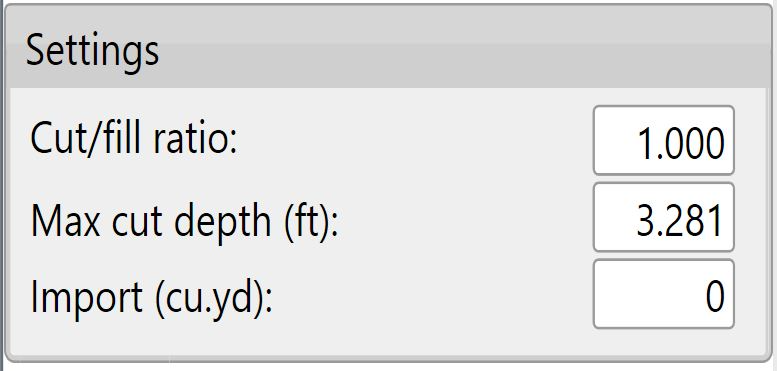
The '**Cut/fill ratio**' is determined by the type of material being moved and how much of it will “settle” or “shrink” once compacted. This value depends on soil characteristics.Enter a '**Max cut**' for the maximum allowed cut depth. The following warning will appear to notify you if any points on the map exceed the max cut depth. adjustments may be required. The '**Import**' section is used when you need to bring in dirt from a stockpile or export dirt from the field to another area. Change the amount to a negative value for exporting.Once you are happy with the design follow the steps in the '[completing your design](https://t3rra-help.freshdesk.com/en/support/solutions/articles/51000330106-completing-your-design)' section.
# Multi-fit Design
'**Multi-fit**' creates an optimized non-linear surface with slopes between the entered minimum and maximum. Multi-fit balances the dirt down the field in the direction you specify. The balancing occurs within strips, and is great for working within rows and moving minimal dirt.

- A Multi-Fit design allows the slopes to vary within set tolerances and can greatly reduce the amount of dirt moved.
- Dividing the field into regions can further decrease the dirt movement required. Enter details in the below panel and into all fields to generate a Multi-fit plane. 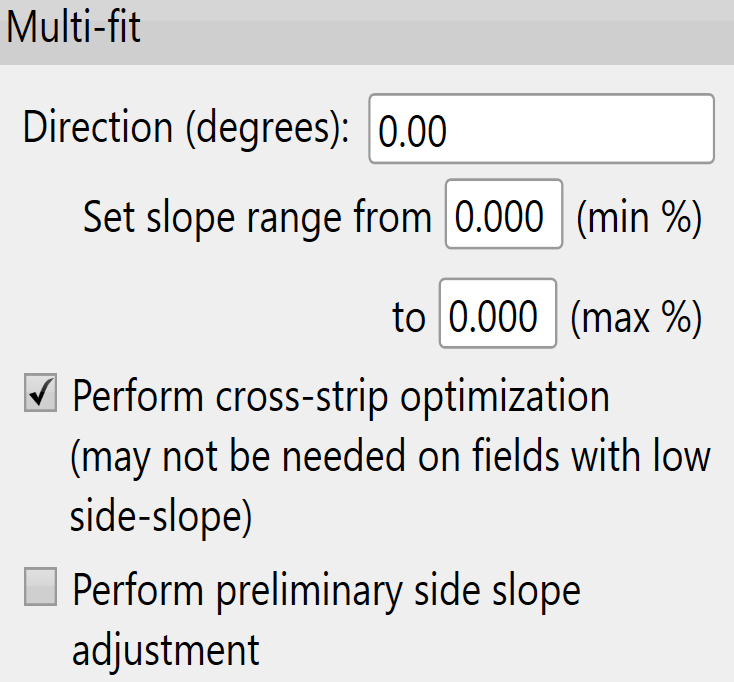'**Set slope range**'You can use the iGrade™ Plane Calculator to find out the average slope percentage. Alternatively you can find this in T3RRA Cutta by doing a plane of best fit in a direction and then looking at the primary and cross slopes in the plane statistics window. If in doubt, consult an irrigation engineer.*If ‘min%’ or ‘max%’ are left blank the design results will not be desirable.*'**Perform cross-strip optimization**'This will attempt to tilt the strip sections to match the actual side slope present. Use in fields that have high side slopes (>2% slope). It is unlikely to provide any benefit in relatively flat fields. *This is enabled by default.*'**Perform preliminary side slope adjustment**'This will cause an initial side slope adjustment to occur. It will attempt to ensure that the side slope is no greater than the minimum row slope. *Use if water might have a tendency to run across rows rather than down the rows.***Cut/fill ratio****, Max cut depth, & ****Import**can be set in 2 locations. The defaults that will be applied to new projects can be set in the [Settings menu>Project tab](https://t3rra-help.freshdesk.com/en/support/solutions/articles/51000328670-project-tab) or in the lower left corner of the Multi-Fit (and Best-Fit) page.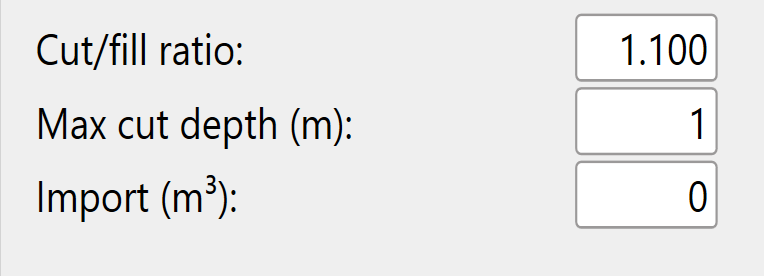'**Cut/fill ratio**' - Determined by the type of material being moved and what percentage of it will “settle” or “shrink” once compacted. *T3RRA software does not calculate this value.*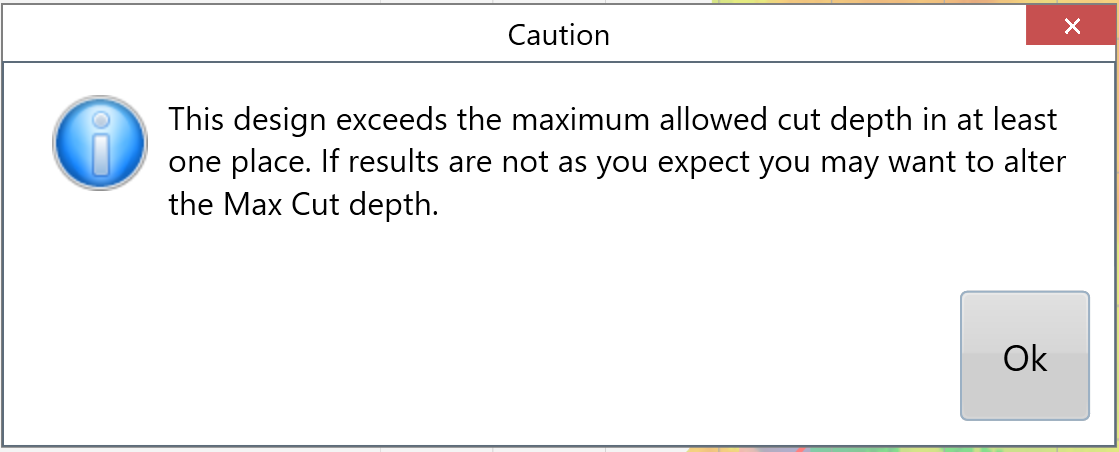'**Max cut depth**' - The maximum allowed cut depth. The warning (shown right) will appear to notify you if any points on the map exceed the Max Cut depth.'**Import**' - Used when you need to bring in dirt from a stockpile or export dirt from the field to another area. Change the amount to a negative value for exporting.Once you are happy with the design follow the steps in the '[completing your design](https://t3rra-help.freshdesk.com/en/support/solutions/articles/51000330106-completing-your-design)' section.
# Smooth Design
 Select the '**Smooth**' button to create a more regular surface with fewer and more gradual hummocks and dips. The smoothing strength can be adjusted to produce a stronger or lesser effect as needed.
#### **Regular Smoothing**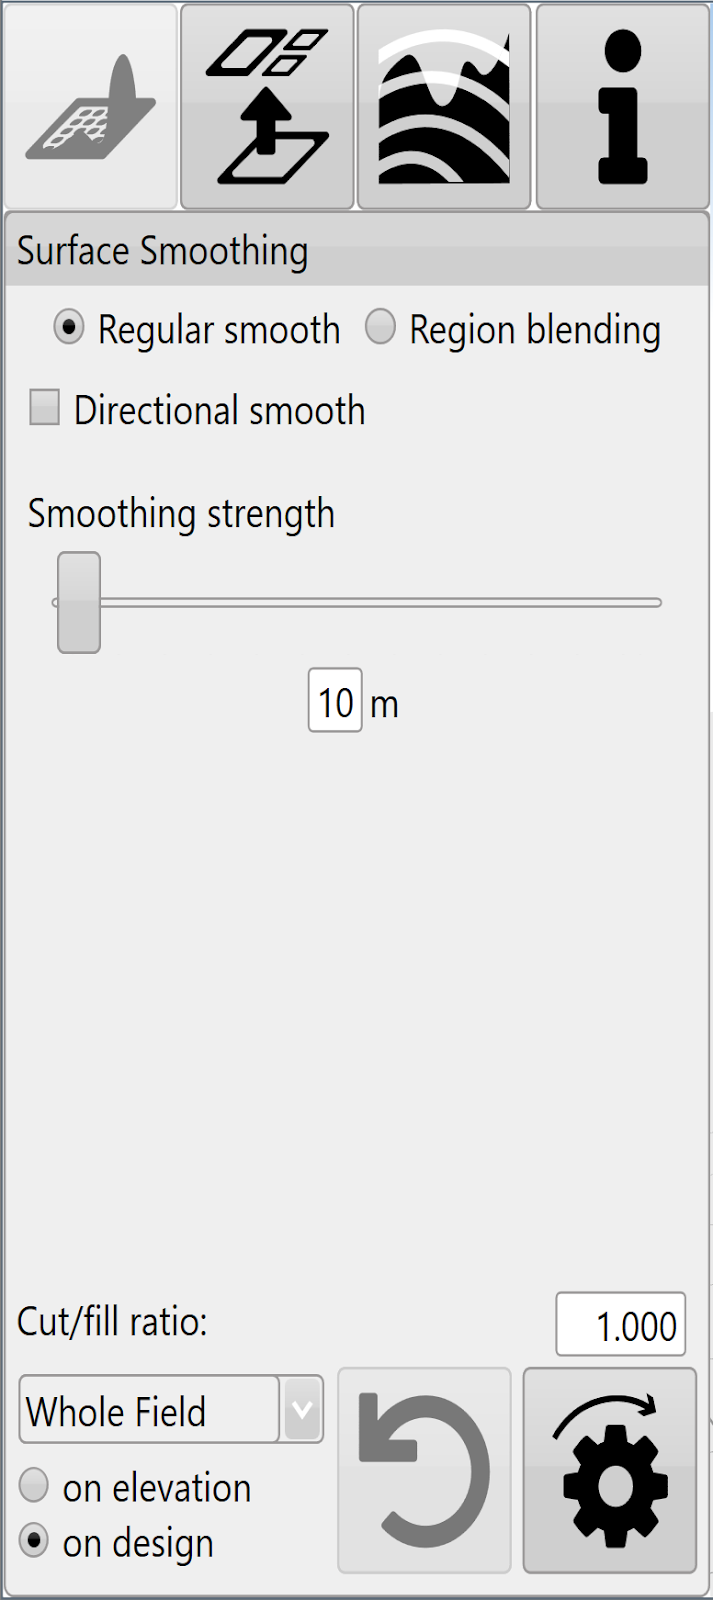Regular smoothing applies an averaging filter to the surface of the field to remove bumps and dips. The ‘**Smoothing strength**’ slide bar controls how smooth it is by increasing the radius that is used in calculations. The smaller the slider value, the less of an effect the smoothing will have. Smoothing can be applied to the whole field, or to individual regions. It can be applied to the original surface, or to an existing design.
#### **Directional Smoothing**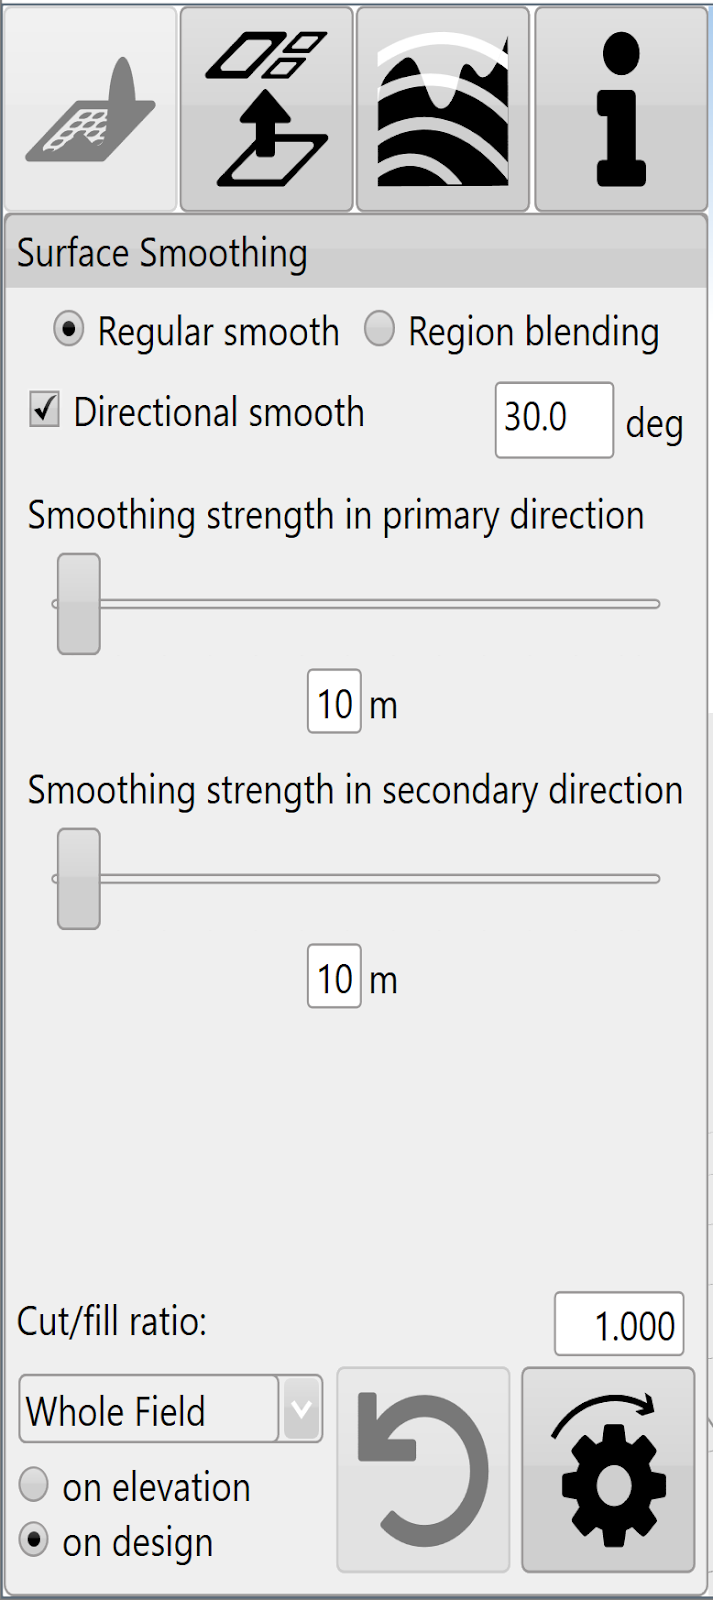'**Directional smooth**' is a check box just below regular smoothing. Directional smoothing causes the smoothing effect to be stronger in a particular direction and weaker in the perpendicular direction.Enter the primary smoothing direction in the provided text box.'**Smoothing strength in the primary direction**' allows you to set the influence radius in that direction.
'**Smoothing strength in the secondary direction**' controls the influence radius at a 90 degree angle to the primary direction.
#### **Region Blending**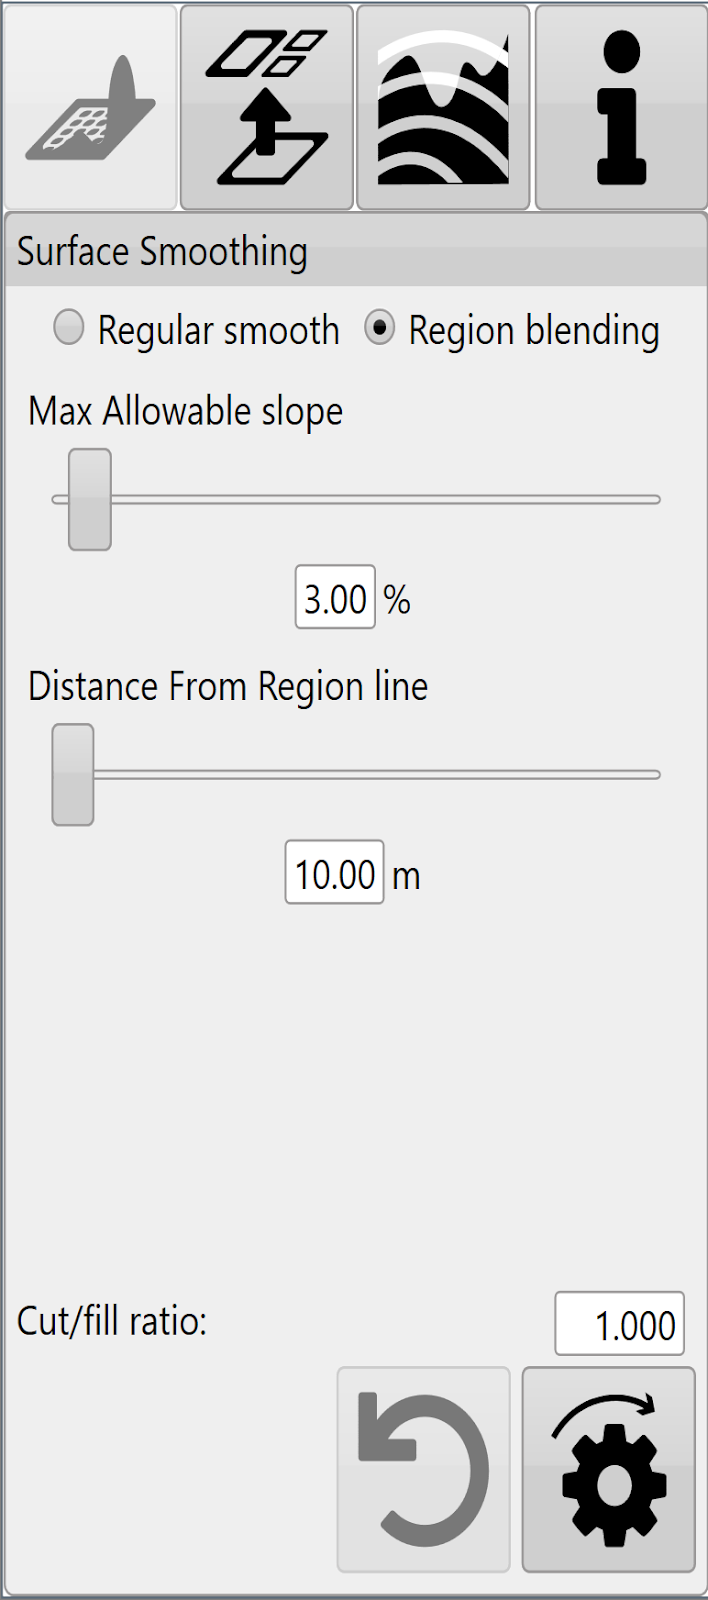Region blending allows you to “feather” the edges of regions to allow for smooth transitions between regions.'**Max Allowable slope**' lets you set the maximum steepness that can be used to achieve a region blend.'**Distance from Region line**' limits how far into each region the blend can go, in order to help make sure that other design elements are not affected.NOTE: changes made with region blending may not be obvious in 2D view but can be much more prominent in 3D view, or in the cut/fill map.Press '**Apply**' after parameters are entered in order to see effects.Once you are happy with the design follow the steps in the '[completing your design](https://t3rra-help.freshdesk.com/en/support/solutions/articles/51000330106-completing-your-design)' section.
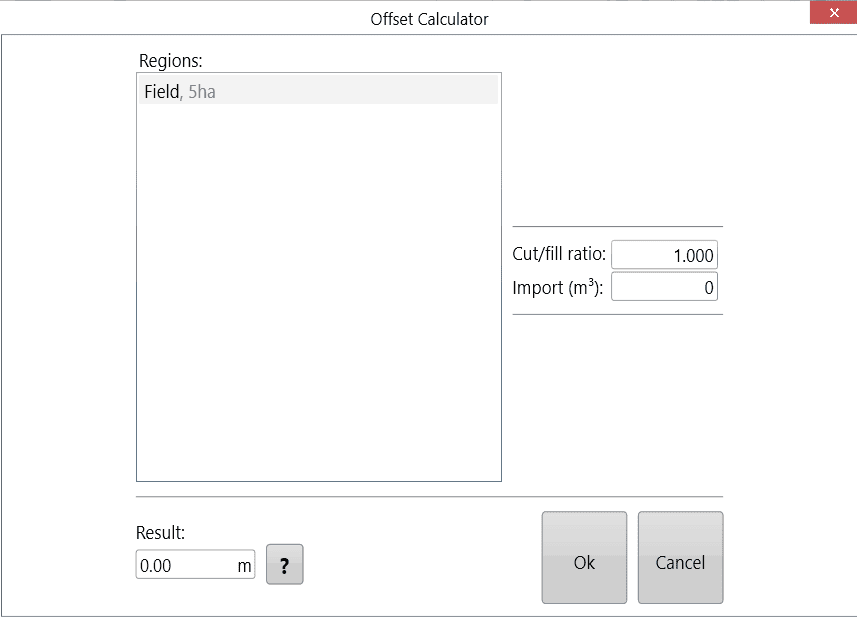
# Offset Design
 Select the '**Offset**' button to raise or lower the surface height of a field or region. This can help with:
- Importing and exporting dirt
- Addition or removal of topsoil
- Raising pads
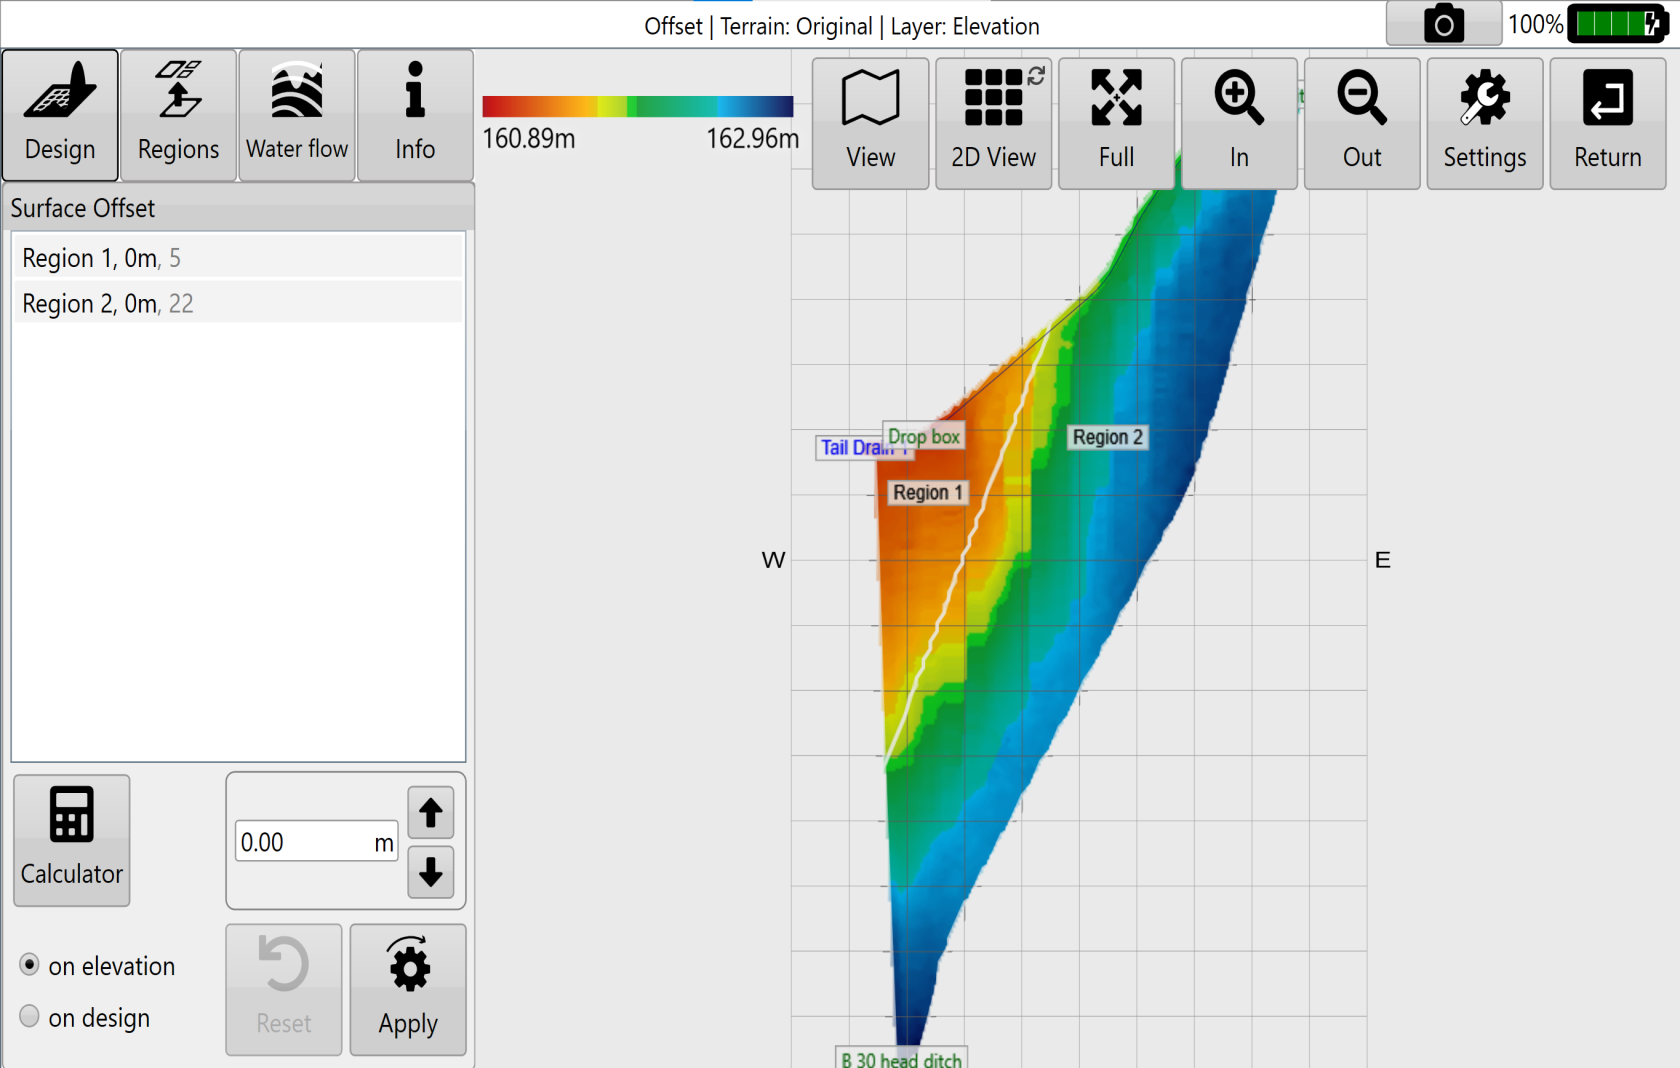
You can either:
- Manually enter the desired offset amount (This can also be adjusted in set increments using the arrow buttons).
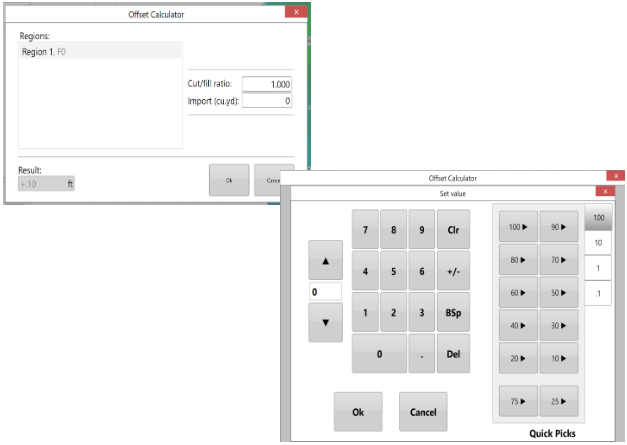
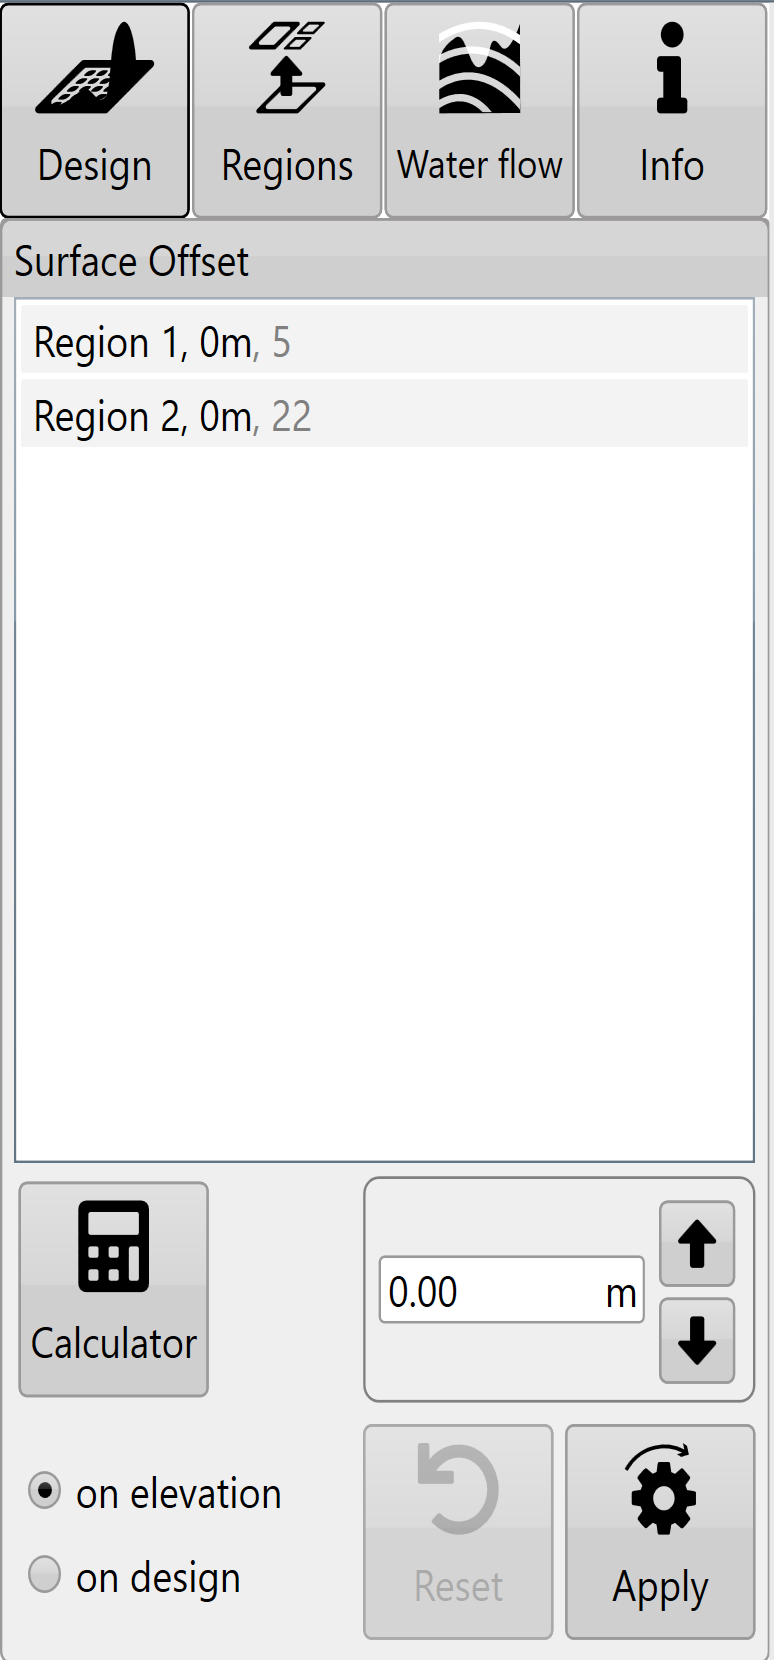
- Use the calculator to adjust the offset amount. The calculator is useful if you want to offset the surface by a certain volume of imported or exported dirt.
- Formular (Click '?' button to see)
Left over volume = (Cut/Fill ratio \* Volumn of cut) + Volume of fill.
Result = (Import + Left over volume) / Selected area
Negative import values are considered exports.Press '**Apply**' (shown as the offset design icon) after parameters are entered.Once you are happy with the design follow the steps in the '[completing your design](https://t3rra-help.freshdesk.com/en/support/solutions/articles/51000330106-completing-your-design)' section.
# Drain Design Tools
When designing drains, there are several aspects that you will find that are across all the different Drain Design tools. The most important feature of the drain design tools that you will find will be the cross section found at the bottom of the screen. The cross section displays all the ups and downs along the drain surface.The cross section is made up of three different lines. The **Red** line is the proposed design that you are currently working on. The **Blue** line is the existing surface that has been surveyed. The **Yellow**dotted line is the current design surface, when starting a new design this will be overlapped with the Blue line and when a design is applied it will overlap with the Red line UNLESS a second design is being made on top of that. The Green dotted line shows any markers along the drain path.
# Auto-Drains Design
You can use Auto-Drains to automatically generate drain paths for wet areas in your field. It will calculate optimal ditch lines to drain depressions. There are two tabs in Auto-Drains:
1. ‘**Create**’ controls the parameters that must be met before drains are applied to the surface.
2. ‘**Edit Drains**’ allows for editing of the drain paths.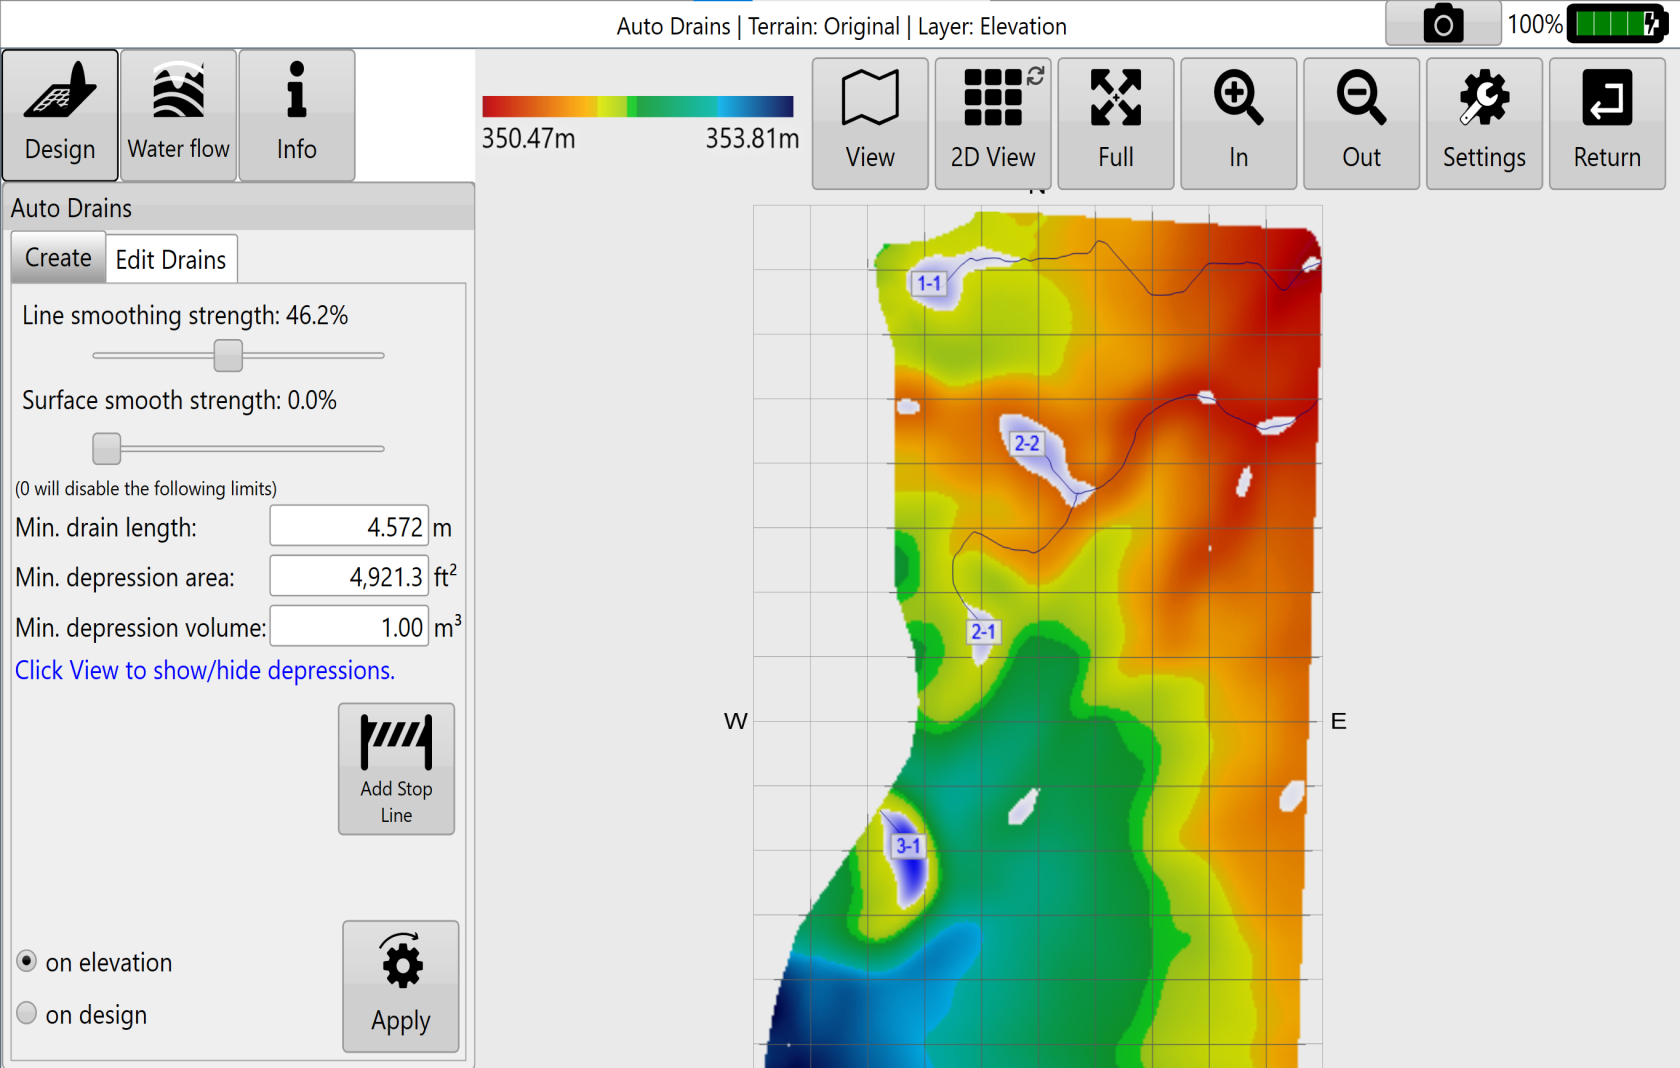
####
#### **Create Drains**
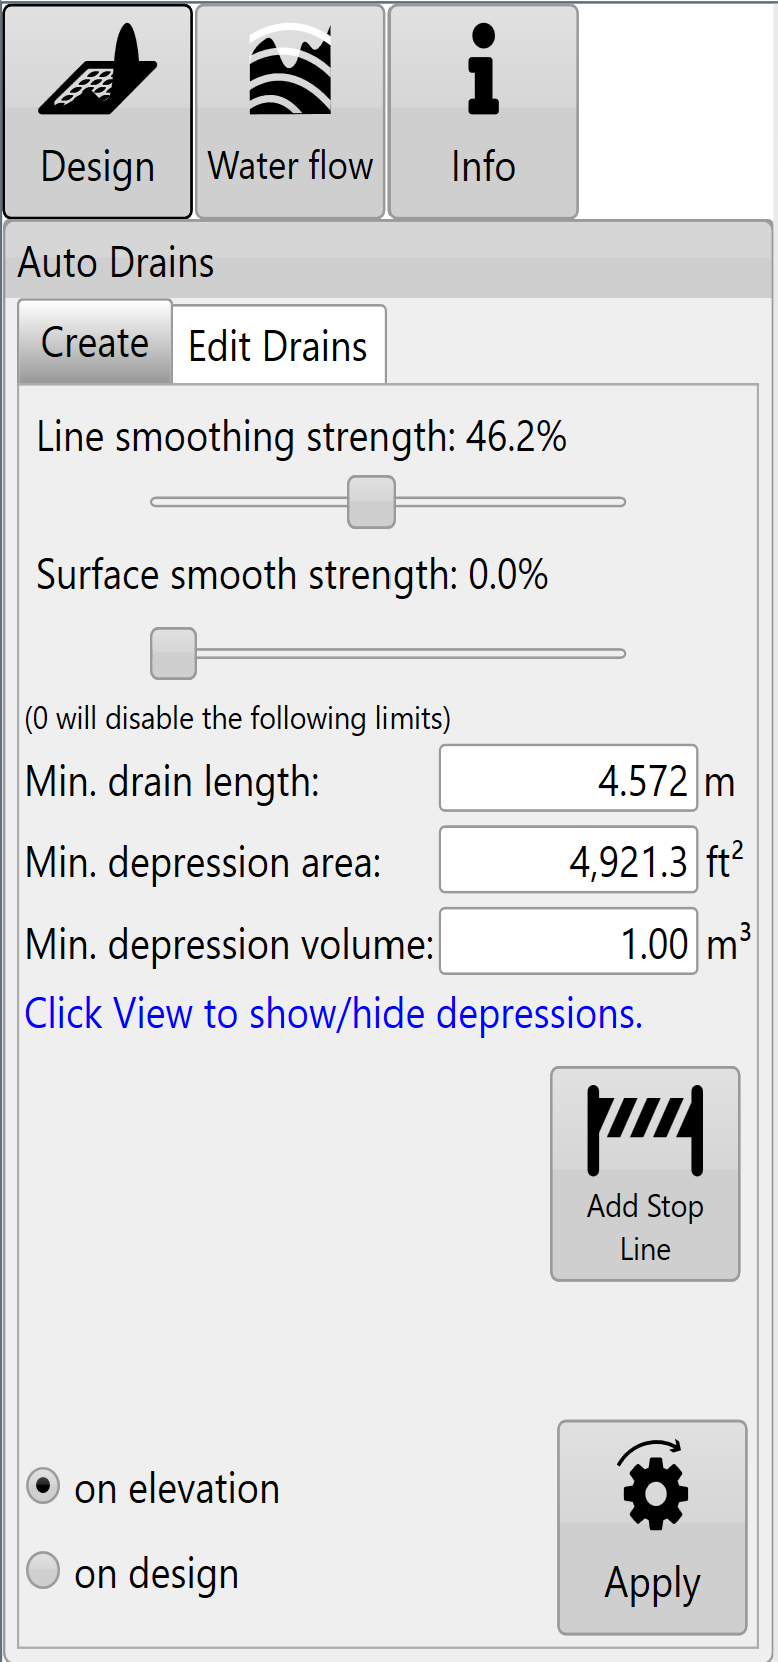‘**Line smoothing strength**’ - Adjusts how many sharp turns and how smoothly the drain lines flow. The further to the right the slider is the more rounded the lines will be (with decreased sharp turns).‘**Surface smooth strength**’ - Adjusts the surface by applying an averaging filter to the surface of the field to remove bumps and dips without creating a full field earthwork design.'**Min. drain length**' - Sets the minimum length a drain must be to be displayed on the surface.‘**Min. depression area**' - Sets the minimum surface area a depression must cover before T3RRA software will consider draining it.'**Min. depression volume**' - Sets a minimum volume for a depression before a drain will be implemented.(A depression will only be drained if it meets all of the minimum length, area, and volume criteria.)‘**View Depressions**’ - All depressions will be made visible (including those that did not meet above requirements).‘**Add Stop Line**’ - Creates a line on the screen with red anchors at each end. Drain lines will not cross this line. 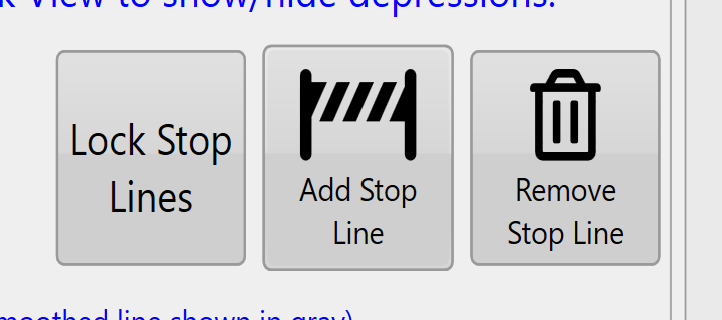To confirm the placement, press the ‘**Lock Stop Lines**’ button. Pressing the white anchor in the centre of the lines will create another red anchor so that lines can be adjusted. Additional stop lines can be added by pressing the ‘**Add Stop Line**’ button again.
#### **Edit Drains**
#### 
#### The ‘**Existing Drains**’ list will show all drains in the current project.
- Tapping on any of the drains in the list will select or unselect it. Multiple drains can be selected at once.
- ‘**Delete**’ will delete all of the selected drains.
- ‘**Delete All**’ deletes all drains in the list (even if they have not been selected).
- ‘**Move Lines**’ will allow all the drain lines on the surface to be edited(shown in bottom image).
- Drain lines will have blue dots along them to indicate they can be moved to adjust the drain path.
- Always start at the origin point (which can also be moved) and move downhill when moving drain lines.
- The drain lines will automatically adjust their paths according to your changes to ensure they flow off the edge of the surface.
- Press '**Save Changes**' to keep changes or ‘**Discard Changes**’ to revert to the original paths.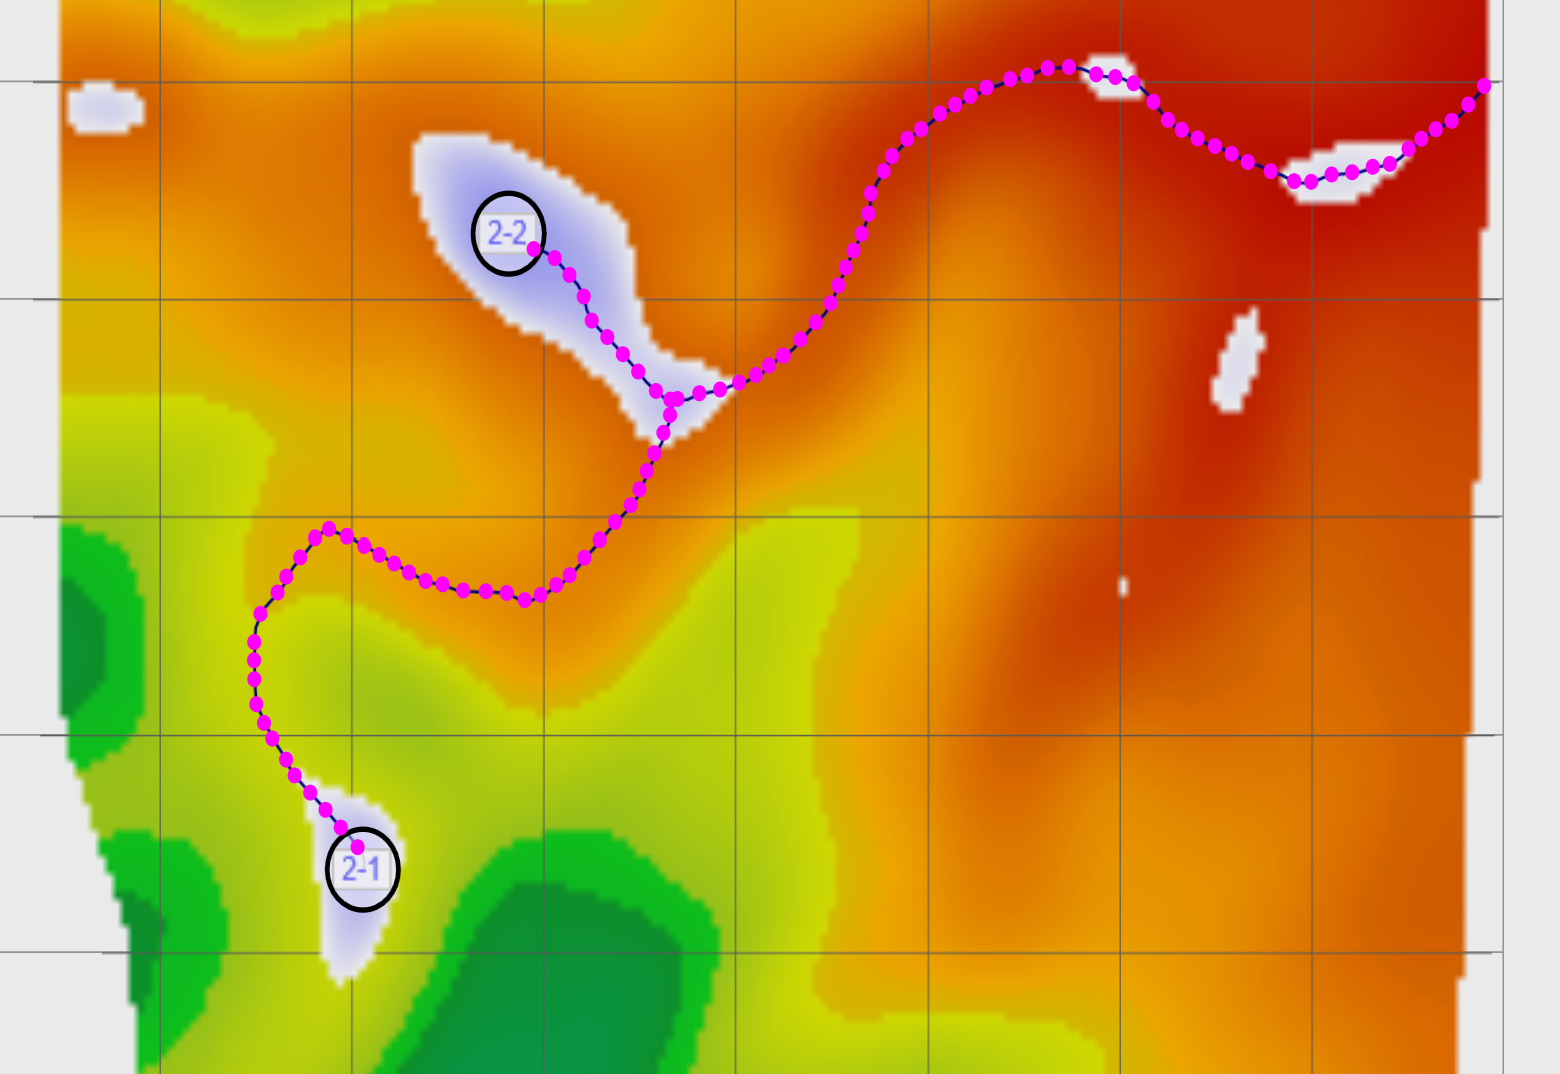NOTE: If you make an adjustment on a drain line and make a second adjustment closer to the origin point the first adjustment will revert to the line's original state. Auto-drains ALWAYS flow downhill from the point of the last change.Once you are happy with the drains go back to the wizard page and use the ‘**Drain Design**’ function to set their profiles and cross sections.
# Pattern Drain Design
This design tool allows for simple design of many parallel drains at once.
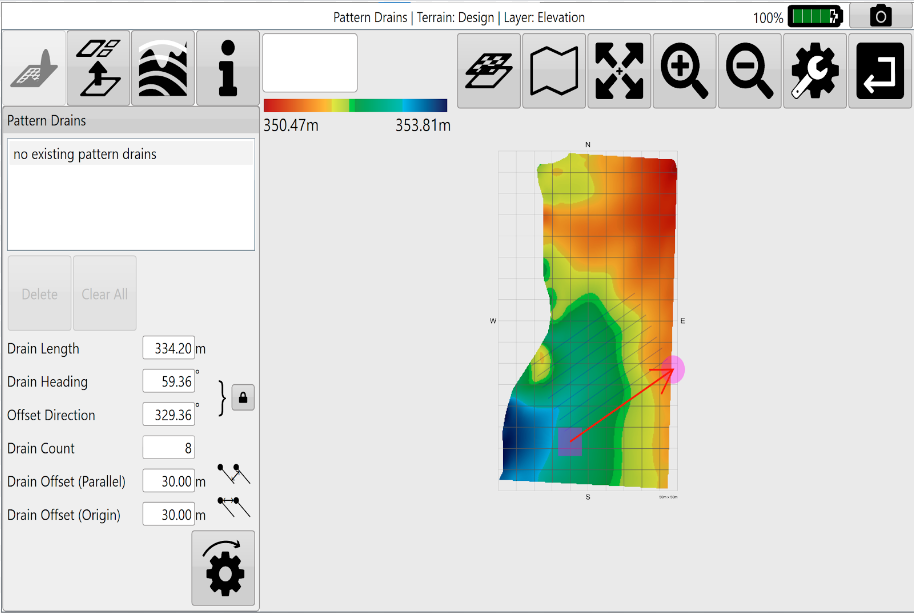
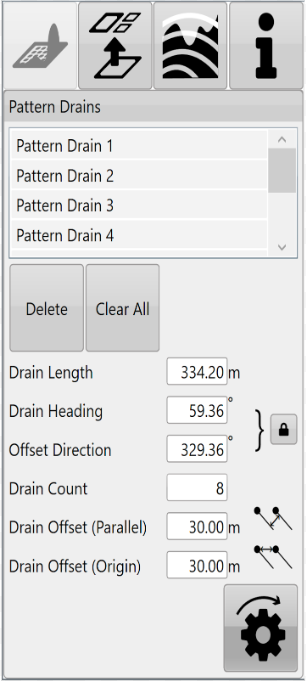The pattern drain window allows you to select specific drains to delete.The '**Delete**' and '**Clear All**' buttons allow you to either delete selected drains or all pattern drains.'**Drain length**' can either be set here or by moving the red circle on the design map.'**Drain Heading**' is the direction that the drains run (represented as degrees).‘**Padlock**’ button changes the behaviour of the copied drains in relation to the original.locked - This locks ‘Drain Heading’ to ‘Offset Direction’ so if either are adjusted the other will change to match.Unlocked - ‘Drain Heading’ and ‘Offset Direction’ can be set independently of each other.'**Offset Direction**' sets the direction in which copy drains will be created from the original.'**Drain Count**' is the number of drain copies you want to add (not including the original drain).'**Drain Offset (Parallel)**' is the distance between each line of the copies. (if the padlock is unlocked this will not show in the example until it is manually updated.)‘**Drain Offset (Origin)**’ is the set distance between the origin point of each copy.Press '**Apply**' (shown as the pattern drain icon) after parameters are entered.Once you are happy with the drain paths use the ‘**Drain Design**’ function to design the profile and cross section of the drains.
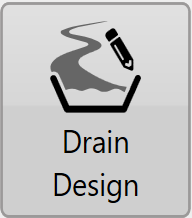
# Drain Design
Drain *paths* can be created by:
- Surveying them in the '**Collection**' wizard step
- Importing them
- Using the Auto drains tool
- Using thePattern drains tool**Drain Design** allows slope profile and cross section design choices before “burning” (embedding) drains into the map for implementation.NOTE: If a surface & drain exist, the surface should be designed first & the drain second. If you need to edit drain elevation data you can return to the '**Collect**' wizard step to edit the drain line. However you will lose current project designs.Select a drain and the depth/elevation profile of the drain will show in the plot at bottom right (this chart may need to be dragged up into view). Use the '**AB Reverse**' button to make sure your drain is falling from left to right in the profile chart, this will make sure that slope values are all positive and make adjustments a lot easier.Drain paths can be changed into roads by selecting the checkbox. By selecting ‘**Road**’ the drain design will be inverted.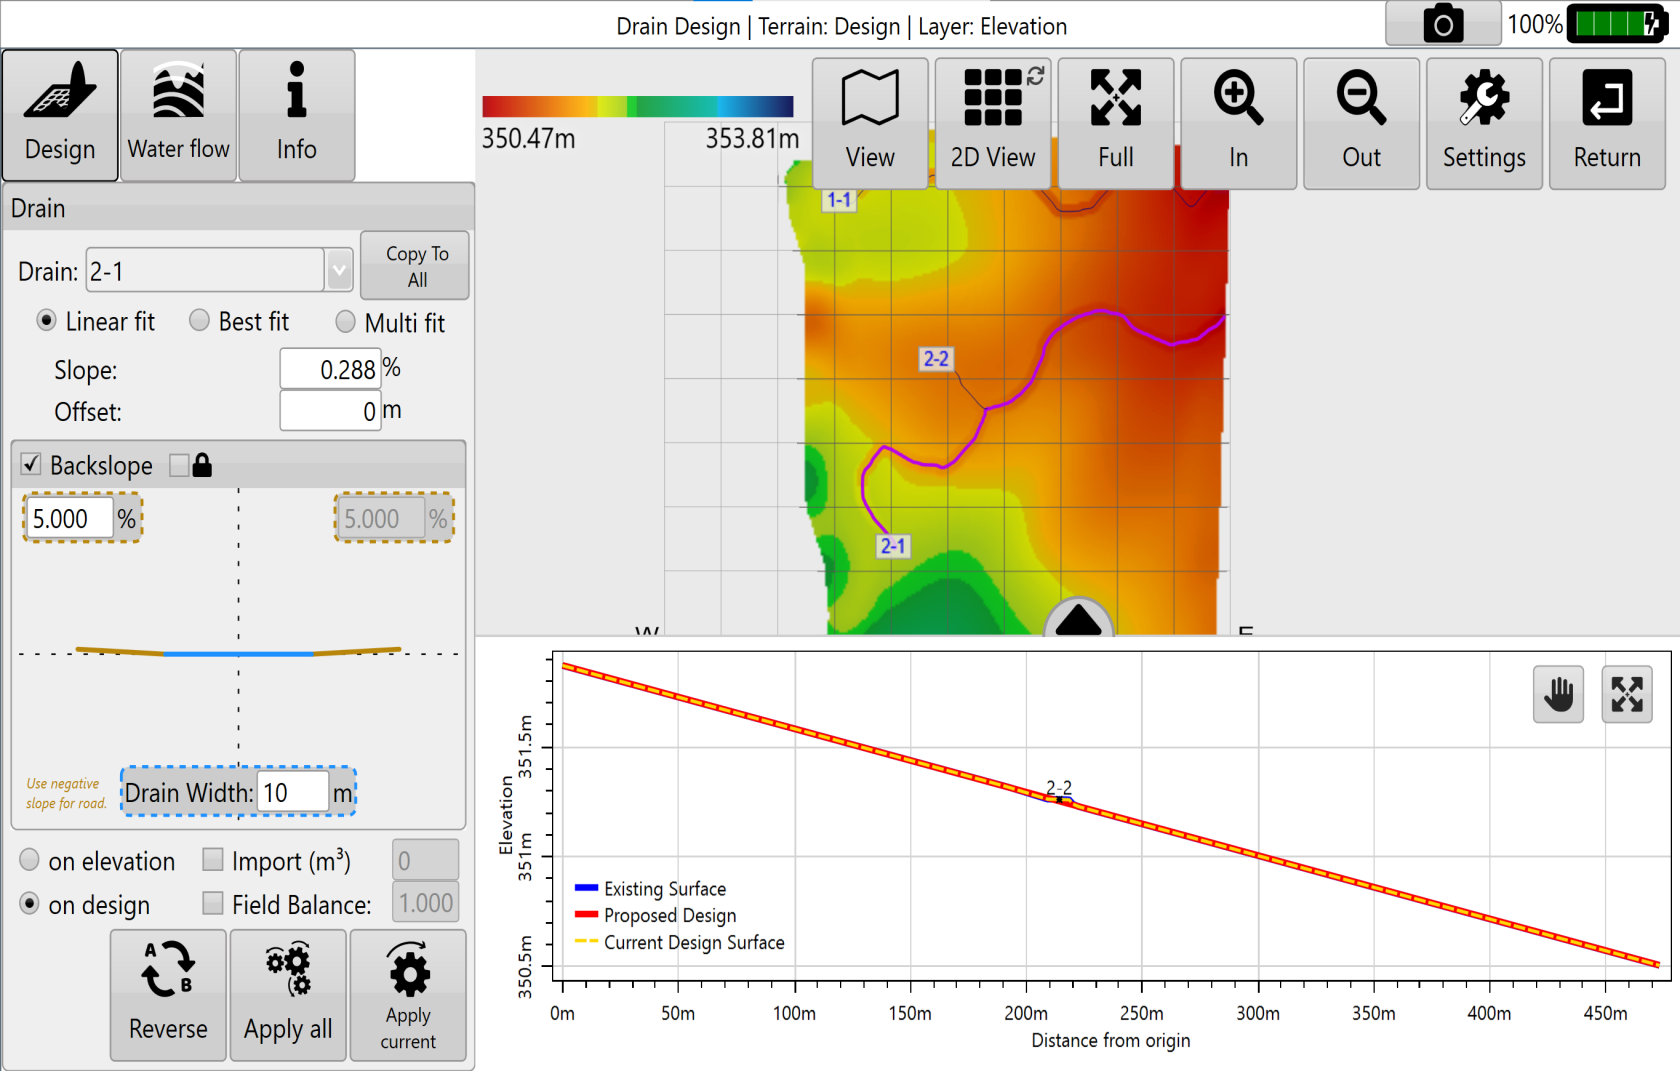NOTE: The positioning/layout of drain paths is not considered part of '**Drain Design**'. They can be adjusted in the surfacing step for driven drains or in auto drains/pattern drains.When applying drain designs there are 3 different modes that adjust the path of the drain which are Linear fit, Best fit and Multi fit.
#### **Linear fit**Creates a single straight plane along the drain path. '**Slope**'- is the gradient at which the drain is installed to ensure that water flows in the direction you want.'**Offset**'- allows for vertical offsetting of the drain. Setting a positive value will lift the offset creating a fill effect along the entire drain, while a negative value in the offset will lower the design height creating a deeper cut drain.
#### **Best fit**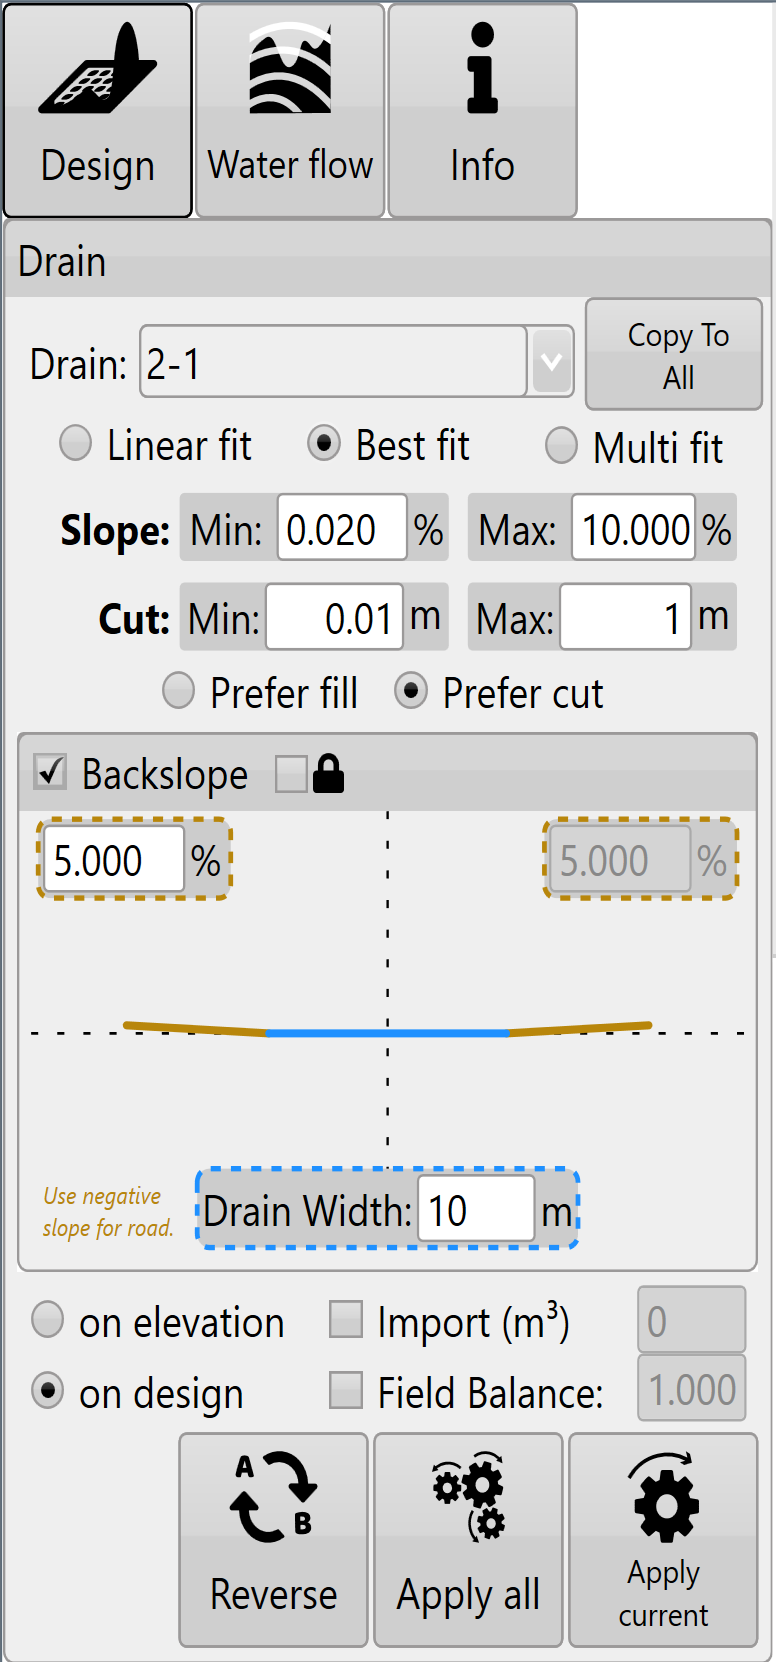Adjusts the slope to try and follow the natural curve of the field. Similar to multi-fit field design. NOTE: Best-fit in drains is equivalent to Multi-fit in full field design. This incongruity comes from a desire to try and match the naming conventions of the John Deere SWP+ product (which is superseded by T3RRA Cutta and T3RRA Ditch).‘**Min. Slope**’- The lowest gradient of slope you will accept in the drain. ‘**Max. Slope**’- The highest gradient slope you will accept in the drain‘**Min. Cut**’- ensures the design will consistently cut at least this amount.‘**Max. Cut**’ sets the maximum depth that the design will cut to and ensures that it never exceeds this point.
#### **Multi fit**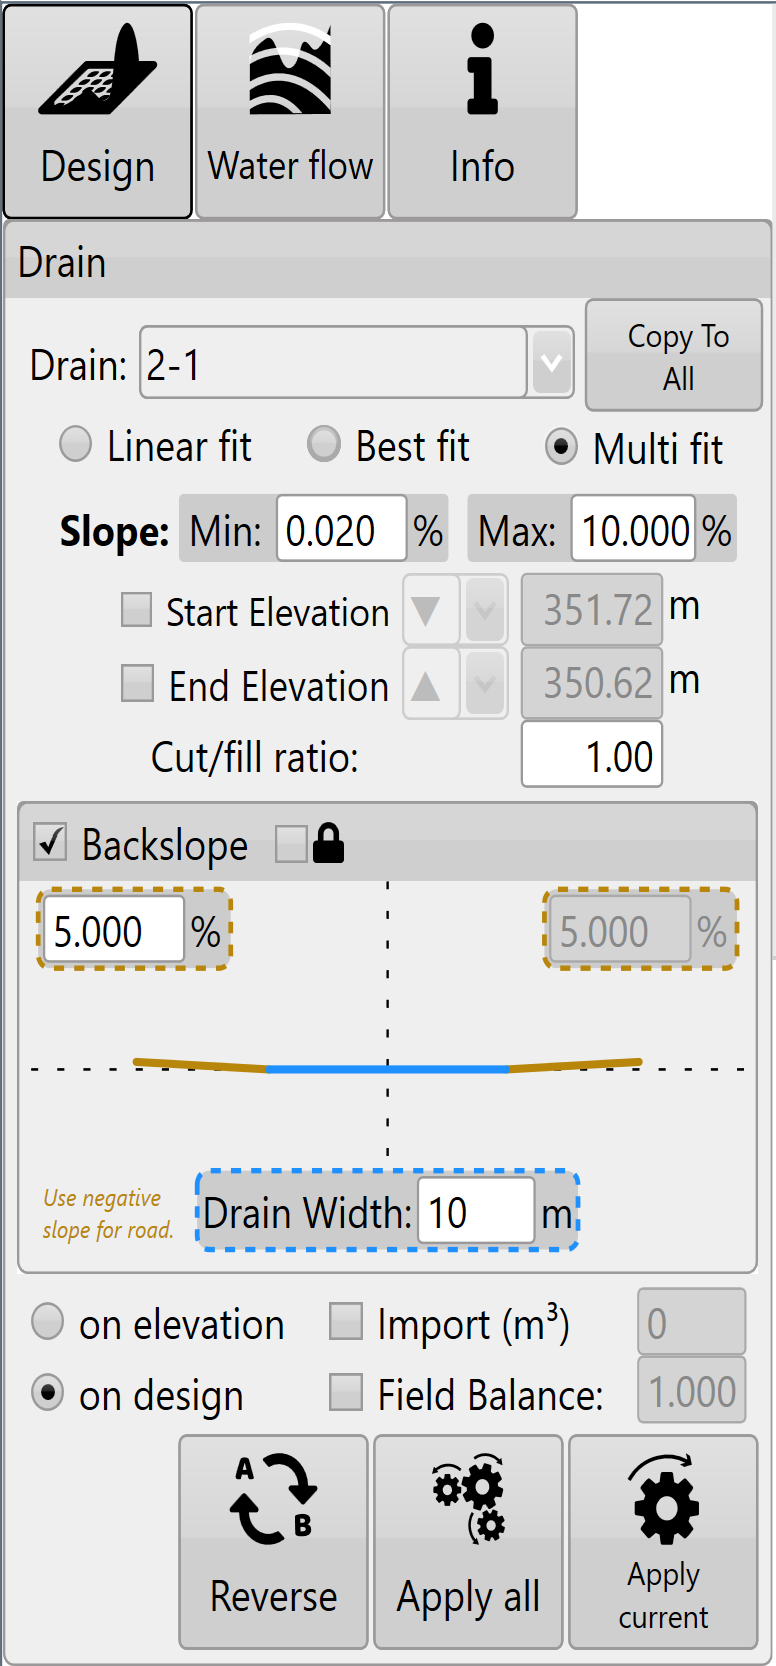Applies both cut and fill, and can be used to remove points of erosion and build up that would cause issues. Best used when maintaining existing drains.‘**Min. Slope**’- The minimum allowable gradient of the slope.‘**Max. Slope**’- The maximum allowable gradient of the slope.‘**Start Elevation**’- The desired elevation point at which the design will begin (at point A). Set to be greater than, equal to, or less than the set value adjusting the start elevation value of the design to be no higher or lower than the set value ‘**End Elevation**’- The desired elevation of the final point on the design also referred to as (point B). Set to be greater than, equal to, or less than the set value to ensure that the final elevation of the design is not higher or lower than the set value.NOTE: Multi fit tries to balance the cuts and fills using the start and end elevations. If the design parameters won’t work you will see the message: “Model is too constrained” .
#### **General settings**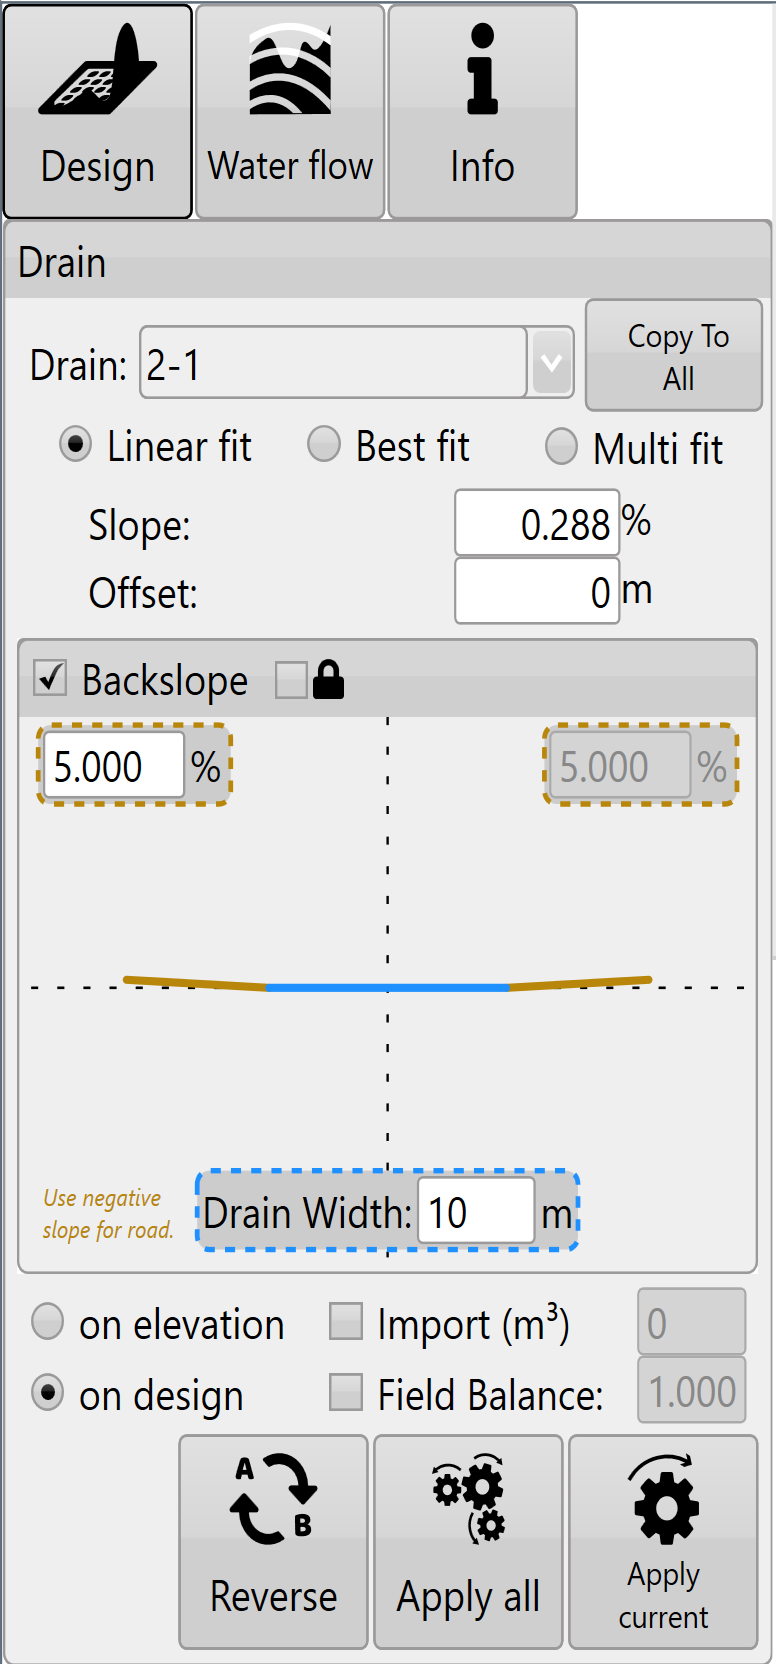These settings are present in all drain design modes.‘**Cut/Fill ratio**’ - please refer to definitions in appendix. The following settings and buttons are all constant between all three modes in Drain Design.'**Copy Settings To All**' - copy the settings of the currently selected drain to all other drains present in the project. If all drains are likely to require similar parameters this can be a big time saver.'**Backslope**' (batter) is the gradient of the drain walls. A higher backslope value means a sharper drop into the drain. (If no backslope is desired enter 0 as the value.) If you wish to make a road switch the selected Road/Drain option (below Drain Bottom Width). ‘**Lock Backslope**’ is mainly intended to be used when working with drain lines - not full surfaces. Will cause the surface to be ignored and the backslopes will be created to their maximum extent. Note: that the drain bottom will always be burnt in, regardless of the surface elevation. I.e., if you offset a drain up 5m, you would always have a drain bottom burnt in, regardless of if lock backslope is on or off'**Drain Bottom Width**' allows you to control how wide the bottom of the drain is. The drain bottom is always horizontal. If you want a drain bottom with a defined non-zero cross slope you should manually set the cross slope control on your implement in the ‘Implementation’ stage of operation.'**Cut/fill ratio**' allows you to compensate for soil compaction characteristics.'**Apply All**' allows you to apply all the drains in the field, not just the drain that is currently selected.The '**AB**' button reverses the drain direction. It effectively reverses the direction calculations are performed on the drain.Choosing to apply ‘**on elevation**’ or ‘**on design**’ chooses the elevation profile that is used to calculate the designed surface. For example, one drain requires a different design than the others present, you will apply the design ‘on elevation’ to All then select the drain from the drop down and apply a different design ‘on design’ to that drain alone.NOTE: choosing to design on a design will continue to lower the surface of the drain.The swap ‘**A-B**’ button reverses the profile as it is displayed in the profile view. This also affects how the software designs the profile as the software will always try to slope the design from left to right.Press '**Apply All**' (the image of 3 cogs) to apply all drains at oncePress '**Apply**' (the image of 1 cog) to apply only the currently selected drain.After editing your drains in the surveying step, return to create a new drain design in the 'Design' wizard step. If a surface and drain exist, the surface should be designed first and the drain second.After designing the drain and applying it, it is “burned” (embedded) into the field surface model. At this point you can begin implementing in the same way you would a normal field design. If you are using a constant depth drain cutting implement you may not be interested in the depth profile. You may want to only rely on the paths for guidance and not elevation control. In this case there is no need to create the drain profile (unless you want to look at the effects of the drains in the rainfall simulation).
Option: Use the '**Export**' button on the wizard screen to export the drain paths to an RCD folder structure (JD Guidance lines). You can export ditch track guidance lines that will steer your tractor on exactly the right path to accurately and efficiently remove your wet areas (John Deere AutoTrac™ required).
Once you are happy with the design follow the steps in the '[completing your design](https://t3rra-help.freshdesk.com/en/support/solutions/articles/51000330106-completing-your-design)' section.
# Levee Design
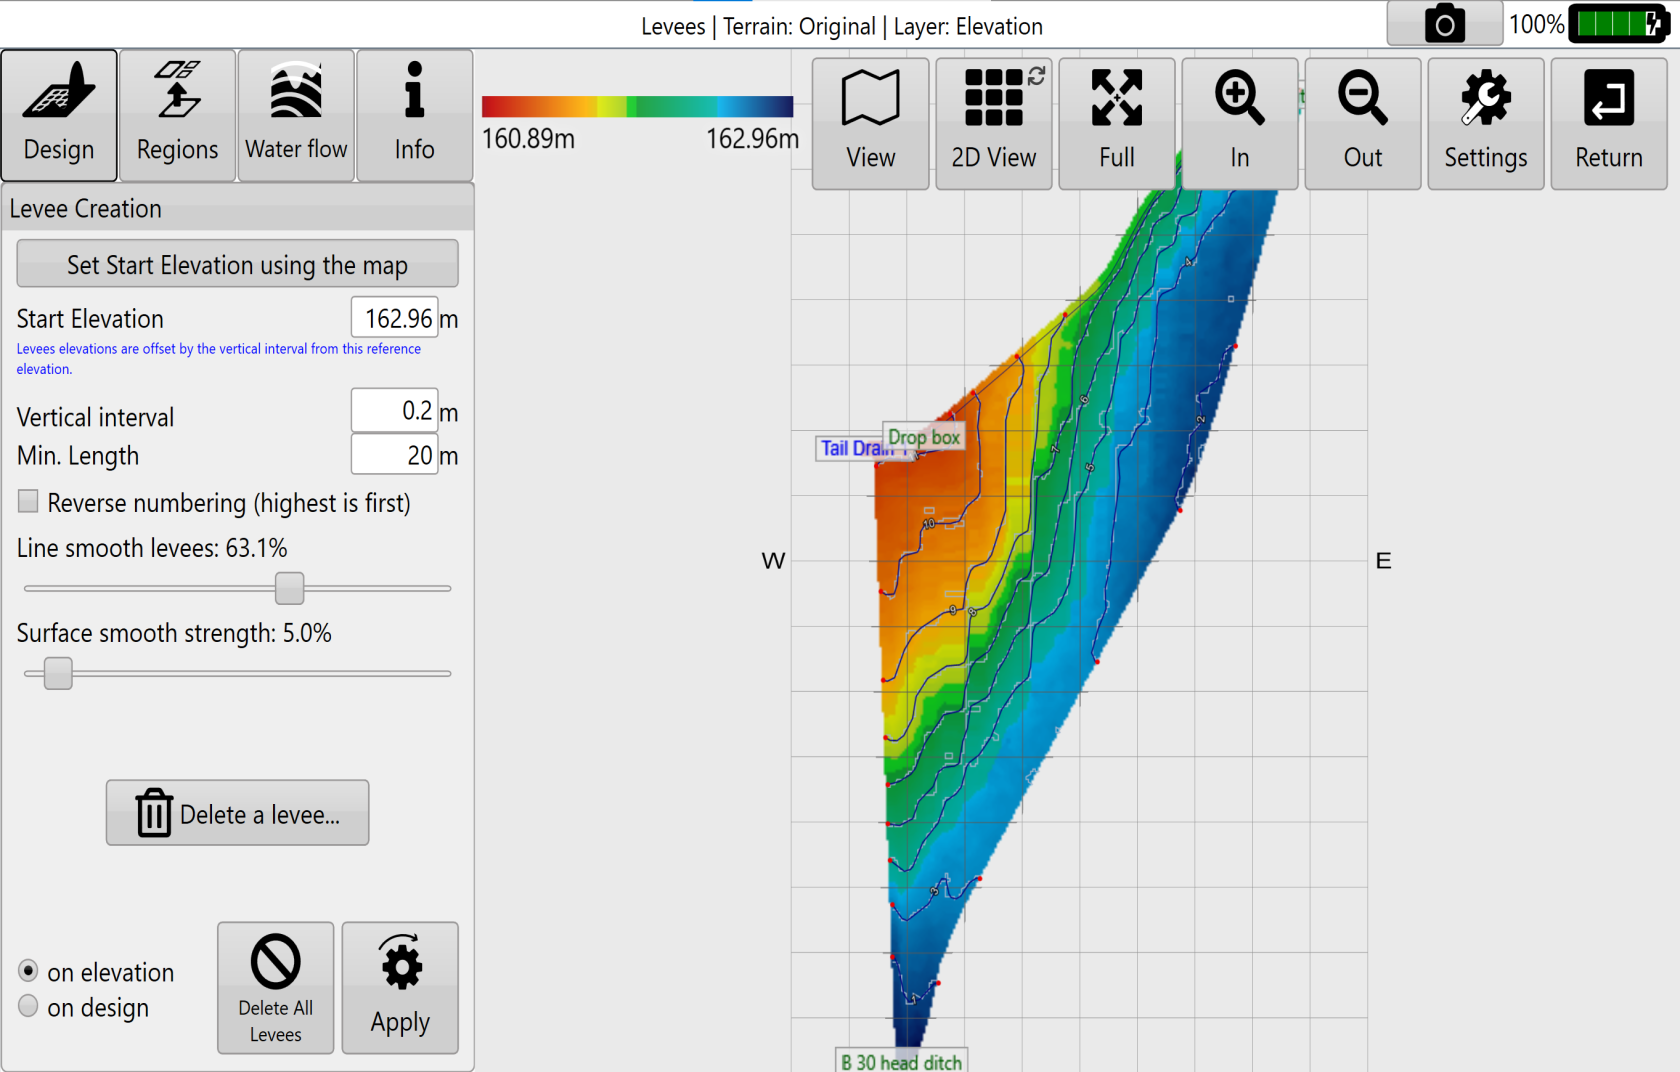
'**Levees**' allows you to create repeating or singular levees at set elevations.
- Levees can be added at set intervals.
- Levees can be smoothed.
- Levees can be selectively deleted.
- Levees can be applied selectively to field regions.
- Levees can be exported as guidance curves for use with John Deere AutoTrac™.
####
#### **Levee Creation Parameters**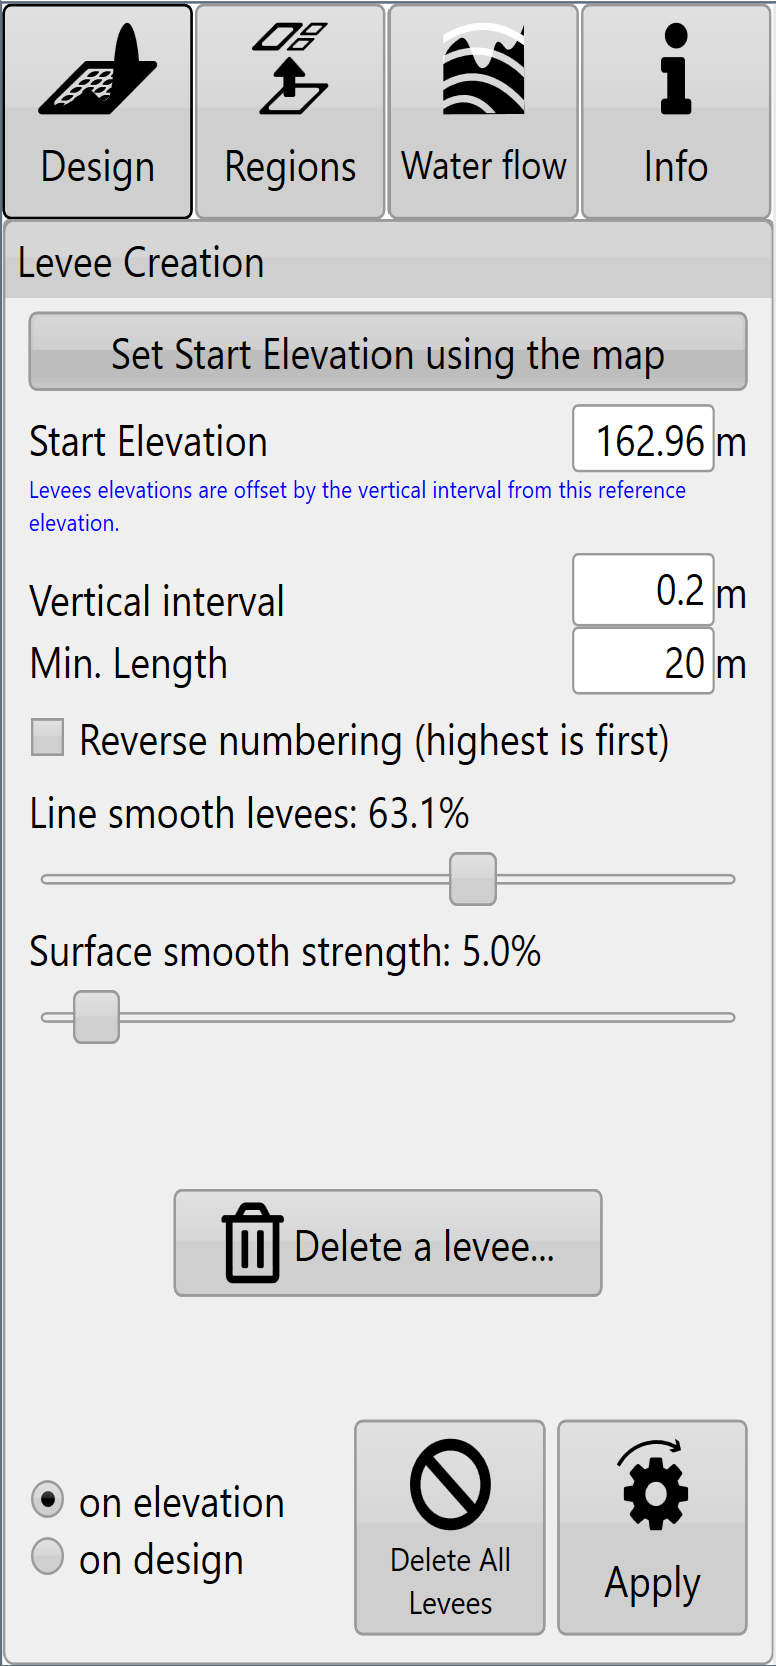'**Start Elevation**' will be populated automatically. You can also choose the ‘Start Elevation’ by manually pressing on the ‘Start Elevation’ button and then touching the design map at the location you would like to start the levees from. Press Finish selecting to apply.'**Vertical interval**' tells T3RRA Cutta and T3RRA Ditch how much elevation change from the previous levee is needed before adding another levee.'**Min. size**' determines the minimum length a levee must be before it is included as a drivable path. Levees that are shorter than this will appear greyed out and not be available as paths.'**Reverse numbering**' – By default levees are numbered from highest elevation to lowest, reverse numbering switches it to count up from the lowest elevation.‘**Line smooth levees**’ adjusts how many sharp turns and how smoothly the levee lines will be created. The further to the right the slider is the more round the lines will be (with decreased sharp turns).‘**Surface smooth strength**’ adjusts the surface by applying an averaging filter to the surface of the field to remove bumps and dips without creating a full field earthwork design.'**Delete a levee**' will bring up a window allowing you to enter the number associated with the levees you want to remove.Like other design tools, Levees allows you to use either the original elevation surface, or a design surface as the basis for the calculations. It may be beneficial to perform a landforming operation on this field prior to putting in levees and then base the levees off the design surface.
Even if you are not performing a landforming operation it can sometimes be useful to perform a smoothing design on the surface first before attempting to lay out levees (ie, to work around poor data). Press '**Apply**' (shown as the levees icon) after parameters are entered.Levees can be applied separately to individual regions. It may be advantageous to do this if you have differently spaced levees in different sections of a field. NOTE: Levees can be added to each region individually.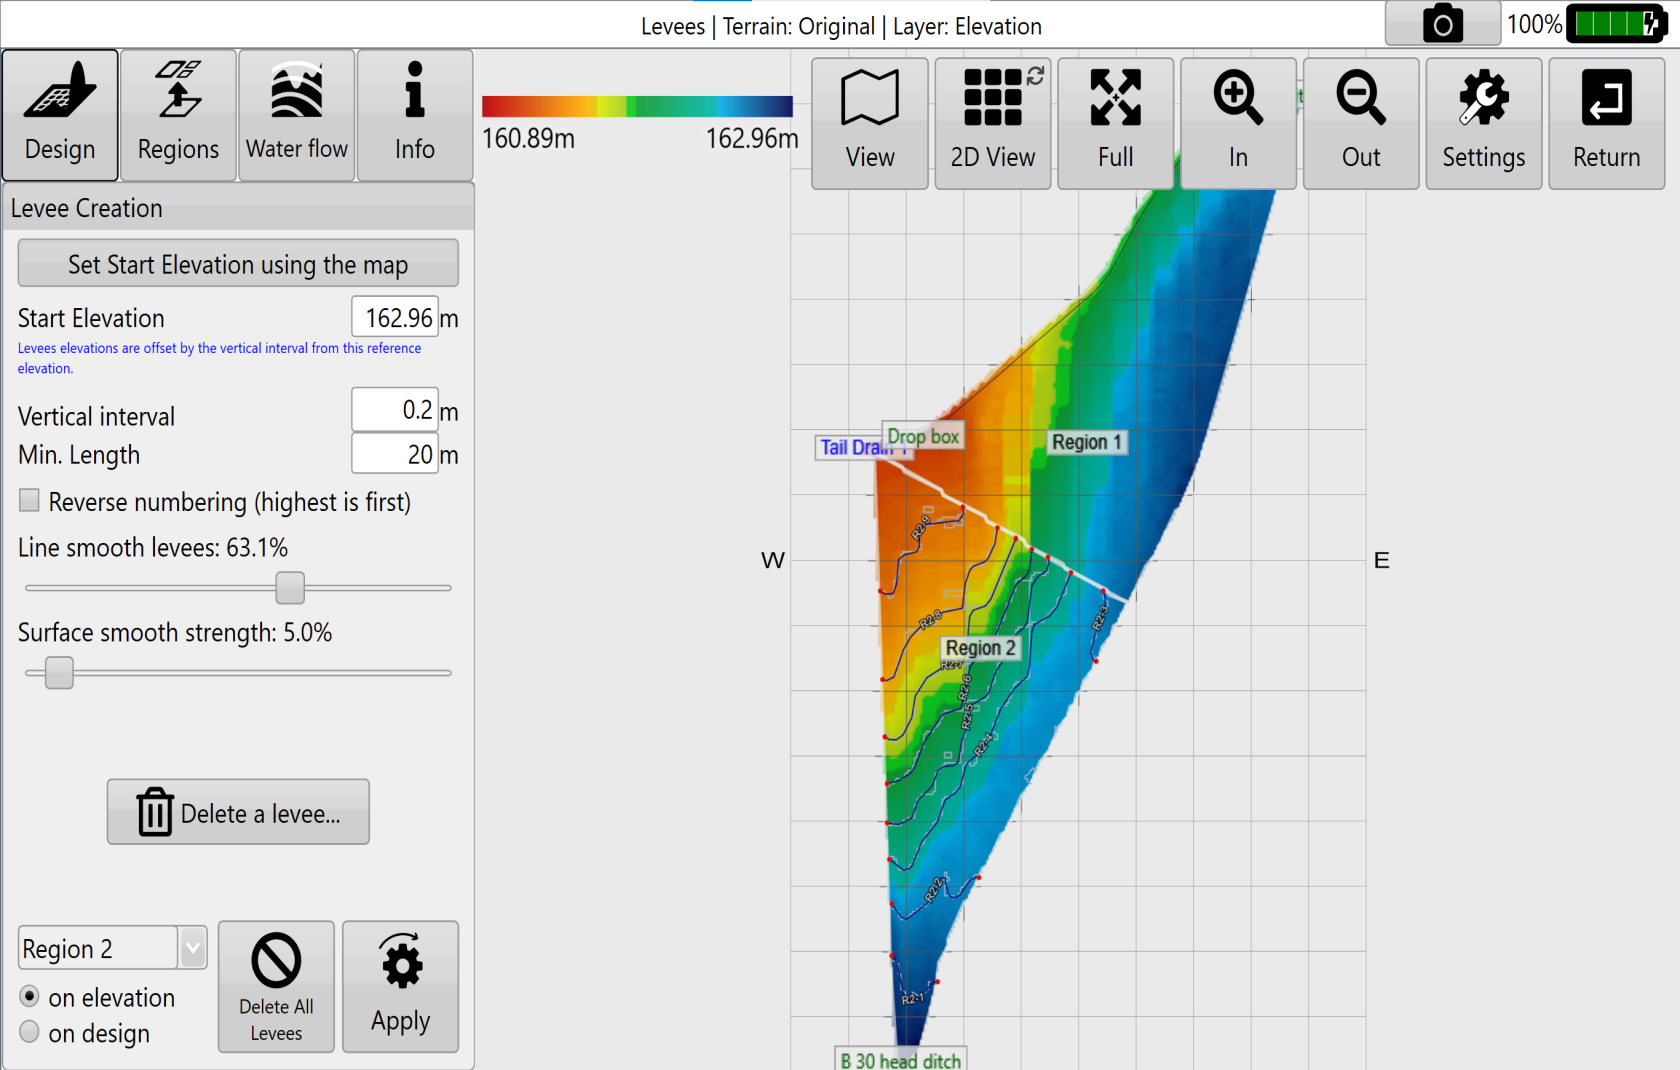Once you have finished designing your levees and are happy with them there are two options available:
- export levee paths as guidance lines.
- begin implementation.Exporting will allow the lines to be saved as guidance curves that can be loaded to John Deere’s guidance system.
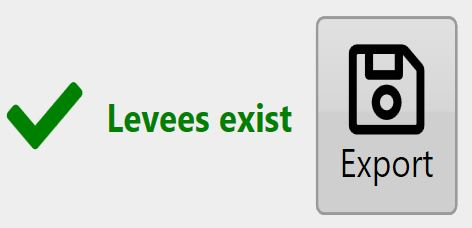
Select the Export button on the main design page to save as guidance curves (John Deere AutoTrac™ required).If you want to continue and manually implement the levee paths or just display current position on the map while pulling levees, you can follow the instructions to begin implementation on the following page.
# Exporting Guidance lines from T3RRA and importing into AutoTrac.
**Remember that guidance lines are only available for Drains and Levees.**Should you wish to export guidance lines from T3RRA software for use with AutoTrac™ be sure to follow the following steps to be sure that the process is successful.Exporting begins by pressing the export button next to the information that you want to export that appears once that data is present at the bottom on the ‘Design” home screen.
**How to export guidance lines from T3RRA**
1. **A window should appear similar to the image to the right when you select ‘Export’.**
2. **Select curve type.**
3. **Set the display to the model number of the John Deere display you will be using.**
4. **Input project information into client, farm, field and profile.**
5. **Press “Save” and a file with your guidance lines will be saved in the set location.**
6. **Press “Upload” and a file will be uploaded to JDOC where it can be assigned to equipment.**
****
****
****
****
**How to transfer guidance lines to a John Deere display**
**(Instructions given are for the GS3 2630 Display, steps for other displays may vary: refer to the appropriate display manual)**
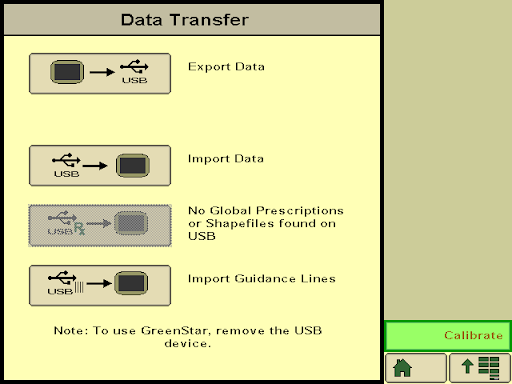
1. **Insert USB with guidance lines saved on it into John Deere Greenstar display. (The display will automatically detect the USB and display the available options.)**
2. **Select “Import Guidance Lines” which should be the bottom option.**
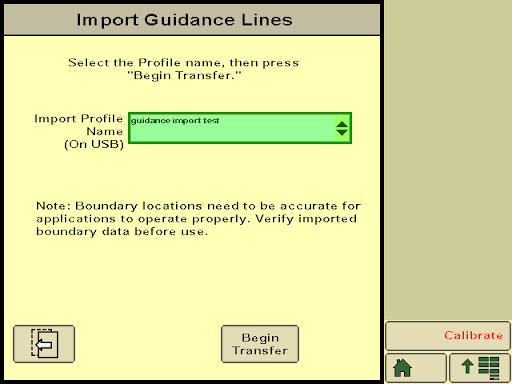
3. **Select the desired profile and press “Begin Transfer”.**
** **
4. **On this screen select which client, farm, field and tracking option of the file you want to import and press “Accept”. (The tracking option should be set to adaptive curves.
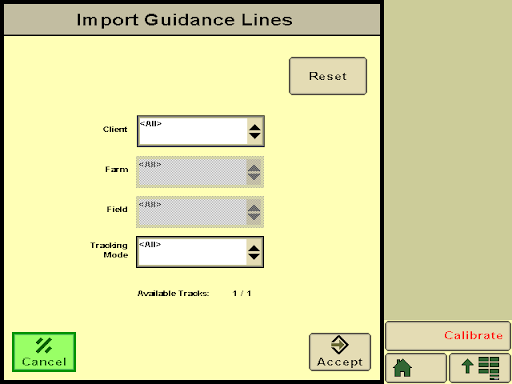**
5. **Make sure the correct line/s you want to import are ticked and press “Accept”.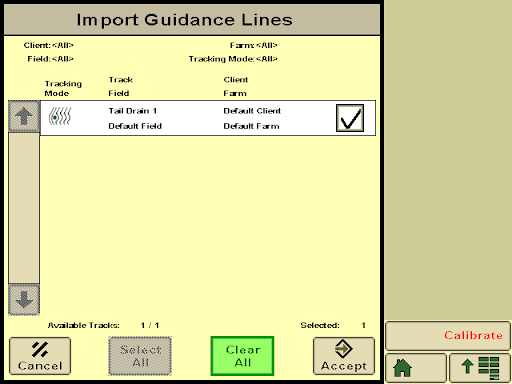**
6. **A loading bar should appear, if everything has been successful the Data Transfer Complete screen should appear and you will be able to press “Accept”.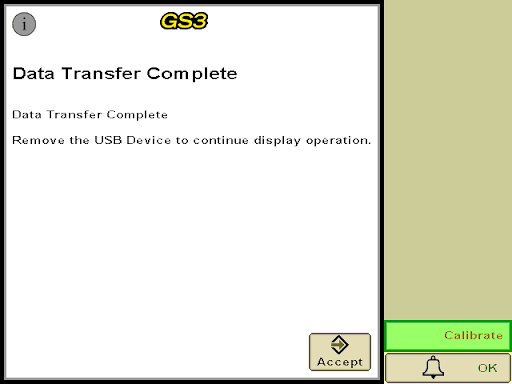**
7. **Your guidance lines have been imported to your John Deere Greenstar display and are now ready to be used with Autotrac™.**
# Completing your design
Once satisfied with your design surface and/or drain. 1. Select the '**Return**' button. (Top right corner)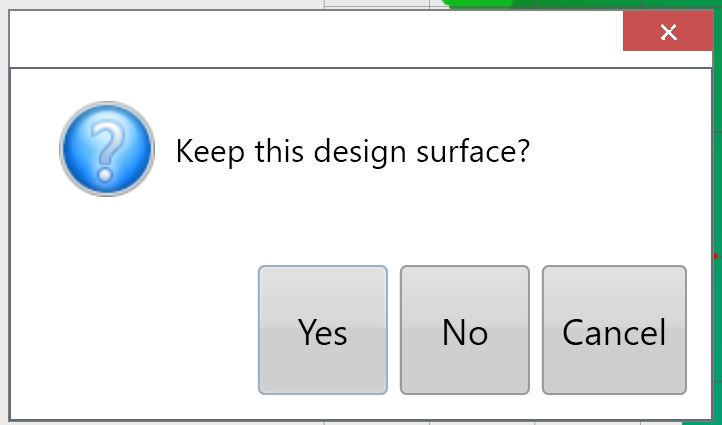 2. Select '**Yes**' to keep the design surface. 3. Select the '**Save proj.**' button to save the T3RRA project.Once you have finished making all your design changes, move onto step 4. 4. Select the '**Apply**' button and follow on screen steps to begin implementing your design.
# Terrace Design
'Terraces' allows you to create Guidance curves to mark terraces for erosion control.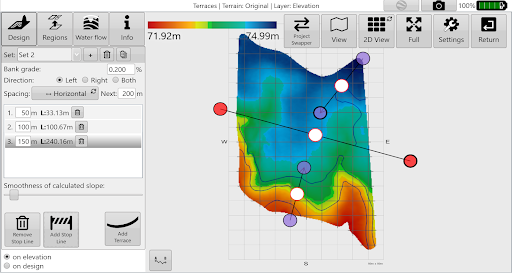When you first enter the terraces tool, a start line is displayed on the map. This is where your terraces will start from. There are a few parameters for terraces:
- ‘**Bank grade**’ allows you to control the slope of the terraces. This will affect how quickly water flows down each terrace.
- ‘**Direction**’ controls how terraces flow from the start line. To the left, right or to the left and right (both) of the start line. If you want the terraces to flow towards the start line, make the bank grade negative (e.g. 0.2% to -0.2%).
- ‘**Spacing**’ controls whether the starting positions of the terraces are controlled by Vertical distance (elevation drop) or Horizontal distance (distance travelled along the start line). Each time a terrace is added (with the \[Add Terrace\] button in the lower right of the design pane), it updates the ‘Next’ distance on the right.
- Each terrace added is listed in the center. In the list, you can change each terrace’s start distance, or delete it. It also shows you how far the terrace extends.
- ‘**Smoothness**’ controls how much the surface irregularities are smoothed out. If your terrace lines are too jagged, you may increase this slider. Note, however, that high smoothing will lead the terraces to not follow the ‘Bank grade’ as closely. This may lead to wet spots and/or require earth moving to ensure drainage.
- ‘**Add Stop Line**’ adds a new black line to the map with large red circles at each end. Position one or more stop lines using the red circles to terminate terrace lines at the right location (e.g. a waterway).Once you’ve created terraces with one start line (also called a ‘set’), you may use the smaller Plus button at the top to add a new start line. You can add as many start lines as desired. To switch between start lines, use the ‘**Set**’ drop down, or simply tap on one of its purple circles on the map. If you want to remove a start line (including the full terrace set), select it and click the delete button at the top.Once you’re done creating and laying out the terraces, you may export them as guidance lines, etc.