# 2. Creating Projects

# Main page / New Project Page

When T3RRA software is opened, the **Main Page** is the first screen displayed. This same screen is also shown when **New Project** is selected from within the Wizard.

The Main Page provides access to the primary application controls, including display settings, software configuration, the Operator’s Manual and T3RRA support tools.

<span style="font-family: Helvetica, sans-serif;">  
</span>

![O5Kf8xf0beisajimizpwrq14sgbqvkmldqjrq-png.png](https://docs.t3rra.com/uploads/images/gallery/2025-03/scaled-1680-/O5Kf8xf0beisajimizpwrq14sgbqvkmldqjrq-png.png)

<span style="font-family: Helvetica, sans-serif;">  
</span>

## Application Information

When T3RRA software is running in windowed mode, the title bar displays information about the current application and project.

Depending on the software being used, this may include:

- The name of the currently loaded project file.
- The T3RRA application name, such as **T3RRA Cutta**, **T3RRA Ditch**, **T3RRA Plane** or **T3RRA Survey**.
- The installed software version.

## [![image.png](https://docs.t3rra.com/uploads/images/gallery/2026-08/scaled-1680-/sMlimage.png)](https://docs.t3rra.com/uploads/images/gallery/2026-08/sMlimage.png)Full Screen Mode

Select **Full Scrn** to switch between full-screen and windowed operation.

Full-screen mode maximises the available display area for T3RRA software. Windowed mode may be useful when you need to access another application or Windows function at the same time.

If a keyboard is connected, press **F11** to switch between full-screen and windowed modes.

## [![image.png](https://docs.t3rra.com/uploads/images/gallery/2026-08/scaled-1680-/8Hrimage.png)](https://docs.t3rra.com/uploads/images/gallery/2026-08/8Hrimage.png)Display Modes

T3RRA software provides three display modes to improve visibility under different operating conditions:

<div class="group TyagGW_tableContainer" id="bkmrk-mode-description-day"><div class="TyagGW_tableWrapper flex flex-col-reverse w-fit" tabindex="-1"><table class="w-fit min-w-(--thread-content-width)" data-end="1989" data-start="1614" style="width: 98.9286%;"><thead data-end="1636" data-start="1614"><tr data-end="1636" data-start="1614"><th class="last:pe-10" data-col-size="sm" data-end="1621" data-start="1614" style="width: 14.0691%;">Mode</th><th class="last:pe-10" data-col-size="lg" data-end="1636" data-start="1621" style="width: 85.9636%;">Description</th></tr></thead><tbody data-end="1989" data-start="1647"><tr data-end="1764" data-start="1647"><td data-col-size="sm" data-end="1657" data-start="1647" style="width: 14.0691%;">**Day**</td><td data-col-size="lg" data-end="1764" data-start="1657" style="width: 85.9636%;">Standard light interface with a white background. This is the display mode used throughout this manual.</td></tr><tr data-end="1870" data-start="1765"><td data-col-size="sm" data-end="1785" data-start="1765" style="width: 14.0691%;">**High Contrast**</td><td data-col-size="lg" data-end="1870" data-start="1785" style="width: 85.9636%;">Uses an inverted colour scheme to improve visibility in some lighting conditions.</td></tr><tr data-end="1989" data-start="1871"><td data-col-size="sm" data-end="1883" data-start="1871" style="width: 14.0691%;">**Night**</td><td data-col-size="lg" data-end="1989" data-start="1883" style="width: 85.9636%;">Uses a dark background with a green foreground to reduce screen brightness during low-light operation.</td></tr></tbody></table>

</div></div><span style="font-family: Helvetica, sans-serif;"><span style="font-size: 14pt; color: rgb(0,0,0); font-weight: 400;"><span class="fr-video fr-deletable fr-fvc fr-dvb fr-draggable"><iframe class="fr-draggable align-center" height="352" src="https://www.youtube.com/embed/b-YLq5bELTk?&wmode=opaque" style="border: 0; width: 822px; height: 352px;" width="822"></iframe>

</span></span></span>

[![image.png](https://docs.t3rra.com/uploads/images/gallery/2026-08/scaled-1680-/image.png)](https://docs.t3rra.com/uploads/images/gallery/2026-08/image.png)

## Settings

Select **Settings** to review and configure the application.

Before beginning work, confirm that the software has been configured correctly for the machine, implement, project and GNSS system being used.

The available settings and their functions are described in the **Settings** chapter of this manual.

## [![image.png](https://docs.t3rra.com/uploads/images/gallery/2026-08/scaled-1680-/eJUimage.png)](https://docs.t3rra.com/uploads/images/gallery/2026-08/eJUimage.png)Open Manual

Select **Open Manual** to access the T3RRA Operator’s Manual.

The first time this option is used, T3RRA software will download and install a local copy of the manual on the tablet. Once installed, selecting **Open Manual** will open the manual directly.

An internet connection is required when downloading the manual for the first time.

## [![image.png](https://docs.t3rra.com/uploads/images/gallery/2026-08/scaled-1680-/xMfimage.png)](https://docs.t3rra.com/uploads/images/gallery/2026-08/xMfimage.png)Report

Select **Report** to open the T3RRA bug report and feature request window.

This tool can be used to:

- Report unexpected software behaviour.
- Submit information about a problem.
- Request or suggest new functionality.

The **Name** and **Email Address** fields are automatically populated using the details associated with the software licence.

An active internet connection is required to submit a report.

<span dir="ltr" style="font-size: 14pt; font-family: Helvetica, sans-serif; color: rgb(0,0,0); font-weight: 300;"><span class="fr-video fr-deletable fr-fvc fr-dvb fr-draggable"><iframe class="fr-draggable align-center" height="365" src="https://www.youtube.com/embed/YzdzwxzxydU?&wmode=opaque" style="border: 0; width: 850px; height: 365px;" width="850"></iframe>

</span></span>

# Importing External Files

T3RRA software uses the **T3RRA Project File (`.tci`)** as its native project format. Data from supported external file formats can be imported and converted for use within a T3RRA project.

To import external data, select **Import** from the Main Page and choose the appropriate file or data source.

<p class="callout info">**T3RRA Design** provides additional import and conversion capabilities and can be used to prepare many other file formats for use with T3RRA software.</p>

## Supported Import Formats

The available import options depend on the type and source of the data.

### Survey and Elevation Data

<div class="group TyagGW_tableContainer" id="bkmrk-data-type-supported-"><div class="TyagGW_tableWrapper flex flex-col-reverse w-fit" tabindex="-1"><table class="w-fit min-w-(--thread-content-width)" data-end="1743" data-start="1437" style="width: 99.6429%;"><thead data-end="1480" data-start="1437"><tr data-end="1480" data-start="1437"><th class="last:pe-10" data-col-size="sm" data-end="1449" data-start="1437" style="width: 21.1831%;">Data Type</th><th class="last:pe-10" data-col-size="sm" data-end="1480" data-start="1449" style="width: 78.8478%;">Supported Formats / Sources</th></tr></thead><tbody data-end="1743" data-start="1491"><tr data-end="1525" data-start="1491"><td data-col-size="sm" data-end="1509" data-start="1491" style="width: 21.1831%;">**Drain Paths**</td><td data-col-size="sm" data-end="1525" data-start="1509" style="width: 78.8478%;">CSV (`.csv`)</td></tr><tr data-end="1538" data-start="1526"><td data-col-size="sm" data-end="1528" data-start="1526" style="width: 21.1831%;"> </td><td data-col-size="sm" data-end="1538" data-start="1528" style="width: 78.8478%;">PCTXYZ</td></tr><tr data-end="1580" data-start="1539"><td data-col-size="sm" data-end="1564" data-start="1539" style="width: 21.1831%;">**Full Field Surveys**</td><td data-col-size="sm" data-end="1580" data-start="1564" style="width: 78.8478%;">CSV (`.csv`)</td></tr><tr data-end="1593" data-start="1581"><td data-col-size="sm" data-end="1583" data-start="1581" style="width: 21.1831%;"> </td><td data-col-size="sm" data-end="1593" data-start="1583" style="width: 78.8478%;">PCTXYZ</td></tr><tr data-end="1618" data-start="1594"><td data-col-size="sm" data-end="1596" data-start="1594" style="width: 21.1831%;"> </td><td data-col-size="sm" data-end="1618" data-start="1596" style="width: 78.8478%;">John Deere RCD Log</td></tr><tr data-end="1645" data-start="1619"><td data-col-size="sm" data-end="1621" data-start="1619" style="width: 21.1831%;"> </td><td data-col-size="sm" data-end="1645" data-start="1621" style="width: 78.8478%;">John Deere ADAPT Log</td></tr><tr data-end="1673" data-start="1646"><td data-col-size="sm" data-end="1648" data-start="1646" style="width: 21.1831%;"> </td><td data-col-size="sm" data-end="1673" data-start="1648" style="width: 78.8478%;">John Deere SWM Survey</td></tr><tr data-end="1708" data-start="1674"><td data-col-size="sm" data-end="1676" data-start="1674" style="width: 21.1831%;"> </td><td data-col-size="sm" data-end="1708" data-start="1676" style="width: 78.8478%;">MyJohnDeere Field Operation\*</td></tr><tr data-end="1743" data-start="1709"><td data-col-size="sm" data-end="1727" data-start="1709" style="width: 21.1831%;">**Survey Data**</td><td data-col-size="sm" data-end="1743" data-start="1727" style="width: 78.8478%;">KML (`.kml`)</td></tr></tbody></table>

</div></div>\*An internet connection is required when importing from MyJohnDeere.

### Digital Elevation Models

- JSONGrid
- ESRI ASCII
- Field Level II
- AGPS Design File
- Trimble Grid (`.xyzout`)

### Control Files

<div class="group TyagGW_tableContainer" id="bkmrk-data-type-supported--1"><div class="TyagGW_tableWrapper flex flex-col-reverse w-fit" tabindex="-1"><table class="w-fit min-w-(--thread-content-width)" data-end="2096" data-start="1953" style="width: 99.5238%;"><thead data-end="1985" data-start="1953"><tr data-end="1985" data-start="1953"><th class="last:pe-10" data-col-size="sm" data-end="1965" data-start="1953" style="width: 21.3291%;">Data Type</th><th class="last:pe-10" data-col-size="md" data-end="1985" data-start="1965" style="width: 78.7014%;">Supported Format</th></tr></thead><tbody data-end="2096" data-start="1996"><tr data-end="2060" data-start="1996"><td data-col-size="sm" data-end="2014" data-start="1996" style="width: 21.3291%;">**Drain Paths**</td><td data-col-size="md" data-end="2060" data-start="2014" style="width: 78.7014%;">John Deere Ditch Tracks (SWP Ditch Tracks)</td></tr><tr data-end="2096" data-start="2061"><td data-col-size="sm" data-end="2078" data-start="2061" style="width: 21.3291%;">**Full Field**</td><td data-col-size="md" data-end="2096" data-start="2078" style="width: 78.7014%;">Field Level II</td></tr></tbody></table>

</div></div><div class="group TyagGW_tableContainer" id="bkmrk-"></div>

# Importing Data

T3RRA software uses the **T3RRA Project File (`.tci`)** as its native project format. Data from supported external sources must be imported using the **Import** function before it can be used within a T3RRA project.

<p class="callout info">**T3RRA Design** provides additional import and conversion capabilities and can be used to prepare many other file formats for use with T3RRA software.</p>

<p class="callout warning">**T3RRA Apply does not support data import.** T3RRA Apply can only work with designs created in, or provided by, other T3RRA projects.</p>

## Loading vs Importing

Throughout T3RRA software and this manual, **loading** and **importing** refer to two different operations:

- **Loading** means opening an existing T3RRA `.tci` project file.
- **Importing** means bringing data from an external or third-party source into a T3RRA project.

A `.tci` project can normally be loaded directly. Importing external data may require additional steps because T3RRA may need information about the source data, or the data may need to be interpreted or converted before it can be used.

## Importing a File

External data can be imported when creating a project or added to an existing project at any time.

### [![image.png](https://docs.t3rra.com/uploads/images/gallery/2026-08/scaled-1680-/YOeimage.png)](https://docs.t3rra.com/uploads/images/gallery/2026-08/YOeimage.png)1. Open the Import Window
Select **Import** from the **Main Page** or from the **Collect** step of the Wizard.

If a keyboard is connected, press **Ctrl+I** to open the Import window.

### 2. Select the Import Type and File

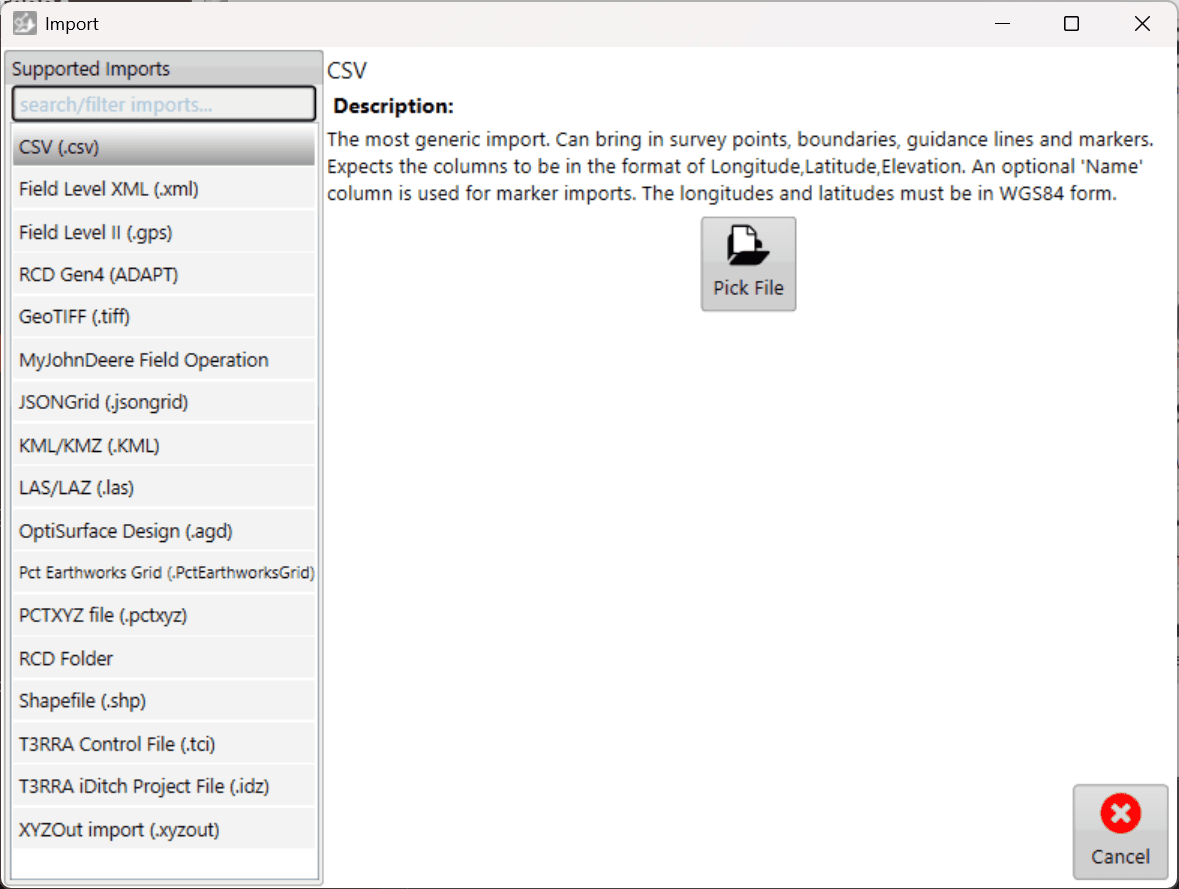
Select the appropriate data or file type from the options on the left side of the Import window.

Select **Pick File**, then browse to and select the file you wish to import.

[![image.png](https://docs.t3rra.com/uploads/images/gallery/2026-04/scaled-1680-/pFw5zUByAuf4kdhE-image.png)](https://docs.t3rra.com/uploads/images/gallery/2026-04/pFw5zUByAuf4kdhE-image.png)
### 3. Configure the Import

Some file types require additional information before they can be read, such as coordinate system or projection information.

Enter any required information, then select **Read** in the lower-right corner.

<p class="callout warning">When importing CSV data containing latitude and longitude coordinates, the coordinates must use **WGS84**.</p>

### 4. Review the Data

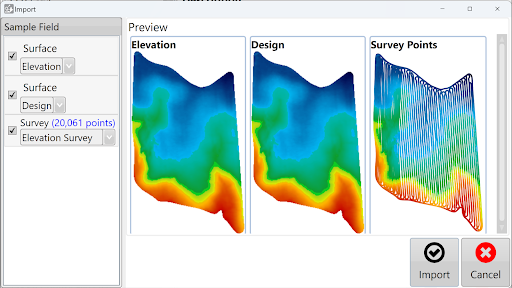
Once the file has been read, select the data you wish to import. A preview of the available data is displayed on the right side of the window.

T3RRA will attempt to automatically identify the type of data contained within the file. If the detected data type is incorrect, use the available drop-down menus to select the correct type.

Review the data and selections, then select **Import**.
<span dir="ltr" style="font-size: 14pt; font-family: Helvetica, sans-serif; color: rgb(0,0,0); font-weight: 300;"><span dir="ltr" style="font-size: 14pt; color: rgb(0,0,0); font-weight: 300;">![M0nfkryjyz5whro3iek8dvppnc1etq7ltoysg-png.png](https://docs.t3rra.com/uploads/images/gallery/2025-03/scaled-1680-/M0nfkryjyz5whro3iek8dvppnc1etq7ltoysg-png.png)</span></span>

### 5. Continue with the Imported Data

Once the import is complete, the imported data is available for use within the project. Surfacing and design operations can then be performed as required.

<p class="callout success">When elevation survey point data is imported, T3RRA automatically creates the corresponding surface.</p>

![fdta7xdo6hifaktrjxx7okpmlw8izej2efzfw-png.png](https://docs.t3rra.com/uploads/images/gallery/2025-03/scaled-1680-/fdta7xdo6hifaktrjxx7okpmlw8izej2efzfw-png.png)

# Loading a Project

[![image.png](https://docs.t3rra.com/uploads/images/gallery/2026-08/scaled-1680-/fYbimage.png)](https://docs.t3rra.com/uploads/images/gallery/2026-08/fYbimage.png)

Select **Load proj.** to open an existing T3RRA project (`.tci`). Projects can be loaded from the standard T3RRA project structure, from another location on the tablet PC, or from external storage such as a USB drive.

To begin, select **Load proj.** from the Main Page.

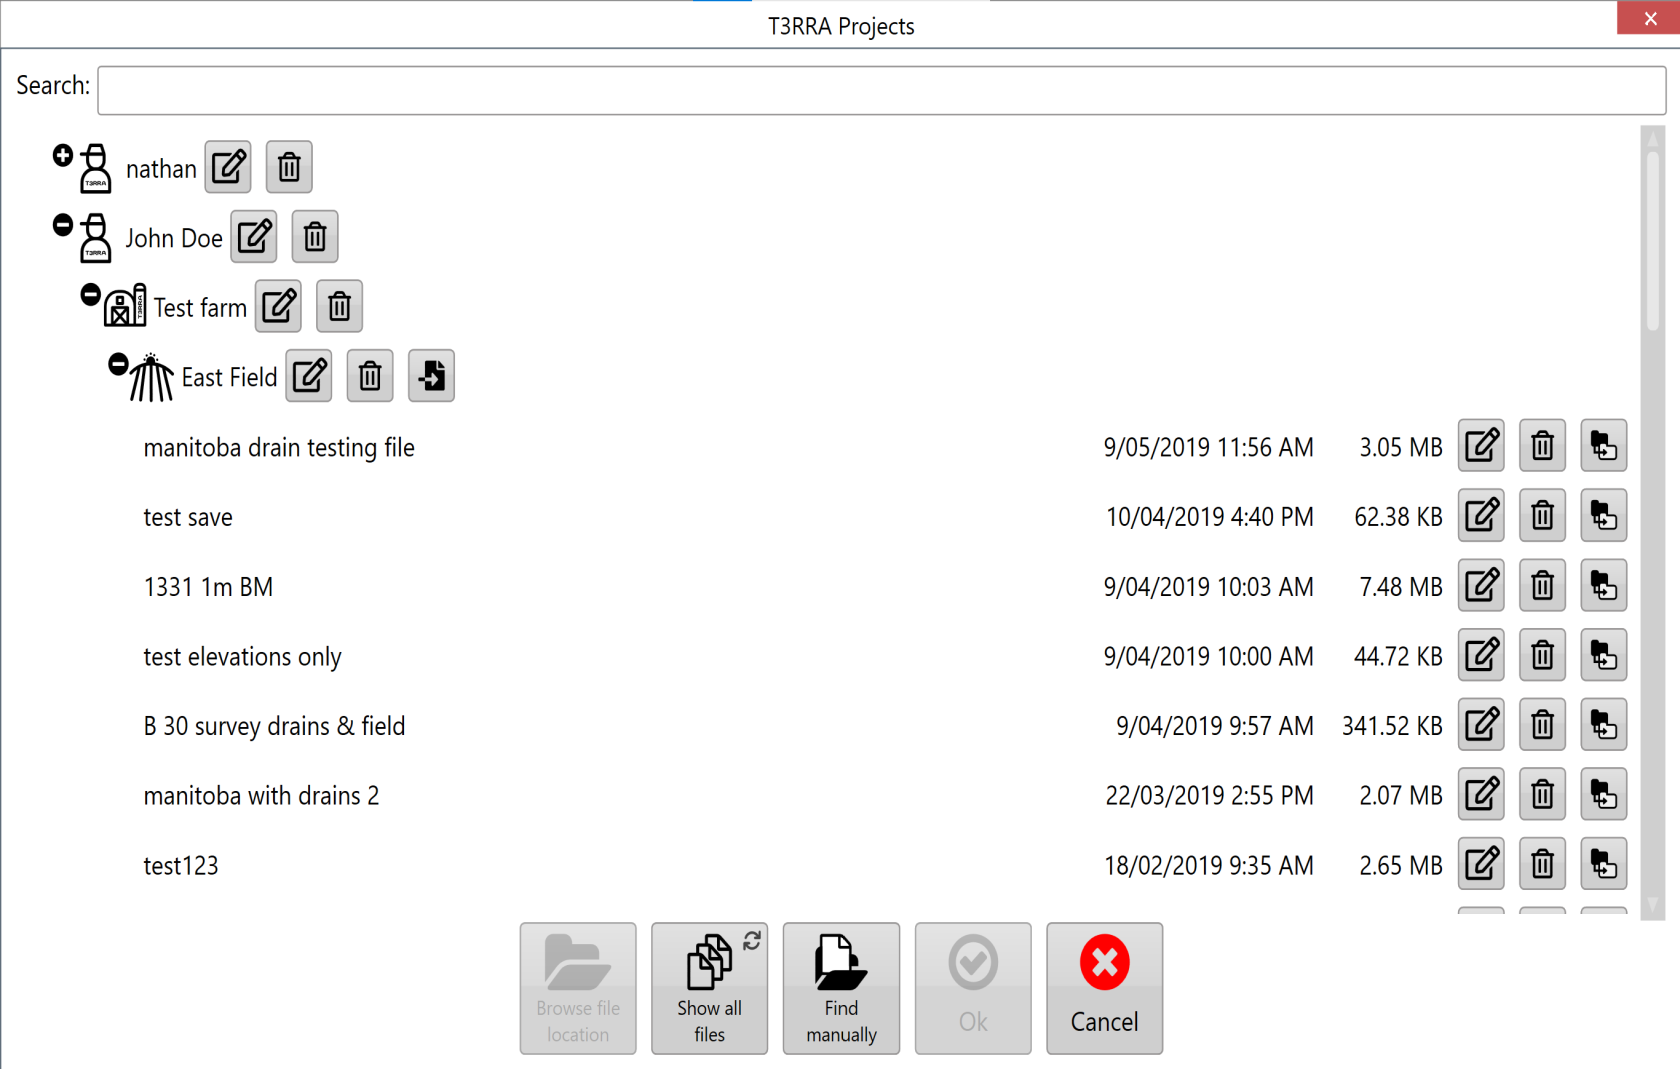
## Loading from Grower/Farm/Field

Projects stored within the standard T3RRA file structure are organised using **Grower, Farm and Field** profiles.

Select the appropriate **Grower**, **Farm** and **Field**, then select the project you wish to open and press **OK**.

For more information about creating and managing Grower, Farm and Field profiles, refer to the relevant section later in this chapter.
<span dir="ltr" style="font-family: Helvetica, sans-serif;">![qDqdxd87ev-j3eoxjfz8tsxq6-apnlilth2wa-png.png](https://docs.t3rra.com/uploads/images/gallery/2025-03/scaled-1680-/qDqdxd87ev-j3eoxjfz8tsxq6-apnlilth2wa-png.png)</span>

## <span style="font-family: Helvetica, sans-serif;"><span style="font-size: 14pt; color: rgb(0,0,0); font-weight: 300;">![QC17sbmiv-xoyoqbdrdy-t-wl1wijewnf8ojq-png.png](https://docs.t3rra.com/uploads/images/gallery/2025-03/scaled-1680-/QC17sbmiv-xoyoqbdrdy-t-wl1wijewnf8ojq-png.png)</span></span>Managing Saved Projects

Three management buttons are displayed alongside each project:

<div class="group TyagGW_tableContainer" id="bkmrk-button-function-rena"><div class="TyagGW_tableWrapper flex flex-col-reverse w-fit" tabindex="-1"><table class="w-fit min-w-(--thread-content-width)" data-end="1471" data-start="1148" style="width: 100%;"><thead data-end="1169" data-start="1148"><tr data-end="1169" data-start="1148"><th class="last:pe-10" data-col-size="sm" data-end="1157" data-start="1148" style="width: 16.3218%;">Button</th><th class="last:pe-10" data-col-size="lg" data-end="1169" data-start="1157" style="width: 83.708%;">Function</th></tr></thead><tbody data-end="1471" data-start="1180"><tr data-end="1231" data-start="1180"><td data-col-size="sm" data-end="1193" data-start="1180" style="width: 16.3218%;">**Rename**</td><td data-col-size="lg" data-end="1231" data-start="1193" style="width: 83.708%;">Renames the selected project file.</td></tr><tr data-end="1330" data-start="1232"><td data-col-size="sm" data-end="1245" data-start="1232" style="width: 16.3218%;">**Delete**</td><td data-col-size="lg" data-end="1330" data-start="1245" style="width: 83.708%;">Deletes the selected project. Deleted files are moved to the Windows Recycle Bin.</td></tr><tr data-end="1471" data-start="1331"><td data-col-size="sm" data-end="1342" data-start="1331" style="width: 16.3218%;">**Move**</td><td data-col-size="lg" data-end="1471" data-start="1342" style="width: 83.708%;">Opens the project location window, allowing the selected project to be moved to another Grower, Farm, Field or file location.</td></tr></tbody></table>

</div></div>These controls allow existing project files to be organised without leaving T3RRA software.

## Finding a Project Manually

T3RRA project files are standard Windows files and are not required to be stored within the default T3RRA folder structure.

To open a project stored elsewhere, select **Find manually**.

![CE0yhrldvcpamd9ru-z1xogz0etku8vxfqlqw-png.png](https://docs.t3rra.com/uploads/images/gallery/2025-03/scaled-1680-/CE0yhrldvcpamd9ru-z1xogz0etku8vxfqlqw-png.png)

Use Windows File Explorer to browse to the required T3RRA project (`.tci`), select the file, then select **Open**.

![q0voumrw55i2tqqp5carwo0epfpeiuknppjmg-png.png](https://docs.t3rra.com/uploads/images/gallery/2025-03/scaled-1680-/q0voumrw55i2tqqp5carwo0epfpeiuknppjmg-png.png)

<p class="callout success">This option can also be used to open projects stored on external media such as a USB drive.</p>

## Finding All T3RRA Projects

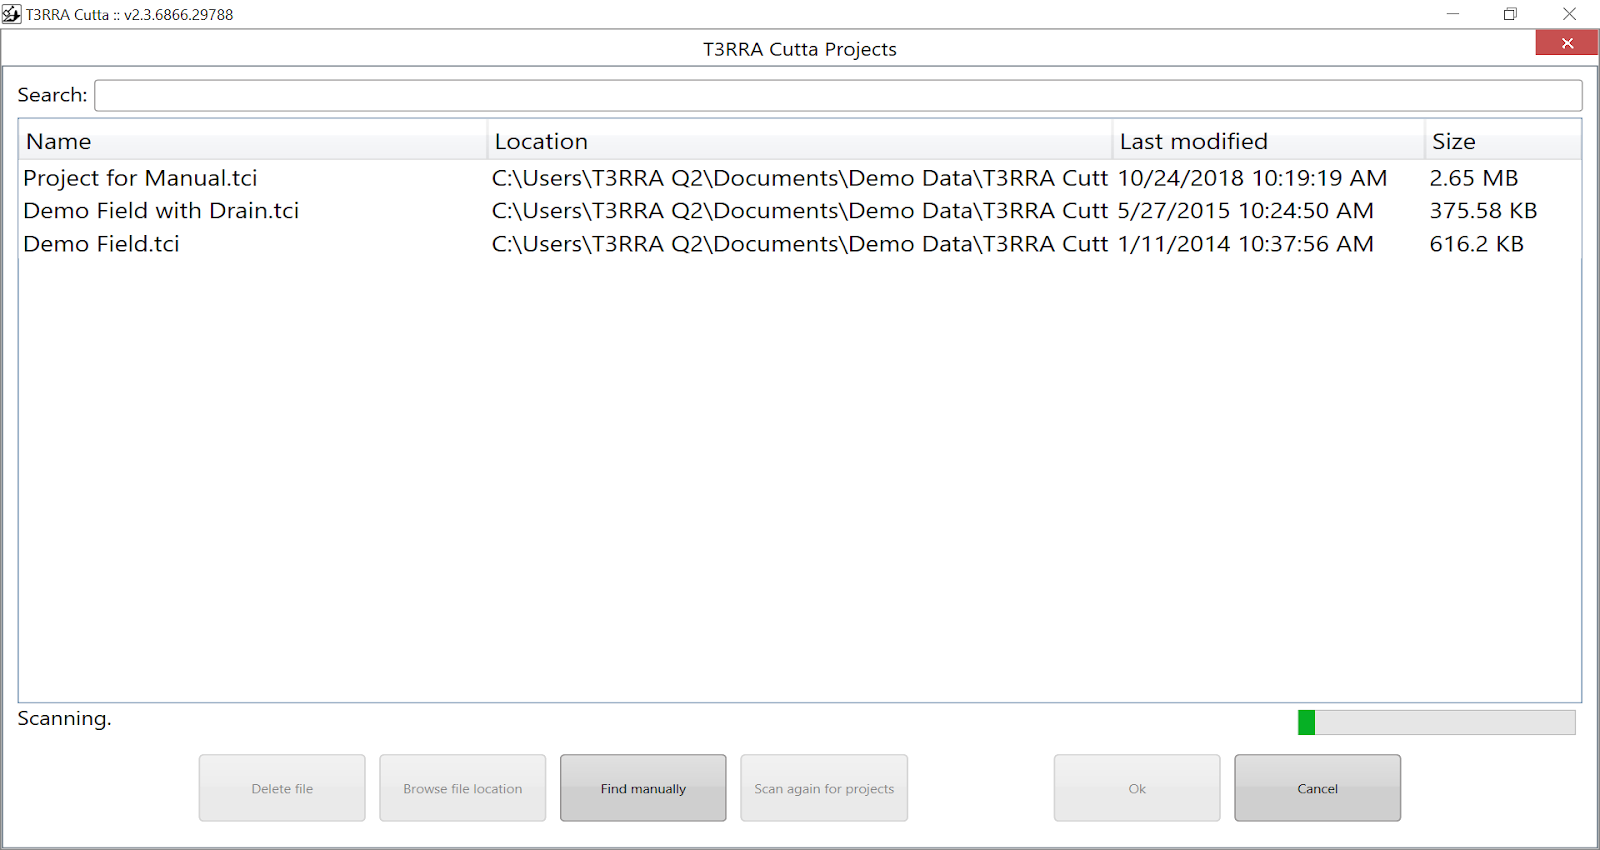
If you do not know where a project has been saved, select **Show all files**.

T3RRA will scan the computer's **C: drive** for compatible T3RRA project files and populate the project list as files are found. A progress bar in the lower-right corner indicates that the scan is still in progress.

Use the **Search** field to filter the results by project filename.
<span dir="ltr" style="font-family: Helvetica, sans-serif;">![w3lw9yll8ioomv3ksw8gmof8zjkk5t-cafzgg-png.png](https://docs.t3rra.com/uploads/images/gallery/2025-03/scaled-1680-/w3lw9yll8ioomv3ksw8gmof8zjkk5t-cafzgg-png.png)</span>

Once the required project has been located, select it and press **OK**.

## Continuing a Loaded Project

Once a project has been loaded, T3RRA will open the **Wizard** at the appropriate stage for that project. Existing project progress is retained, allowing you to continue from where the project was previously saved.

Where the project is ready for machine control, you can proceed directly to the **Apply** stage.

<span style="font-family: Helvetica, sans-serif;">![4r8mlcs9iwe2x8mut7xnxeinnp0envpe-oqdw-png.png](https://docs.t3rra.com/uploads/images/gallery/2025-03/scaled-1680-/4r8mlcs9iwe2x8mut7xnxeinnp0envpe-oqdw-png.png)</span>

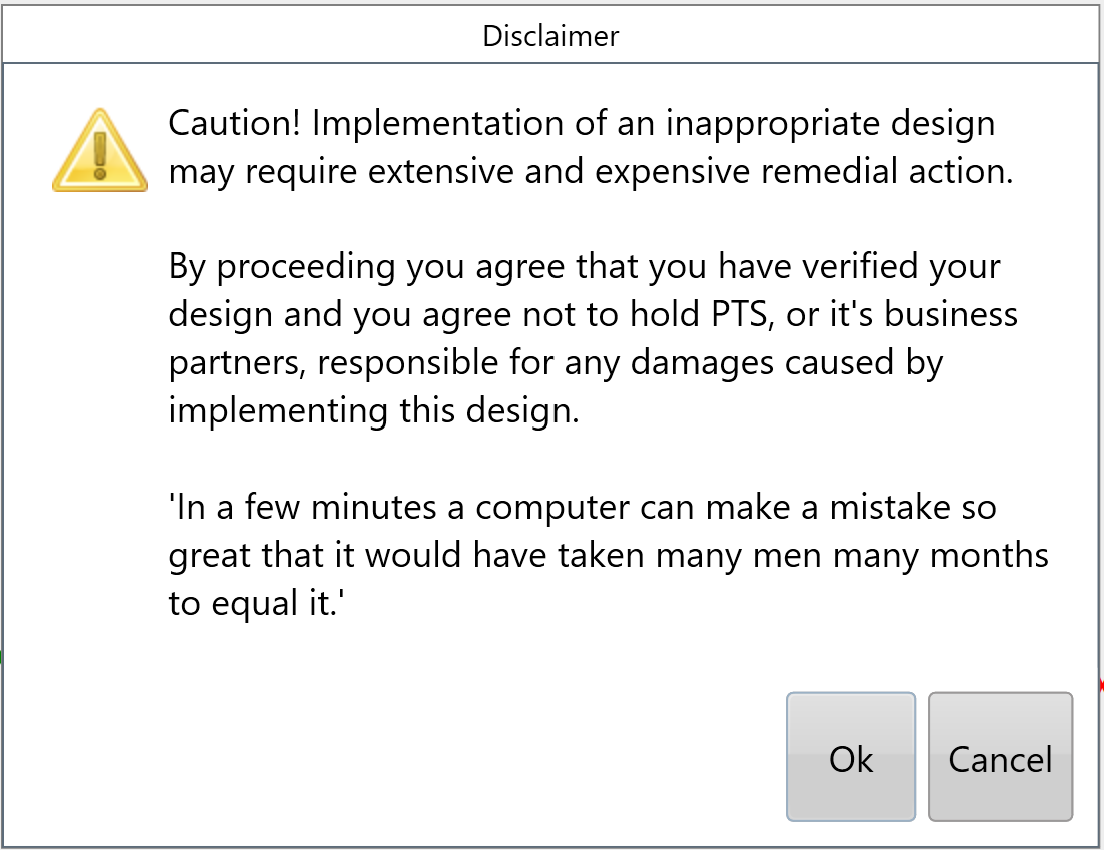
When ready to begin implementation, select **Start**. You will be required to accept the displayed **Disclaimer** before machine control can begin.
![JQB1ziexpj3xdvtjl7yp5-wghowolcg6j5ouw-png.png](https://docs.t3rra.com/uploads/images/gallery/2025-03/scaled-1680-/JQB1ziexpj3xdvtjl7yp5-wghowolcg6j5ouw-png.png)

# Saving and Auto-Saving Projects

Saving a project allows you to close T3RRA software and return to your work later while retaining the project's survey, design and other associated data.

Although T3RRA software includes an automatic backup system, **regularly saving your project is strongly recommended** to minimise the risk of data loss.

[![image.png](https://docs.t3rra.com/uploads/images/gallery/2026-08/scaled-1680-/w4bimage.png)](https://docs.t3rra.com/uploads/images/gallery/2026-08/w4bimage.png)
## Saving a Project

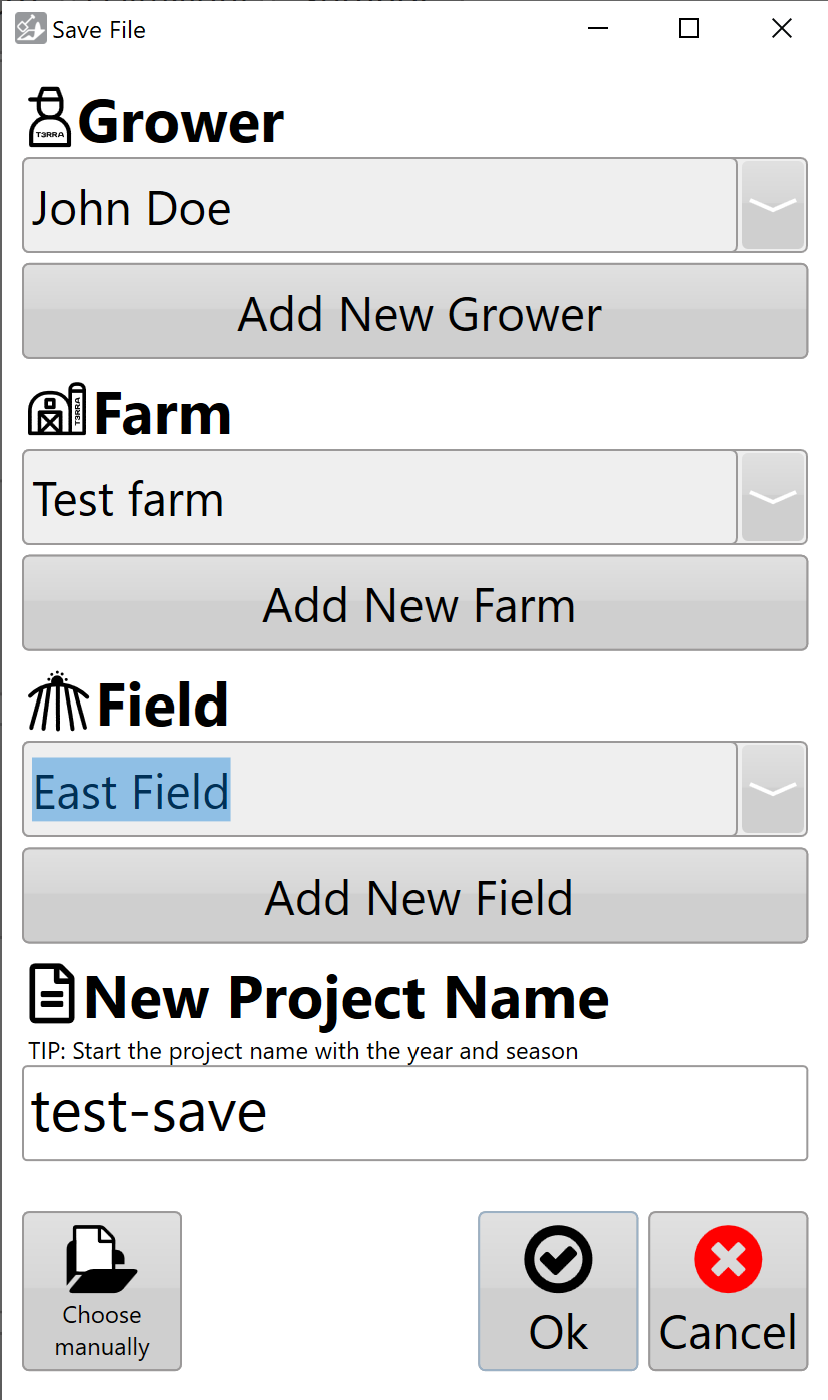
The **Save project** button is available from the main Wizard pages.

Select **Save project** to open the project save window. T3RRA's standard project structure organises projects using the following information:

- **Grower**
- **Farm Name**
- **Field Name**
- **Project Name**

Enter the required information or select an existing Grower, Farm or Field from the available drop-down lists.

Select **OK** to save the project within the standard T3RRA project structure.
<span style="font-family: Helvetica, sans-serif;"><span dir="ltr" style="font-size: 14pt; color: rgb(0,0,0); font-weight: 300;">![9jRx0kbz6kzqmqpi8vf3jrlrk7mz8wrxyhwhg-png.png](https://docs.t3rra.com/uploads/images/gallery/2025-03/scaled-1680-/9jRx0kbz6kzqmqpi8vf3jrlrk7mz8wrxyhwhg-png.png)</span></span>

## Saving to Another Location

T3RRA project files are standard Windows files and can also be saved outside the default T3RRA project structure.

Select **Manually Choose Location** to specify an alternative save location.

The save window can be navigated using either the folder tree on the left or the main file browser. Navigate to the required location, enter a filename, then select **Save**.

This can be used to save projects elsewhere on the tablet PC or to another available storage location.

![BaG4pkpclrl6vetfabh-ombwdioce3cpvoysw-png.png](https://docs.t3rra.com/uploads/images/gallery/2025-03/scaled-1680-/BaG4pkpclrl6vetfabh-ombwdioce3cpvoysw-png.png)

**Important — Back Up Your Projects**

Regularly copy important project files to a location **separate from the in-cab tablet PC**. This provides an additional copy of your project data if the tablet is damaged, lost or experiences a hardware failure.

Consider backing up projects at appropriate stages throughout a job, rather than waiting until the work is complete.

## Auto-Saving

T3RRA software automatically creates backup copies of project data while you are working. Autosaving helps protect against data loss if the application closes unexpectedly or the tablet PC experiences a software or hardware failure.

The autosave interval can be configured under **Settings &gt; Advanced**.

Autosave files are stored in the same location as the active project and use the same project filename with an additional **`.backup`** suffix.

![z6joaqe05ap9sysucaciimjxg7ck3xnwvpwmw-png.png](https://docs.t3rra.com/uploads/images/gallery/2025-03/scaled-1680-/z6joaqe05ap9sysucaciimjxg7ck3xnwvpwmw-png.png)

## Recovering an Auto-Saved Project

When an existing project is loaded, T3RRA checks for a corresponding autosave file.

If an autosave exists and has a **newer date and time** than the saved project, T3RRA will prompt you to choose whether to load the newer autosaved version.

This allows work completed since the project's last manual save to be recovered following an unexpected shutdown or other interruption.

## Manually Recovering an Auto-Save

An autosave contains the same project data format as a regular T3RRA project and can also be recovered manually if required.

Using Windows File Explorer, locate the appropriate autosave file and **make a copy before modifying it**. Rename the copied file by removing the `.backup` suffix:

`ExampleProject.tci.backup` → `ExampleProject.tci`

The recovered copy can then be opened as a normal T3RRA project while retaining both the original project and autosaved version.