2. Creating Projects
- Main page/ New Project page
- Supported files for Importing
- Importing files
- Loading Projects
- Saving and Auto-saving
Main page/ New Project page
When T3RRA software is first opened this will be the first screen you see, this screen is also what you will be directed to when you press the ‘New Project’ button on a Wizard page (discussed in the Wizard section).

Points to note
- The file name currently loaded will be displayed at the top of the screen if you are not using ‘Full Screen’ mode.
- The name of the software (T3RRA Cutta, T3RRA Ditch, T3RRA Plane, or T3RRA Survey) will be displayed.
- The version (v2.99 above) will be displayed.
 Full Scrn - this option allows you to switch T3RRA software between full screen mode or windowed mode. This is helpful if you need to be looking at other pages on the tablet at the same time as using the T3RRA software. If a keyboard is attached you can use the shortcut of F11.
 Day, Night, & High Contrast modes - These are different variations of displaying the screen.
Day mode (1): classic white (the mode used in the manual).
High Contrast (2): inverts the colours of classic white.
Night mode (3): Has a black background and a green foreground.
 Settings - After the T3RRA software has started the first step is to confirm the correctness of your software configuration. The different settings and how they operate will be covered in the next section.
 Open Manual - The ‘Open Manual’ button will download a digital copy of the manual and install it on your device. After the manual has been downloaded, pressing the same button will open the manual.
 Report - The report button opens up a bug report/feature request window (shown below) allowing you to report issues to T3RRA. The name and email address fields of this window are automatically filled using the details linked to the software licence. You must be connected to the internet for this to work.
Supported files for Importing
Because T3RRA software normally reads .tci “project” files, external files need to be imported using the 'Import' button on the initial screen. The following files are able to be imported and converted into the tci format.
NOTE: T3RRA Design can be used to convert many other file types for use in T3RRA software
- Raw elevation points (survey data)
- Drain paths
- .CSV
- .PCTXYZ
- Full field surveys
- .CSV
- .PCTXYZ
- John Deere
- RCD log
- ADAPT log
- SWM Survey
- MyJD Field Operation (Internet required)
- Survey Data
- .KML
- Existing digital elevation models
- JSONGrid
- ESRI ASCII
- Field Level II
- AGPS Design File
- Trimble Grid .xyzout format
- Complete control files
- Drain paths
- John Deere Ditch Tracks (SWP Ditch Tracks)
- Full field
- Field Level II
- Drain paths
- Drain paths
Importing files
Because T3RRA software normally reads .tci “project” files, external files need to be imported using the 'Import' button on the initial screen.
NOTE: T3RRA Design can be used to convert many other file types for use in T3RRA software
NOTE: T3RRA Apply is unable to import data, and can only work with designs from other T3RRA projects.
 In T3RRA software we make a distinction between loading a project, and importing data. When we refer to “loading” it concerns the opening of a native T3RRA .tci project file. When we refer to “importing” it refers to a 3rd party data file. Whereas a .tci file will load in a single step there are sometimes multiple steps to importing data as the data may need to be changed or altered during the import process, or there may need to be decisions made during the import in order to get the correct data.
The following guide shows the steps required to successfully import a file.
1) To import a file from an external source first press the import button on the Main Page or from the “Collect” step. You can import more data at any time. If you have a keyboard attached (e.g. Desktop in the office), press Ctrl+I.
2) Next press the button for the type of file you are trying to import on the left hand side, then click “Pick File” and select the file you wish to import.
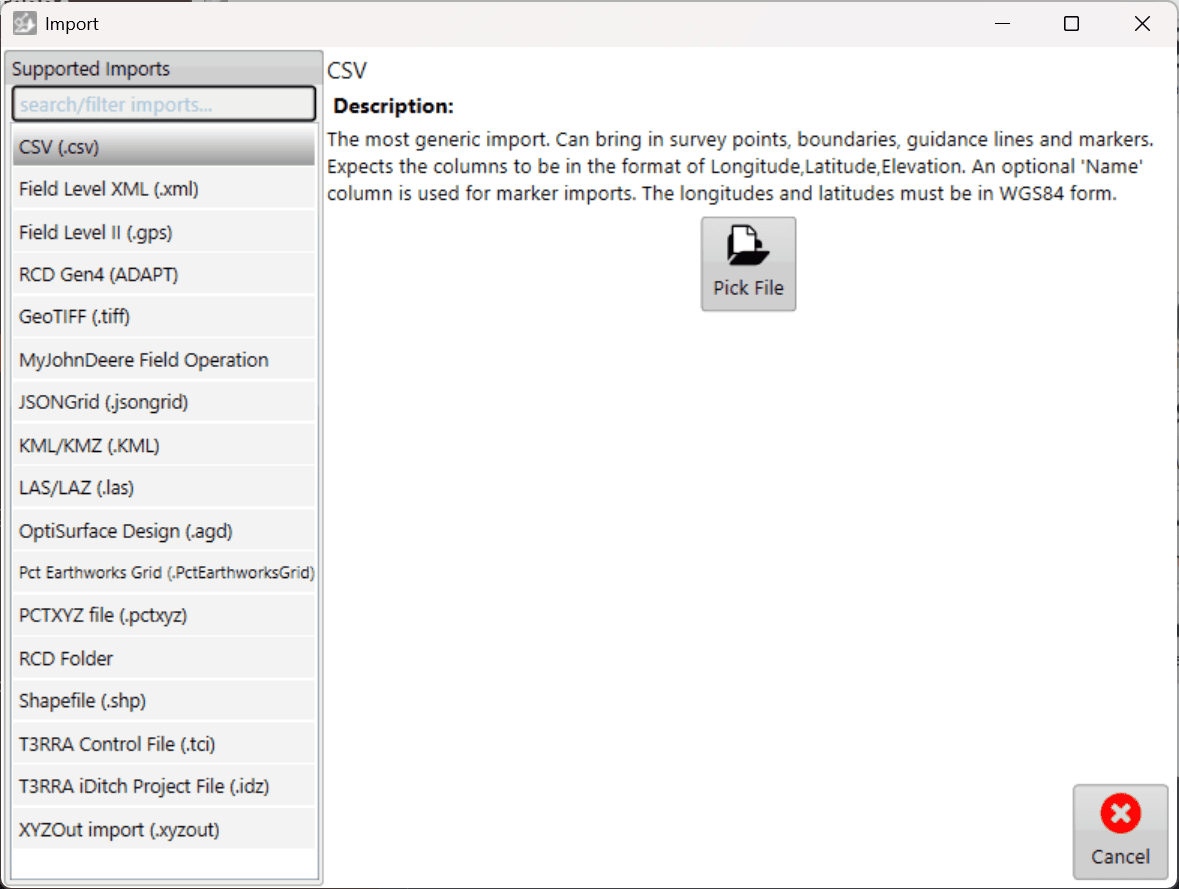
3) For some imports you might need to specify extra information, such as projection information. Once you’ve provided the required information, click “Read” in the bottom right corner.
For CSV import, the longitude and latitude values must be in WGS84 form.
4) You will now be able to select which data you wish to import. On the right is a preview of all the data to be imported.
NOTE: If the auto-detected data type is incorrect, you can change it using the drop downs.
Click “Import” to start working with the imported data.
5) After data has been imported, surfacing and design options can be applied.

NOTE: elevation survey point data that has been imported will have surfacing done automatically.
Loading Projects
 The ‘Load proj.’ button is used to load any saved T3RRA projects. T3RRA projects can be loaded in several different ways, allowing you to load files saved directly to your tablet or from external sources such as USB’s.
To load a project press the 'Load proj.' button in the top left corner or bottom center of the main/new project screen.

Select the project that you wish to load from the desired field and press 'OK'
The ‘Grower/Farm/Field’ file structure allows for projects to be easily organized. For more information on these profiles and how they are set up see later in this section.
Next to each file there are 3 buttons:
 The left button with an image of a pencil and paper is a file renaming option.
- The center button with a trash can is a delete option allowing you to remove that file. Deleted files are moved to the Windows Recycling Bin.
- The right button with the image of 2 folders is a file moving option, this brings up the same window you have when saving a file in T3RRA software allowing you to move the project to a new location.

'Find manually' can be used when files are not saved in the default T3RRA folder structure. Project files are normal Windows files and can be stored anywhere on the computer.

Use the file explorer to find the T3C project file, then select the file and press the ‘Open’ button.
Choosing 'Show all files' will start a scan of your computer's C: drive. A list of the T3RRA Cutta project files will be populated once the scan has been finished.
Entering text in ‘Search’ will limit the displayed projects to only with matching file names.

Progress bar in the lower right indicates scanning in progress
Once the desired file has been found in the list, select the file and press ‘Ok’.
Once a file has been selected and loaded, the wizard page should appear and show the stage that the project is up to. If applicable, you can proceed directly to implementation.

When ready you should press 'Start' to implement your design. You will need to accept the Disclaimer to begin machine control.

Saving and Auto-saving
Save project
 Saving a project allows you to return to it at a later time and ensures that you have a copy of the data in case of accidents. We STRONGLY recommend periodic saving of your projects in order to guard against data loss.
 The ‘Save project’ button can be found in the top left corner on any of the main wizard pages.
 The 'Save proj.' button presents you with a screen that allows you to save using the following structure.
You can enter:
- Grower
- Farm Name
- Field Name
- Project Name
Or you can choose a previously saved value in any of the fields from the drop down list.
Pressing the final 'Ok' will save the project and add the file T3RRA’s structured file saving area.
'Manually Choose Location' allows you to select an alternate location to save to.

When manually choosing the save location there are two ways of navigating to where you would like to save the file.
- You can use the left portion of the window to navigate through folders to find the desired save location.
- Using the main section in the centre of the window you can navigate to the desired file save location.
NOTE: Project files are normal Windows files and can be stored anywhere on the computer. We recommend that you regularly copy your files to a location off the in-cab tablet in order to have them stored safely in case anything happens to your tablet.
Autosaving
T3RRA software autosaves project data, You can adjust the frequency level in settings under the advanced tab. This is to assist in case of accidentally closing the software, or software or hardware failure.
Autosave files have the same name and location as the open project, with the additional suffix ‘.backup’.

When a project is loaded a check is made to see if a backup exists for that project. If it does and the backup has a newer date/time stamp associated with it, you will be given the option of loading it.
An autosave file has the same format as a regular project. From within Windows Explorer you can rename the autosave file and remove the .backup extension in order to keep both the original file and the autosaved version.