# Workspace layout
# What's on the Screen
The screen for T3RRA Design Plus can be broken into 3 main sections:
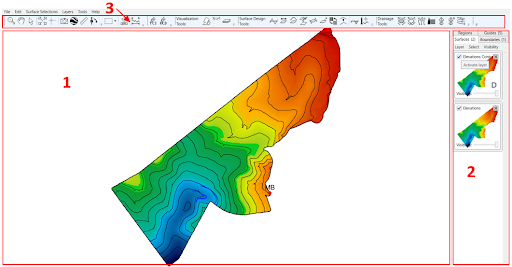
1. The ‘Working Area’. Elevation surfaces, designs and surface overlays are displayed in this area.
2. Layer selection panel. This panel displays the layers of a project and will tailor the available tools in the toolbar (section 3) for each layer type (surfaces, boundaries, regions, guides).
3. Menus and Toolbar. The menus provide advanced tools and options to adjust how T3RRA Design Plus operates. The tools that are currently available change depending on the layer type chosen in the layer selection panel (section 2).
NOTE: Tools that can be used on all layer types need to be reselected when the layer selection changes.
# The Working Area
‘**The Working Area**’ of T3RRA Design Plus displays the topmost selected layer from each of the different layer types in the layer selection panel.
To keep your design from getting cluttered, turn some layers off. You can do this on the right by clearing the checkboxes on unwanted layers or dragging the visibility adjuster for each individual layer.
When T3RRA Design Plus is first opened, the working area will display a notice that there are no active layers and that you should activate some. It will also show where you can find more information about T3RRA Design Plus, including current news and tips.

When you do create or import an active layer, there are some additional areas of information to make note of which may be helpful:
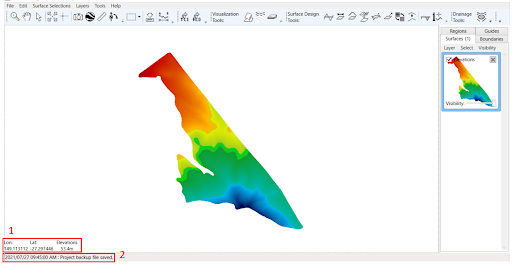
1. Shows the latitude and longitude of the position of your mouse. If your mouse is over a surface, the elevation height will also be displayed.
2. Displays a time stamp of the last action taken in T3RRA Design Plus.
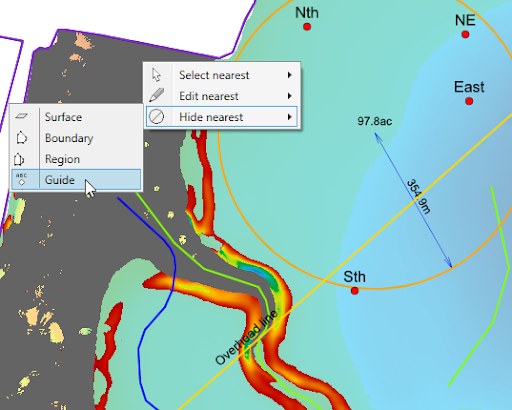Once you have several layers defined, it is easy to work with them by right-clicking near an item on the map. From there you can select, edit or hide the nearest item. This action is only available when not using a tool or editing a layer.
Access keys are defined too - for example, after right-clicking near a drain path, you can press E, G to edit that specific drain. Combined with pressing Escape to finish editing, updating guides and overlays can be done very efficiently.
# Layer Type Selection
On the right side of the screen is the layer type selection panel. This panel allows you to select any layer to view it in the working area, as well as change which layers are currently visible. Four different types of layers are available:
- Surfaces
- Boundaries
- Regions
- Guides
Each layer type has specific tools relating to them, which can be found in two separate places. Firstly, the tools displayed in the toolbar will update and change to match the selected layer type.
Secondly, located under the tab there are three other menu options: Layer, Select and Visibility.
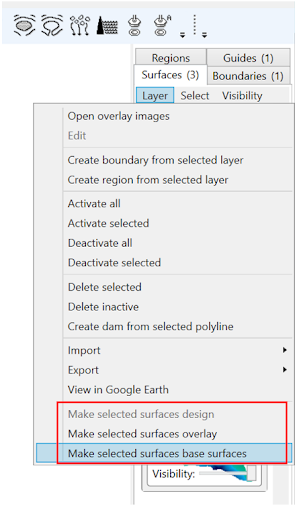
The Layer menu offers various tools and changes depending on the layer type selected. See more here.
The Select and Visibility menus have similar options for each layer type, these are:
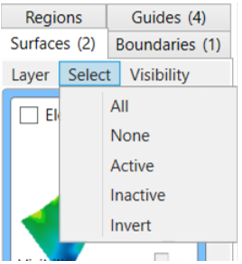Select Menu:
- All - selects all listed layers.
- None - deselects all listed layers.
- Active - selects all layers which are active (checkbox selected).
- Inactive - selects all layers which are inactive (checkbox not selected).
- Invert - selects just the layers that are not selected.
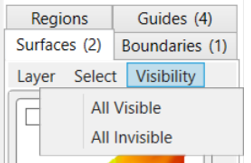Visibility Menu:
- All Visible - will make all listed layers visible
- All Invisible - will make all listed layers invisible
NOTE: The toggle bar on each individual listed layer square can be used to make layers visible/invisible also
# Surfaces
Types of Surfaces
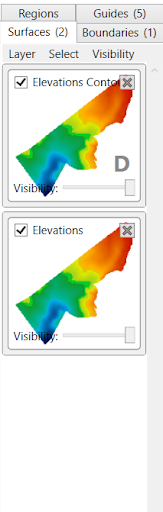
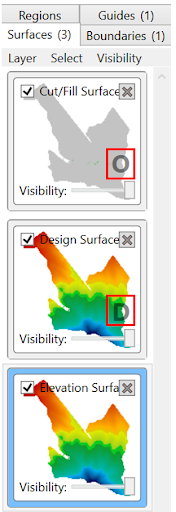
Within T3RRA Design Plus, Surfaces are categorized into the following (depicted here):
- Base - denoted by no letter in the tile
- Design - denoted by the letter ‘D’ in the tile
- Overlay - denoted by the letter ‘O’ in the time
These are important to take note of as many functions with T3RRA Design Plus require certain surface types (i.e. Design surfaces are required when exporting files, creating a Cut/Fill Surface requires both a Base surface and a Design surace).
Should you need to change the category of a surface, you can do this by:
Selecting the necessary surface > Layer > Selecting either of the three options to change to the desired surface type
Surface Tools

The tools specific to surfaces fall into three main groups:
- Surface design
- Drainage
- Surface Derivatives
Surfaces are the primary layer type for work in T3RRA Design Plus, however many of the surface tools are dependent on other layer types being present. For example, the surface design tools require a boundary to be present.
These are explained in more detail in Surface Design Tools
# Boundaries, Regions and Guides
**Boundaries**

The toolbars specifically for Boundaries are:
- Boundaries
T3RRA Design Plus boundaries are used to limit the extent of a design. They are different to regions in that they typically outline the entire project area.
After a surface is imported into T3RRA Design Plus, a boundary will need to be either imported or created to tell T3RRA Design Plus where the desired edges of the surface are.
These are explained in more detail in Boundary Tools
**Regions**
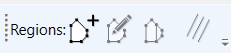
The toolbar specifically for Regions are:
- Regions
Regions in T3RRA Design Plus are flexible and easy to place. Non-linear shaped regions can be easily made by using the point-to-point creation tool or the line split tool. Regions can be used to split a design surface into many sub-surfaces, allowing the user to easily modify multiple parts of the surface independently.
These are explained in more detail in Region Tools
**Guides**

The toolbars specifically for Guides are:
- Guides
Guides are typically used as visual markers and aids when designing. The guides are powerful when visualising and planning the project and can be leveraged to design from and modify the surfaces with many of the tools available. It is possible to add:
- Labels at specific points, useful as benchmarks and references
- Straight and segmented lines, and AB lines
- Polygons to indicate specific areas (however, use regions to design in specific areas)
- Strips
- Circles
These are explained in more detail in Guide Tools