# Regions Tools
# Region Tools overview
When the Regions tab is selected on the right hand side, the relevant tools will be accessed in two different areas. Firstly, on the menu bar (this changes depending on which layer type is selected) and is explained below in Regions Design Tools and secondly, in the Layer menu on the selected tab and is explained in Regions Tools - Layer Menu
***Regions Design Tools***

Regions are a method of dividing a field or alike. Regions allow you to work with multiple fields separately in one project.
# Point to Point region creation
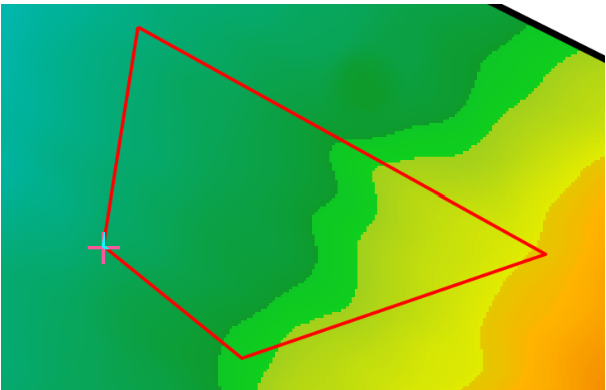This tool lets you create custom regions. When using the creation tool, the cursor will change into a cross. Each left-click will add another corner to the closed region space. To finish adding points to the region, double-click where you would like the final point to be.
# Edit Region nodes and edges
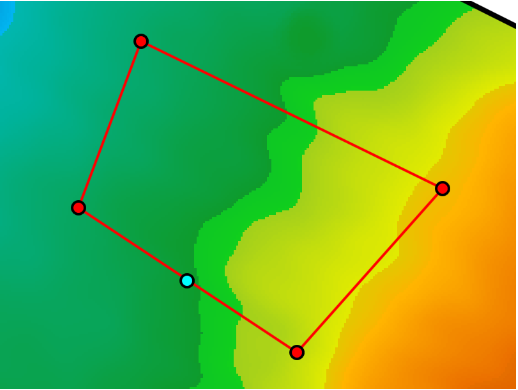This tool is used to make changes to an existing region. Start editing a region by right-clicking on the map near it and choosing Edit nearest > Region. Alternatively, select a region layer in the layers panel on the right then press the edit button. While editing, red dots are shown at each corner of the region. Each of the red dots can be dragged with the left mouse button to adjust the shape of the region.
To insert a new node, hover over a region line and click the blue dot that appears. The blue dot will turn red and become draggable. To remove a node, right-click it. To remove an edge from a region, right-click the edge.
# Split Region using Cut line
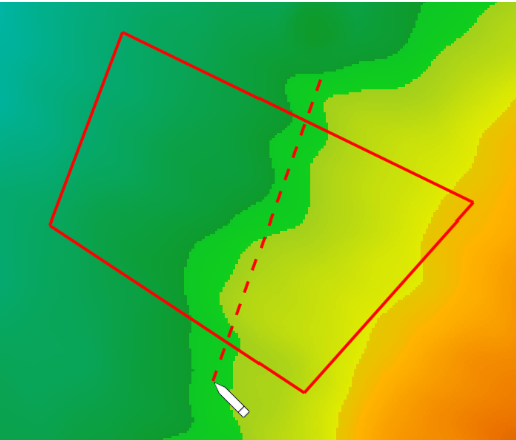The ‘Cut line’ tool allows you to place a line to split a single region into two. This is useful when you wish to create different designs on different sections of the surface.
To use this tool ensure that you have an existing region selected in the layer selection.
To make a cut, left-click at one end of where you would like to cut and move the cursor to the other side. A red dotted line will appear along where the line will be cut. Make sure that this line intersects with at least two other lines of the existing region. When you are sure about the placement of the line left-click on the ending point to cut the region. Right-click to cancel the region cut.
# Region Multi-Slicer
The region multi slicer makes it easy to slice a region into many smaller ones. All cuts made with this tool will follow the same direction and will be parallel to each other.
To use this tool, make sure that you have a region layer selected.

When the tool is selected, it will automatically generate a set of lines. The yellow anchor points can be used to edit the size and positioning of the slices.
- ‘Strip width’. This value controls how far apart each line is. This option allows for precise control over the width.
- ‘Strip count’. This value controls the number of lines that will be used to cut the field.
- ‘Segment length’. This option controls the length of the lines used to cut the region. Adjusting the value here has the same effect as moving the yellow circle anchor.
- ‘Total width’ and ‘Total length’ are not adjustable options − they are for display only, and are calculated from ‘Strip width’ and ‘Segment length’.
- ‘Bearing’. This option is a more precise method of adjusting the heading of the lines. The ‘East/West’ and ‘North/South’ buttons set the heading to follow directly along those directions.
Once all changes have been made, press the ‘Apply’ button to make the cuts on the selected regions, or the ‘Cancel’ button to back out of this tool.
# Regions Tools - Layer Menu
- 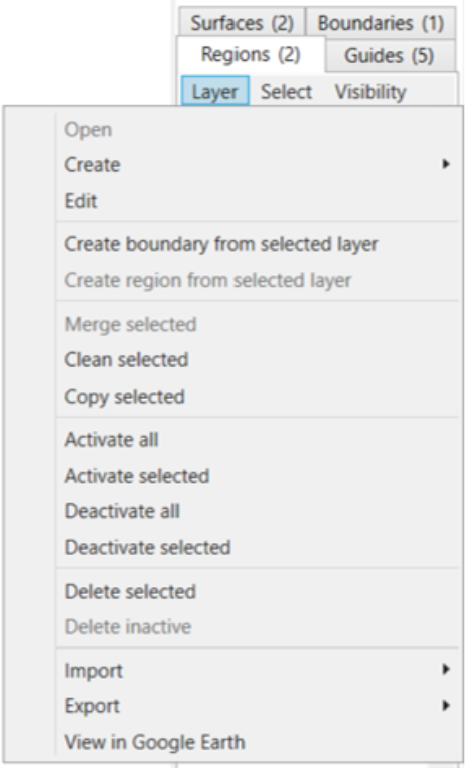Open
- Create >
- Create from saved surface
- Create from selected surface
- Create from saved boundary
- Create from selected boun
- Edit
- Create boundary from selected layer
- Create region from selected layer - this will draw a region around the most outer points of the selected surface and will populate a new region in the Region tab
- Merge selected - (ensuring you have 2 or more boundaries selected) this will create a combined boundary, removing the initial boundaries
- Clean Selected - See below
- Copy selected - this will duplicate the selected boundary
- Activate all - this will activate all the boundaries so they are visible on the Working Area. This is shown by the checkbox being selected.
- Activate selected - this will activate the boundary which is selected (shown by the tile having a blue highlight around it) so it is now visible on the Working Area. This is shown by the checkbox being selected.
- Deactivate all - this will deactivate all boundaries
- Deactivate selected - this will deactivate the boundary which you currently have selected (shown by the tile having a blue highlight around it)
- Delete selected - deletes the boundary that is selected (shown by the tile having a blue highlight around it)
- Delete inactive - deletes all inactive surfaces (i.e. those without a tick in the checkbox)
- Import >
- Import Shapefile
- Import KML
- Import Multiplane Boundary
- Import DXF points/linework
- Export >
- Export selected to Shapefile
- Export selected to KML
- Export selected to Text Columns (CSV, TSV, etc)
- View in Google Earth - this will open the selected surface in Google Earth
NOTE: You must have Google Earth Pro installed on your PC for this to work.
***Clean Selected explained***
Clean selected attempts to simplify and clean the regions by combining points that are very close together (<1mm). It also occurs when dragging nodes and splitting.
In general splitting and editing regions will attempt to reduce the number of points in the region by detecting points that end up close to each other. This can be really helpful when creating internal voids in a region. To do so, add 3 points on the edge of a region, then drag the middle one to where you want your void. Add points near the middle point to go around the void. Then drag the last point you add right on top of the 'middle' point (you may need to zoom in to get it close enough). When you are prompted to simplify/combine, choose Yes. Combine the two points at the edge in the same way. Now you have an internal void.