# T3RRA Cutta Desktop Manual
How to use T3RRA Cutta Desktop, our field analysis and design tool that has a similar look and feel to our in-cab products.
# Setting up T3RRA Cutta Desktop
# Hardware
## Choosing a PC to run T3RRA software
Windows & OS maintenance
Requirements:
Windows 11 (64 bit)
Recommended:
Intel i5 or better processor (manufactured 2021 or newer)
>= 8GB RAM (more RAM facilitates larger fields)
>= 256GB HDD
Integrated or better graphics card
Serial port (preferred) or USB port
Windows updates should be performed whenever an error is encountered or a new version of T3RRA software is downloaded. We suggest doing updates and testing software prior to the earthmoving season each year.
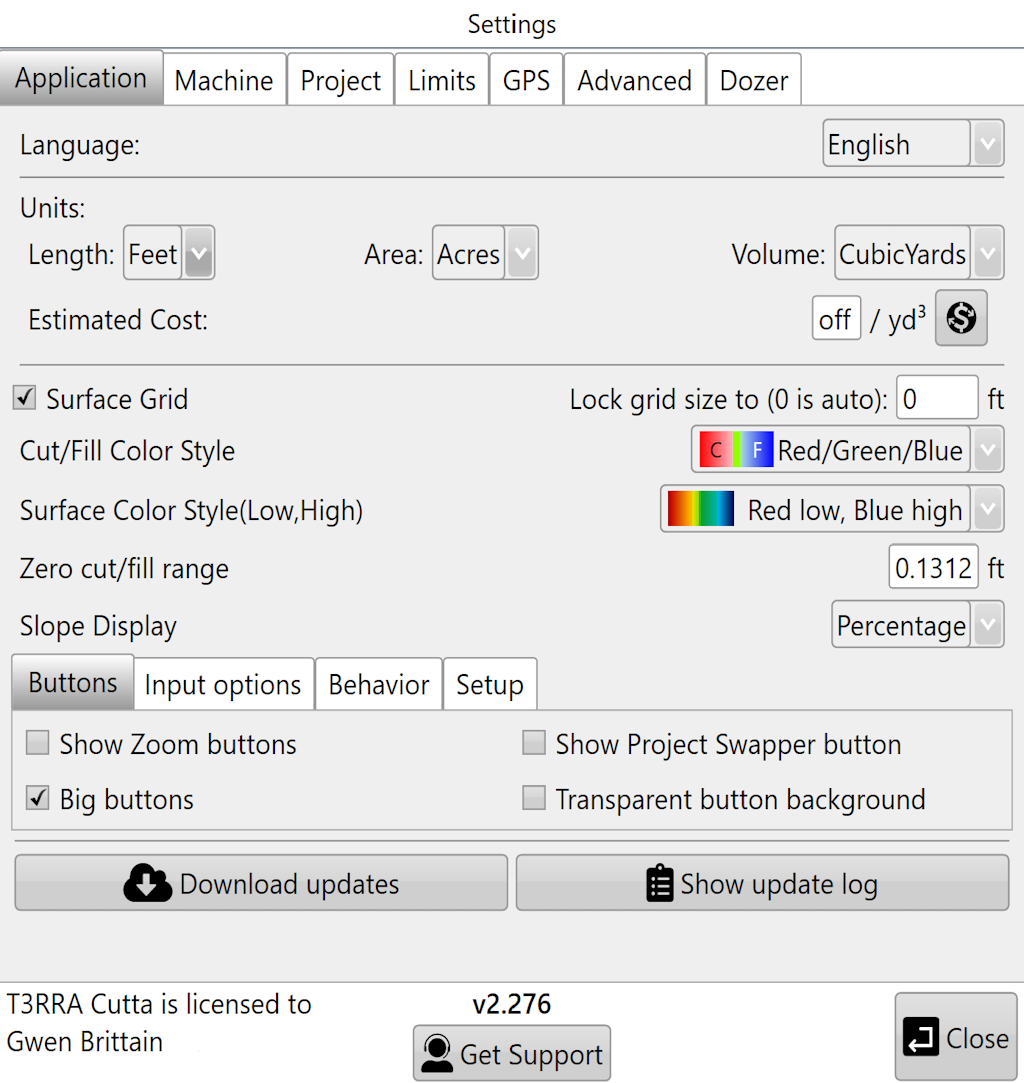
REMEMBER to update T3RRA software after installation. Best practice is to regularly connect your PC to the internet at home or in the office to provide adequate time for software updates to occur and successfully install. After completing your earthmoving jobs, update your T3RRA software by opening the ‘Settings’ window, choosing the ‘Application’ tab, and then clicking ‘Download Updates’.
If you are using antivirus software, help T3RRA Cutta run without interference by adding an exclusion for the T3RRA Cutta folder for your username. For more information, see [T3RRA software will not install](https://docs.google.com/document/d/1RNfeigY7utPoMsvrRS_3KnyfgzvPcrv305fHwjMDmJ8/edit#heading=h.9y21nlbxopg4) in [Troubleshooting](https://docs.google.com/document/d/1RNfeigY7utPoMsvrRS_3KnyfgzvPcrv305fHwjMDmJ8/edit#heading=h.9wh5o68fyu60).
Our software will run on any 64bit Windows 11 PC. It will run on a desktop, a laptop, or a tablet. It will work with a regular mouse and keyboard.
We expect all users to carefully consider the impact of a hardware failure, and the time lost due to waiting on a replacement, on their operation. If the potential losses from PC failure are high they should not consider the consumer grade PC option, or at the very least should have a backup option that can be quickly implemented.
The modern PC is a highly capable machine with the ability to run many different software applications and to be used in many different roles. We ask customers to consider the impact of using their PC for other activities. There are software programs and usage activities that can use up disk and processor resources. This may result in sluggish performance when running T3RRA software, and should be avoided.
NOTE: Maintaining your PC is extremely important. Perform both Windows updates and T3RRA updates on regular intervals.
# Installing T3RRA Cutta Desktop Software
- Make sure you have a good internet connection and your computer has the latest Windows updates installed.
- T3RRA software is normally installed by your dealer. Refer to Dealer T3RRA Install Manual. You will need the standalone T3RRA Cutta Desktop installer and the unlock code.
Windows & OS maintenance
Requirements:
Windows 11 (64 bit)
Recommended:
Intel i5 or better processor (manufactured 2021 or newer)
>= 8GB RAM (more RAM facilitates larger fields)
>= 256GB HDD
Integrated or better graphics card
Serial port (preferred) or USB port
Windows updates should be performed whenever an error is encountered or a new version of T3RRA software is downloaded. We suggest doing updates and testing software prior to the earthmoving season each year.
REMEMBER to update T3RRA software after installation. You can learn more about updating by following the link [How do you update?](https://t3rra.freshdesk.com/en/support/solutions/articles/51000404024-how-do-you-update-) in the [Updating T3RRA software](https://t3rra.freshdesk.com/en/support/solutions/folders/51000450914) folder. Best practice is to regularly connect your tablet to the internet at home or in the office to provide adequate time for software updates to occur and successfully install. After completing your earthmoving jobs, update your T3RRA software by opening the ‘Settings’ window, choosing the ‘Application’ tab, and then clicking ‘Download Updates’.
If you are using antivirus software, help T3RRA run without interference by adding an exclusion for the T3RRA folder for your username.
# Updating T3RRA Software
# How do you know an update is available?
The software will check on startup to see if an updated version is available. This only happens if the computer or tablet on which it is running has an active internet connection. If so, one of two messages will be displayed briefly in the bottom left corner of the main window. One will note that the software is up to date and no update is available. However if an update is available the message will indicate the version number of this update.
# How do you update?
Navigate to the ‘Settings’ window and tap the 'Download updates' button on the 'Application' tab. If you are online and an update exists, downloading of the update will begin immediately.
A window will appear showing the progress of the download. When complete you will be prompted to close the software and re-open it. At this time the upgrade process will be complete. A strong internet connection is recommended for updating.
# When should you update?
Don’t fix what isn’t broken! If the software is doing everything you want then don’t tempt fate by changing anything. In particular don’t update the software while in the middle of an operation. Only update if there is a clear problem apparent, or if you have been advised to do so by your dealer.
# What should you do if updating causes more problems than it fixes?
There is a provision to revert updates if needed. This is not a process that should normally be necessary, or that is recommended to be performed by customers. Please contact T3RRA or your dealer for information about this.
# Hardware
# The Main Pages
# Main Page
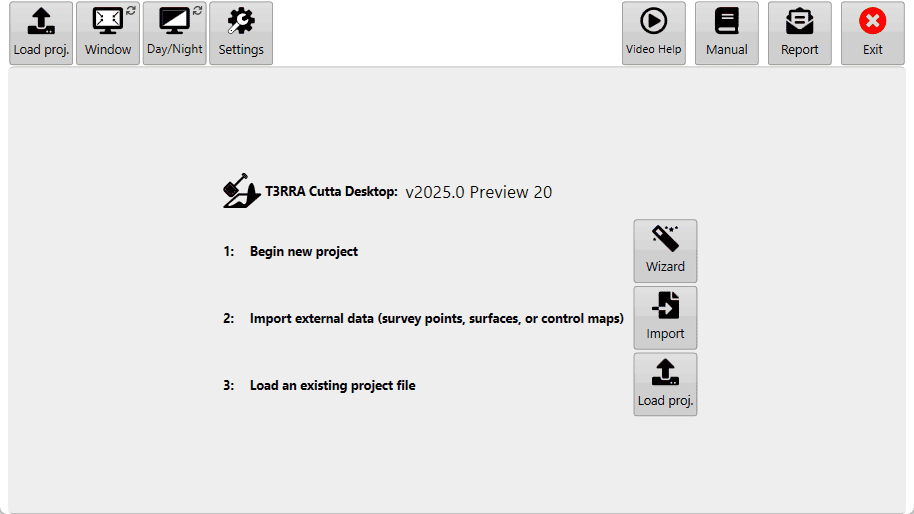
When T3RRA software is first opened this will be the first screen you see. This screen is also shown when you press the ‘New Project’ button on a Wizard page (discussed in the Wizard section).
[](https://docs.t3rra.com/uploads/images/gallery/2026-03/uAyPuXqhgkv29Hba-image.png)
Points to note:
- The file name currently loaded will be displayed at the top of the screen if you are not using ‘Full Screen’ mode.
- The name of the software will be displayed.
- The version (v2023.2) will be displayed.
## In the center
When you open T3RRA Cutta Desktop anew, you'll usually want to choose one of these three options. You can start a new project in the wizard, jump straight to importing data, or load an existing project.
[](https://docs.t3rra.com/uploads/images/gallery/2026-03/pxF42thWvmOGHydf-image.png)
**Wizard** - Tap this to enter the wizard and start collecting data for a new project. It leads you through the process of collecting, surfacing, design and applying the new design.
[](https://docs.t3rra.com/uploads/images/gallery/2026-03/QnqHktnEPnTA5dL5-image.png)
**Import** - Tap this to import external data from any of a variety of sources. This could be from files like CSV and LandXML, or John Deere Ops Center. For more information, see the [Import page](https://docs.t3rra.com/books/t3rra-cutta-desktop-manual/page/import-page "Import page").
[](https://docs.t3rra.com/uploads/images/gallery/2026-03/huvDviZGd0bNMFtX-image.png)
**Load proj.** - Tap this to load a previously saved T3RRA project (\*.TCI). This allows you to continue where you left off last time. For more information, see [Loading Projects](https://docs.t3rra.com/books/t3rra-cutta-desktop-manual/page/loading-projects "Loading Projects").
## Along the top

Window - this option allows you to switch T3RRA software between full screen mode or windowed mode. This is helpful if you need to be looking at other pages on the tablet or computer at the same time as using the T3RRA software. If a keyboard is attached you can use the shortcut of F11.
Day, Night, & High Contrast modes - These are different color schemes for the software.
Day mode (1): Classic white (the mode used in the manual).
High Contrast (2): Is an inverted version of classic white.
Night mode (3): Has a black background and a green foreground.
| For a YouTube video tutorial on contrast adjustment visit [https://youtu.be/b-YLq5bELTk](https://youtu.be/b-YLq5bELTk) or use your phone to scan this barcode
| 
|
| For a YouTube video tutorial on sending reports visit [https://youtu.be/YzdzwxzxydU](https://youtu.be/YzdzwxzxydU) or use your phone to scan this barcode.
| 
|
| For a youtube video tutorial on grid size override visit [https://youtu.be/9rlCn1VuGlo](https://youtu.be/9rlCn1VuGlo) or use your phone to scan this barcode
| 
|
Don't import a TCI file - Load it instead. See [Loading Projects](https://docs.t3rra.com/books/t3rra-cutta-desktop-manual/page/loading-projects "Loading Projects") for more information.
If you see the one you want, tap it, but you can also search for the import using the text box at the top. Once you've selected your import type, tap the **Pick File** button on the right and navigate to your file(s).
[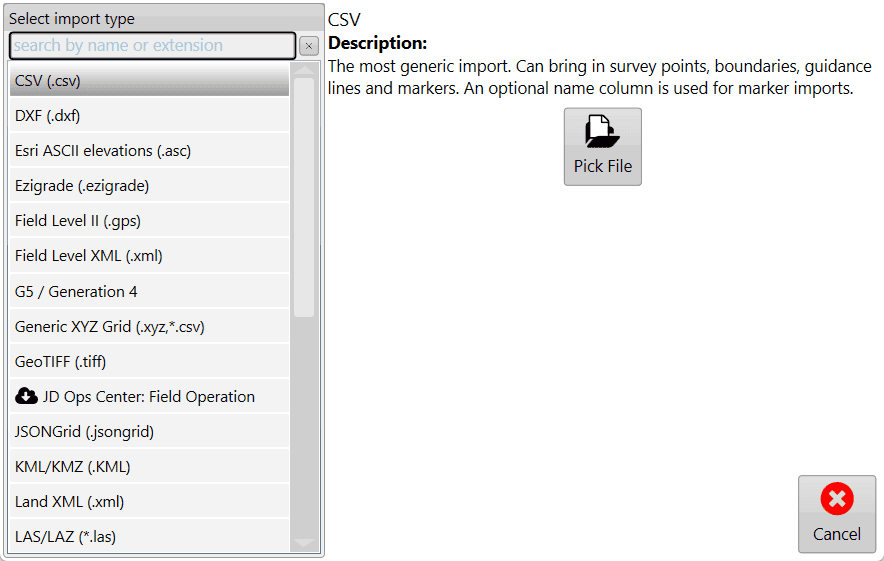](https://docs.t3rra.com/uploads/images/gallery/2026-03/fTk7S4wfSdzZ7Ast-image.png)
Once you've selected the file(s) to import, if any more information is required, more options will be presented. In this case (LAS/LAZ), it gives you an opportunity to filter point classifications and the projection. If you picked the wrong file, tap **Change File**, otherwise, tap **Read** to continue with the import.
[](https://docs.t3rra.com/uploads/images/gallery/2026-03/3efORK6t3sq27uuP-image.png)
The file(s) are then read and the contents available for import are listed. It's here that you can edit the details about each item found. For surfaces, you can mark them as Elevation or Design, and for points, you can mark them as surveys, drains, linework, markers, or boundaries. Once you're satisfied with your edits, tap **Import**, and you'll be able to work with your data.
[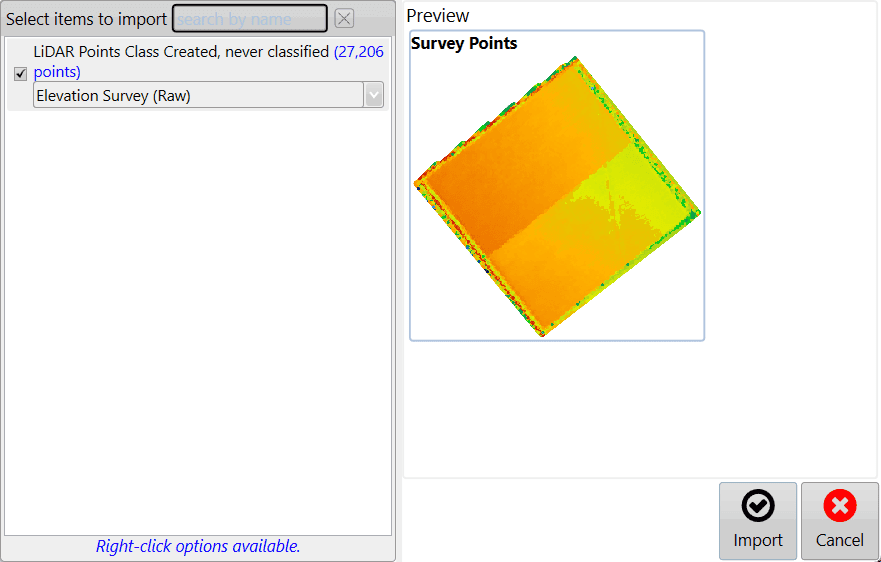](https://docs.t3rra.com/uploads/images/gallery/2026-03/OkVgOlW76CeVlhjx-image.png)
# Common tools found in the Wizard
# Zoom Control
### 
There are multiple methods available for zooming your map.
The first method that can be used is the 2-finger pinch controls (if using on a tablet). By pinching your fingers together on the screen you can zoom out and by moving your fingers apart you can zoom in. You can also use the scroll button on your mouse.
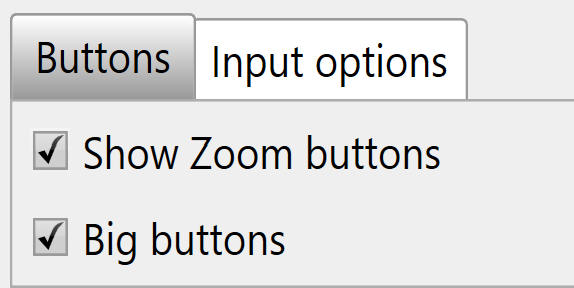
The alternate method is the use of zoom in and zoom out buttons that can be added to the bar along the top right.
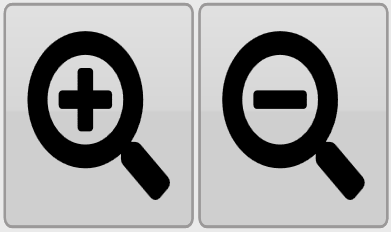
The zoom buttons are not shown by default. To enable these buttons check the 'Show zoom buttons' box under ‘Settings > Application’.

Independent of these zoom controls is the 'Zoom to full' button, this button does NOT need to be enabled. When pressed the button zooms the map in or out to the maximum size that shows the entire surface grid of the map.
# Image Overlays
### 
‘Image overlays’ allows geo-referenced image data to be imported into a field.
The image overlay is accessed by pressing the View button at the top of the screen (Shown right).
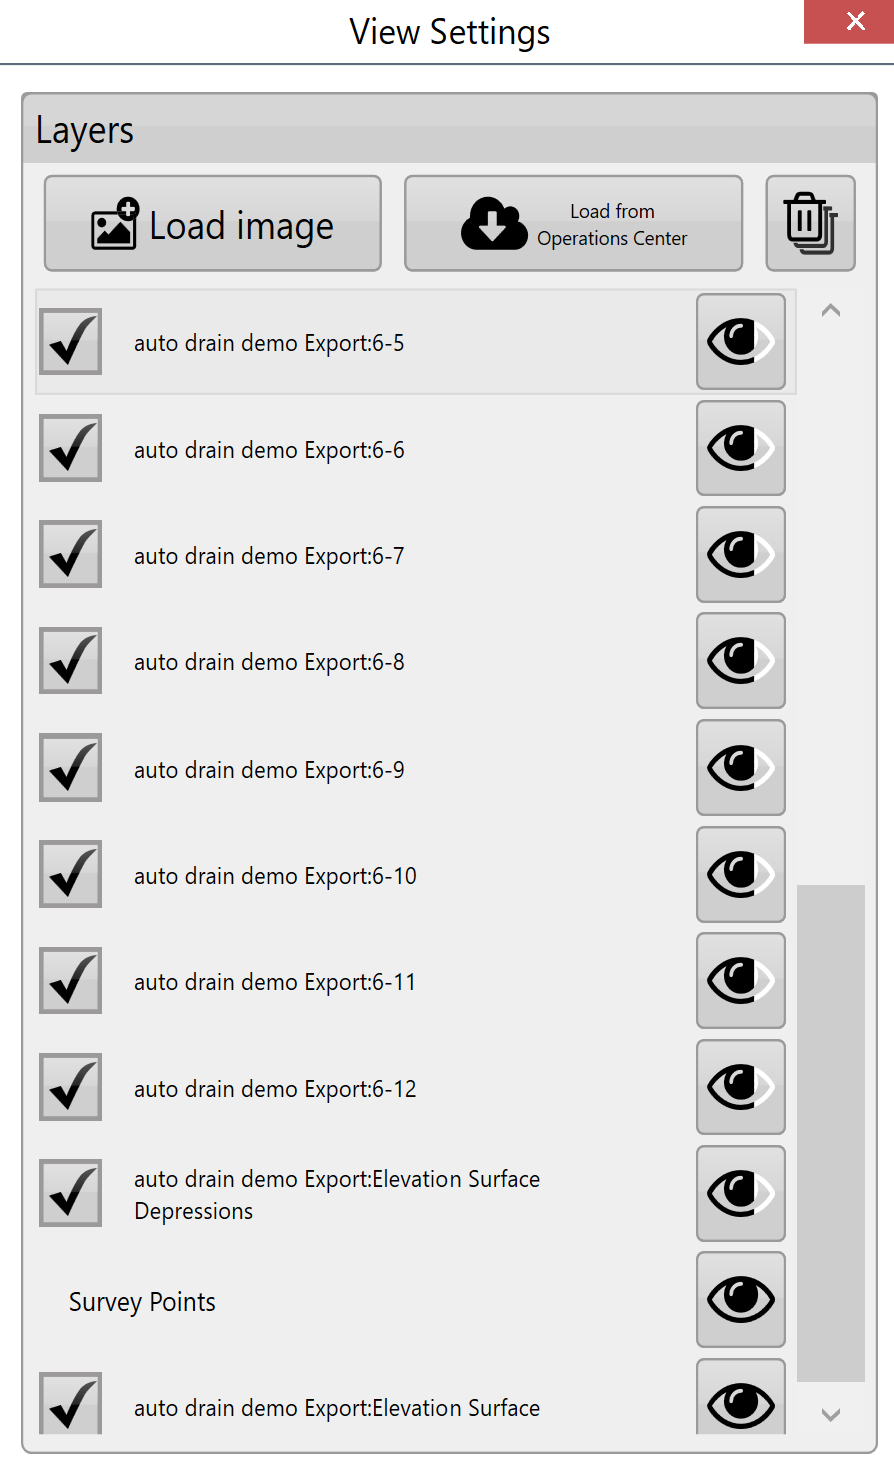
Load image - This is the primary method for adding overlay images to the field. When the button is pressed a file window will open to select the desired file. The file types that are currently supported as overlay images are .KML and .TIFF.
Load image from JDOC - Images from the John Deere Operations Center can be downloaded into the image overlay. This is useful for comparing previous data (such as yields) with current survey data.
Delete images - Overlay images can be deleted by unchecking the box next to them and pressing the ‘delete images’ button. This will delete the layer from the available list.
Transparency - Overlay images can be set to be transparent so that layers below them can be seen. Check the box to the left of the layer and then press the transparency button on the right side.
Layers - Pressing on any of the layers will cause it to be displayed over the others. Drag layers to adjust where they ‘sit’ on the image.
# Choose Mode - 2D or 3D
#### Mode
2D View - By default the map will be displayed in a 2D aerial view.

3D View - When switching to 3D view the map will show all the terrain as small hills and valleys. In this viewing mode if you press the vertical scale magnifier (shown here) it will increase the exaggeration of these hills and valleys so that they can be more easily identified. The focal point when viewing in 3D can be changed by quickly double tapping on a position.

# View
When viewing a map you have a variety of display options.
#### Surface
This refers to the source for the 3D topography and coloring of the map. There are 6 options:

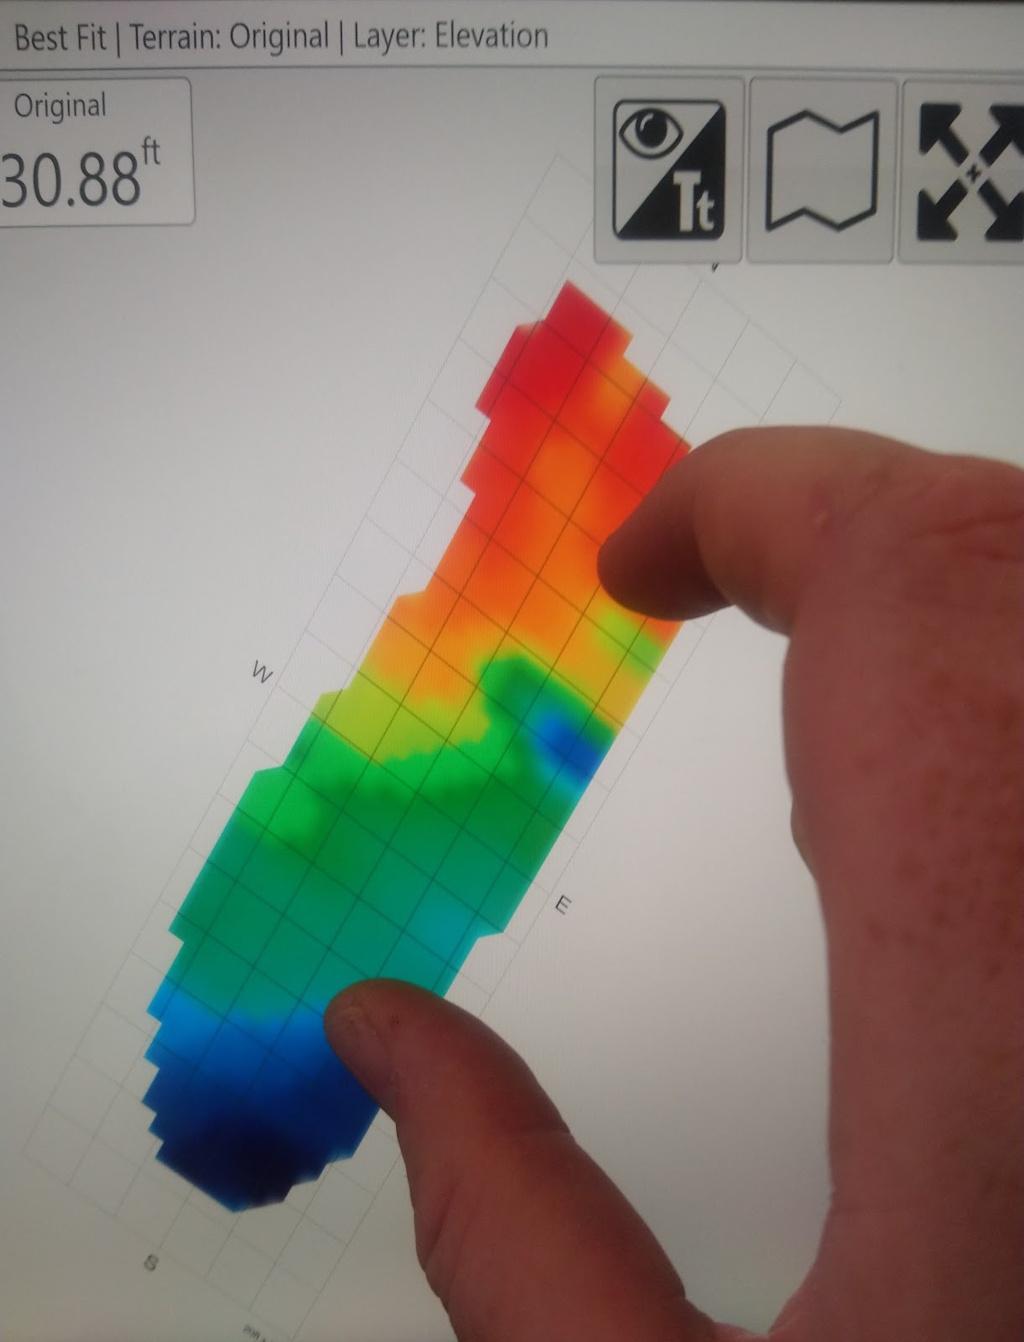
Elevation - This terrain viewing mode shows the map as the original surface prior to any dirt being moved. Displays the map in a Red to Blue gradient scale with Red being low areas and Blue being high areas.
Design - This viewing mode shows the design that has been applied. This is the surface that you are attempting to reach at the end of the dirt moving process. Has the same color scheme as Elevation.

(Legend range is decided by both Elevation and Design surfaces.)
Cut/Fill - Shows where the design will be taking dirt from and where it will be putting it. Coloring of this layer depends on the current Cut/Fill color scheme (Settings > Application).

(Cut/Fill legend shows histogram.)
Satellite image - Toggles satellite image background on and off. The eye changes the visibility of the image to link to google earth.
#### Layers
Various defined layers can be turned on and off here. This includes the current surface (see above), depressions, drains, linework, and overlays such as KML that have been loaded. The buttons at the top allow you to load and clear layers, and beside each layer is a transparency toggle button. Click the button to change its transparency.

NOTE: The depressions layer is not shown if the project only has drains (and no elevation surface).
| For a youtube video tutorial on modes and layers visit Markers[https://youtu.be/x5FrylWjpfk](https://youtu.be/x5FrylWjpfk) or use your phone to scan this barcode
| 
|
| For a youtube video tutorial on setting markers visit [https://youtu.be/sk7BdYk62K8](https://youtu.be/sk7BdYk62K8) or use your phone to scan this barcode
| 
|
| For a youtube video tutorial on Inline offset visit [https://youtu.be/O9Sgkx-DffM](https://youtu.be/O9Sgkx-DffM) or use your phone to scan this barcode
| 
|
| For a youtube video tutorial on editing points visit [https://youtu.be/Q0581DSU7j4](https://youtu.be/Q0581DSU7j4) or use your phone to scan this barcode
| 
|
NOTE: It is possible to create different design types in different regions. You can have a best-fit plane in one region, and a multi-fit surface in another, for instance.
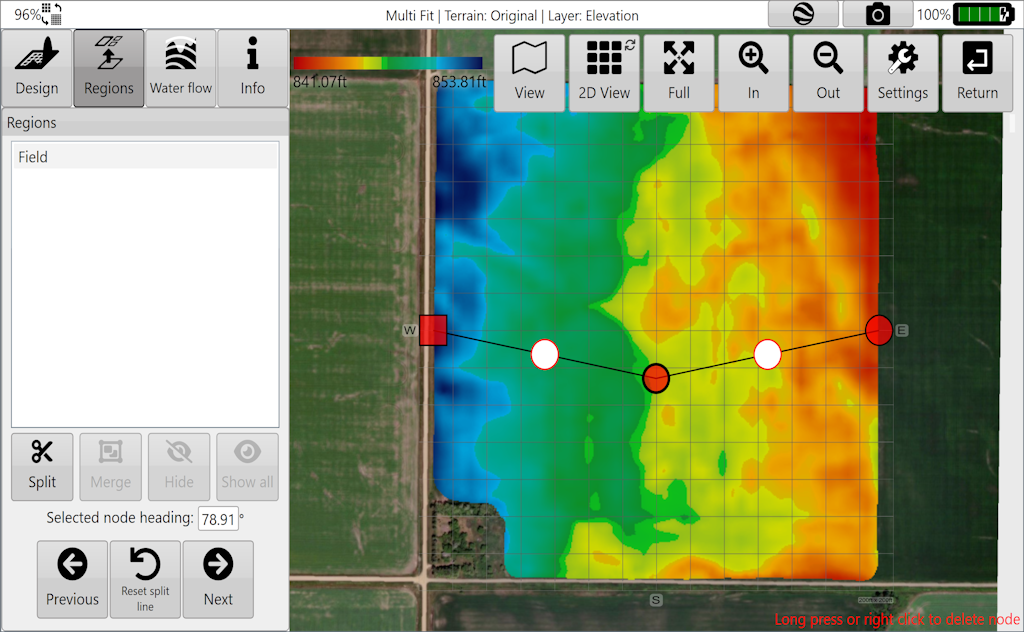
Regions are created by moving a splitting line across two edges of an existing region, or whole field if no regions exist. The split line is set by moving **Point A** and **Point B** into position. The line can be positioned by moving the points directly using the touchscreen or mouse. The split line is straight, but tapping and dragging the white nodes let you create multi-segment splits. In addition, you can split multiple times, then merge regions to make complex region shapes.
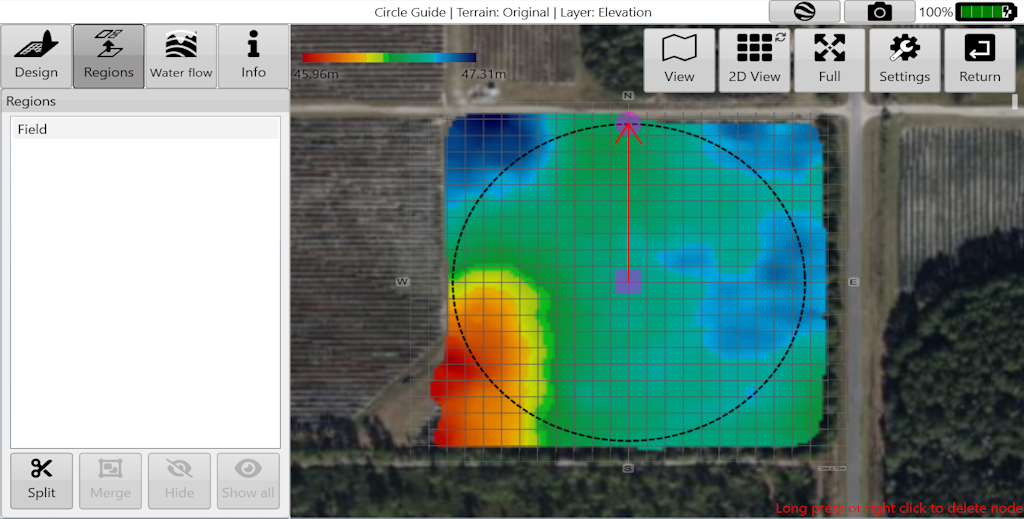
In the Circle Guide and Levee design tools, the region split uses the circle/levees instead of a line. This is great for creating custom region splits for things like pivot irrigation fields and rounded corners.
The '**Split**' button confirms the “split” on the selected area.
The '**Merge**' button will merge regions selected in the list into one region.
You can merge regions that are far apart. Also, if you find a region that has two separate areas, you can split it by positioning the split line between the two parts and pressing the '**Split**' button.
The ‘**Hide**’ button will delete whatever design exists with the selected region(s). At this point the region will not exist as a separate area that can accept designs. It can, however, still have full-field designs applied to it.
The ‘**Show all**’ button will restore all hidden/deleted regions.
Press the '**Design**' button when you have finished adding your regions.
In certain design functions (multi-fit, best-fit, smoothing, and levees) different regions can be selected from a drop down menu allowing you to make design changes to only the selected region.
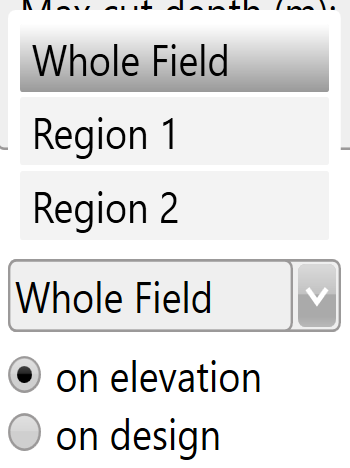 Choose to apply your design to the original elevation surface or to the design surface.
# Rainfall Simulator
#### 
One of the many unique features of the T3RRA product suite is our inclusion of a rainfall simulation tool. This allows a very visual and easily relatable analysis of how a field surface affects water runoff and ponding.
It should first be used after a survey and prior to any design being placed on the field. The intent of this is twofold:
1. To verify that the created surface does in fact truly represent the field. By looking at the water flow, a person familiar with the field will usually be able to say “Yes, that is the normal pattern of water runoff I would see”. In this case the operator can be confident that the survey has created an accurate model of the field. On the other hand, if the simulation produces results that are not expected it may be wise to critically revisit the survey and perhaps collect more data.
2. To compare the design with the original surface. It is expected that the design will result in a pattern of drainage different to the original. Analyzing the design will quickly tell you if the new surface is going to have the effect on drainage that you expect.
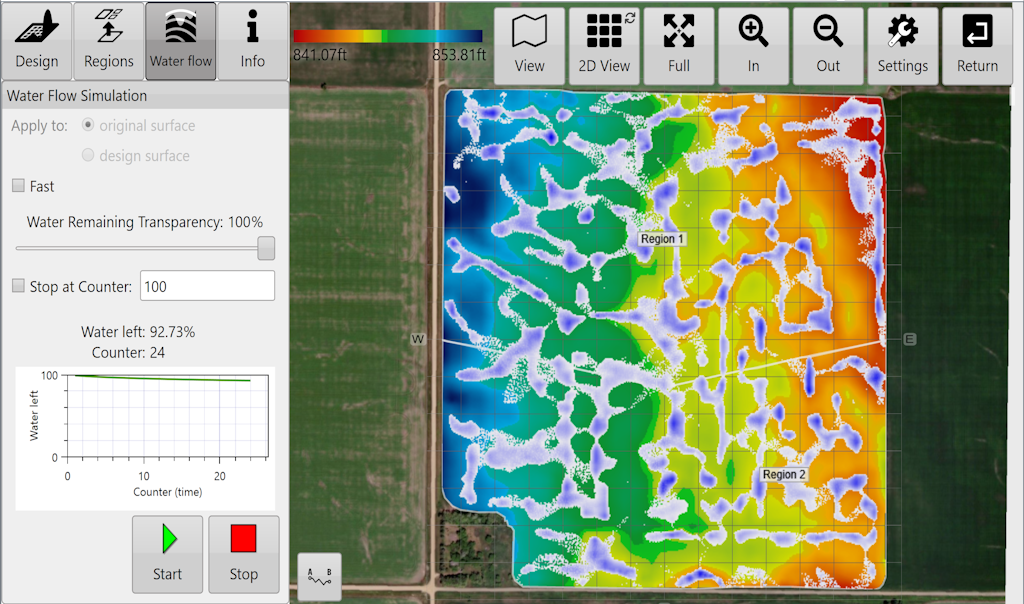
The rainfall simulator cannot tell you how long a field will take to drain. There are simply too many variables, such as the soil type, the soil moisture level and the soil depth before reaching hardpan. Such a calculation is beyond the scope of this software. It can however provide you with an indication of how much faster one design will be over another. You can do this by comparing the iteration counter value of two different designs at a given drainage % value. Even so, be aware that the timing information of the simulation is qualitative in nature, not quantitative.
| For a youtube video tutorial on the rainfall simulator visit [https://youtu.be/LJ5Vw9Q7tqA](https://youtu.be/LJ5Vw9Q7tqA) or use your phone to scan this barcode
| 
|
The water simulation can be viewed in 2D or 3D just like when examining elevation and design surfaces normally.
# Earthworks Information
Press the 'i' button to view earthwork details.
Note: pressing within the ‘Info’ text box will expand the view to full screen.
Each region will have its own set of earthworks details and cut/fill summary.
Press the 'Records' button (shown as a printer) to save design details (in PDF format) to a folder for record keeping and documentation purposes.
Press the 'Activity Log' button (shown as a clipboard) to view the activity that a file has undergone. This includes things like file save times and when/what design functions have been applied to a file.
Note: formerly there was a KMZ and Upload to John Deere button on this screen. These have been moved to the [Export step](https://t3rra.freshdesk.com/support/solutions/articles/51000404051-exporting-data).
| For a youtube video tutorial on Earthwork information visit [https://youtu.be/U0RB2av-vow](https://youtu.be/U0RB2av-vow) or use your phone to scan this barcode
| 
|
[](https://docs.t3rra.com/uploads/images/gallery/2025-03/uSUimage.png)
For a YouTube video tutorial on Levees, visit [https://youtu.be/V8NLmRCQEx0](https://youtu.be/V8NLmRCQEx0) or use your phone to scan this barcode.
# Analysis Tools
# Overview

T3RRA Cutta Desktop offers several tools for analysis beyond what is included in our In-cab packages. These tools allow the user to further analyze and understand how their design will perform once implementation has been completed.
Circle Guide - Creates a circle for reference on the surface.
Elevation Grid - Overlays a grid with elevation values at each junction.
Flow Paths - Overlays arrows in a grid pattern that show the estimated direction of flow at each junction.
Watershed - Identifies the areas of the surface that will flow together to the same exit point on the field.
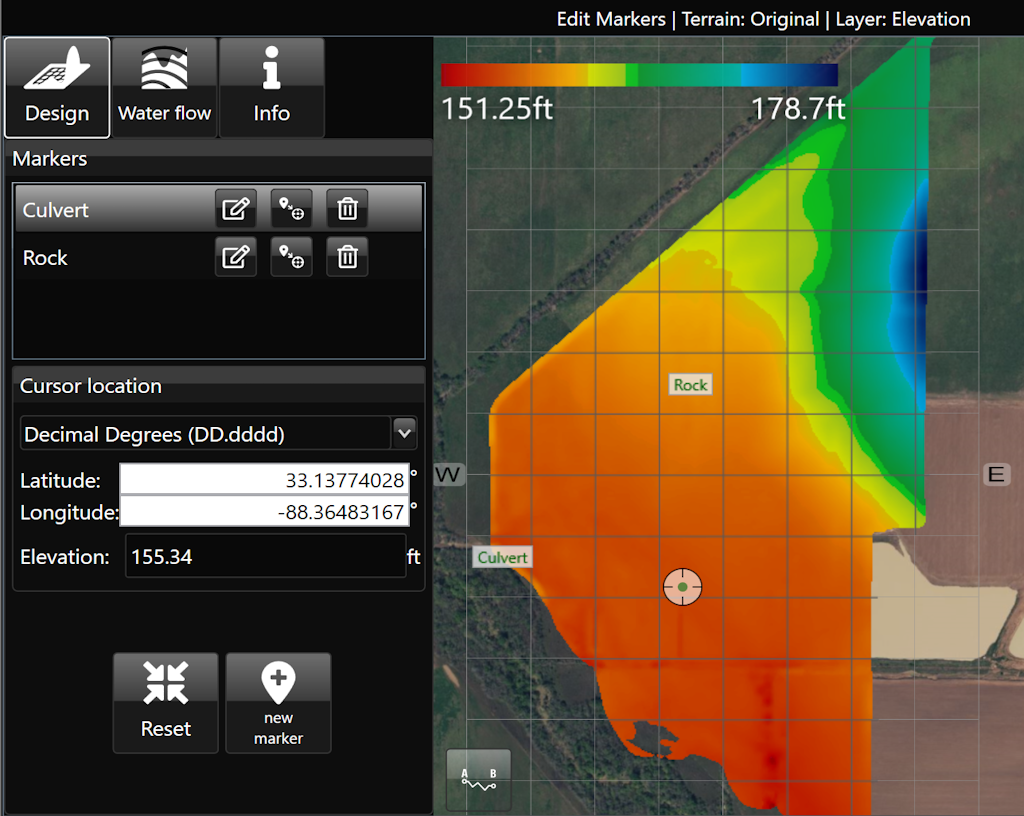
Edit Markers - allows you to view, edit, and create markers on the elevation surface.
# Circle Guide

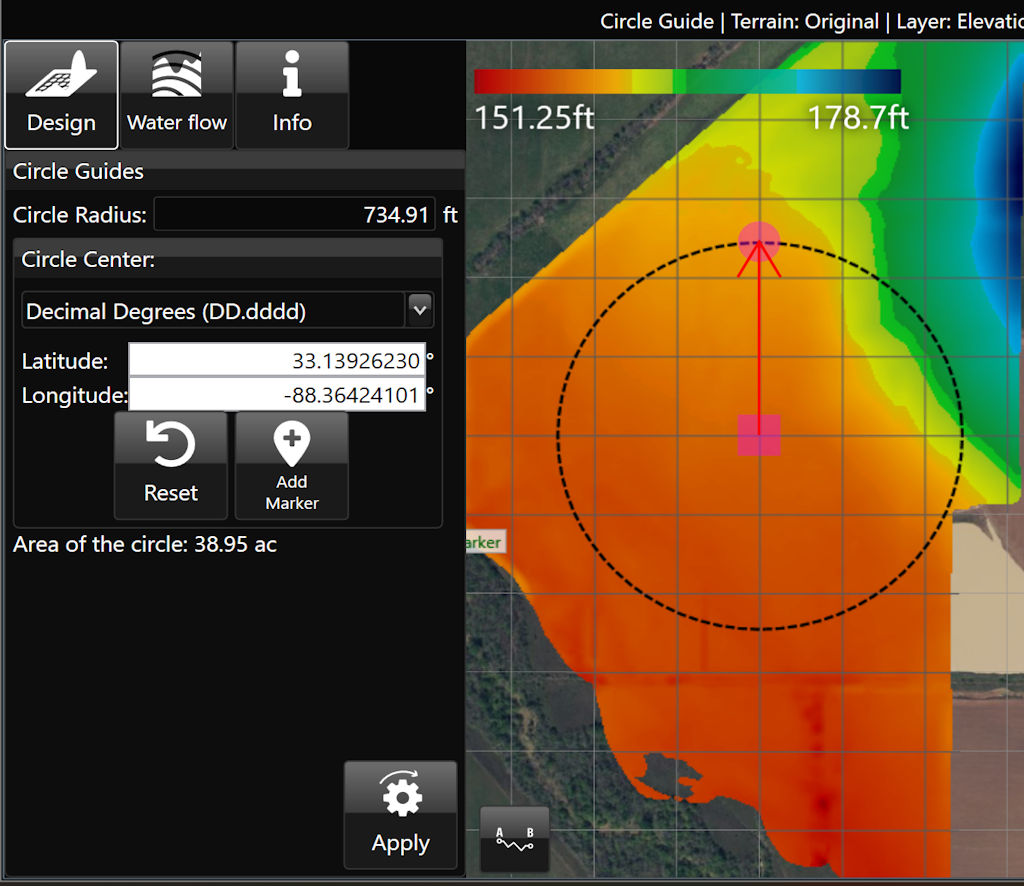
The ‘Circle guide’ tool will display the radius and total area covered by the set circle. To use the tool, drag the square center marker of the circle to the desired point or enter the coordinates. Then, click on the node at the perimeter of the circle and drag it in or out until the desired radius is achieved. Alternatively, you can enter the circle radius if it is known. Hit apply to overlay the circle outline onto the map.
Here is a video on the **[Circle Guide Tool.](https://youtu.be/kmlCQ8V_DFk?feature=shared)**
# Elevation Grid

The ‘Elevations guide’ imposes a grid design on a field in the working area and displays the elevation of points at each junction on the grid.
- ‘Grid cell size’. This option controls the size of the grid. Setting the size to 100m will result in each junction being 100 meters away from its neighbors.
- ‘Alignment angle’ is a method of rotating the grid.
- ‘Decimal places’. Sets how many decimal places will be visible on the grid values.
- ‘Show Raw Elevations’ and ‘Show offset from mean elevation’: These options will adjust what data is present on the grid.

# Flow Paths
‘Flow Paths’ creates a grid on the field with arrows at each junction that point in the direction that water is expected to flow.
- ‘Grid size’. Adjusting this value will make the individual squares of the grid larger or smaller.
- ‘Alignment angle’. This option allows you to change the direction of the grid. The direction is set as the position of the yellow circle in relation to the yellow square.
- ‘Slope calculation area’. The further to the right that the slider is, the larger the area that T3RRA Cutta Desktop takes as a sample to find the water flow direction.
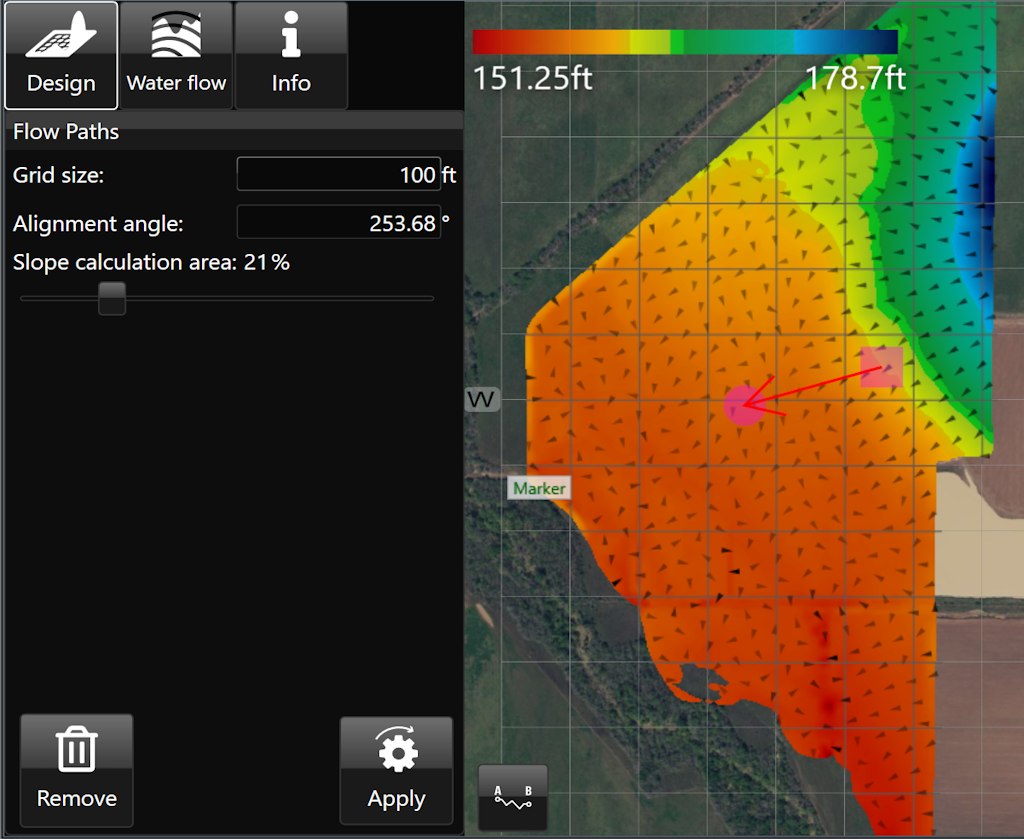
Here is a video on the **[Flow Paths Tool.](https://youtu.be/CotcDrDcMF8?feature=shared)**
# Watershed
The Watershed tool identifies the areas of the surface that will flow together to the same exit point on a field. The working area will display the surface in a patchwork of colors, these indicate your watersheds and what will flow out where. The specific colors do not matter, they are only to help identify individual watersheds.
- ‘Surface smooth strength’ provides control to adjust the level of detail on the surface.
- ‘Segmentation method’ will select a general water event to display watersheds. The options are:
- Hybrid - Immersion and Rainfall event happening simultaneously.
- Immersion - submersion of the surface by water as it engulfs the area as in a flooding event.
- Rainfall- a fall or shower of rain.
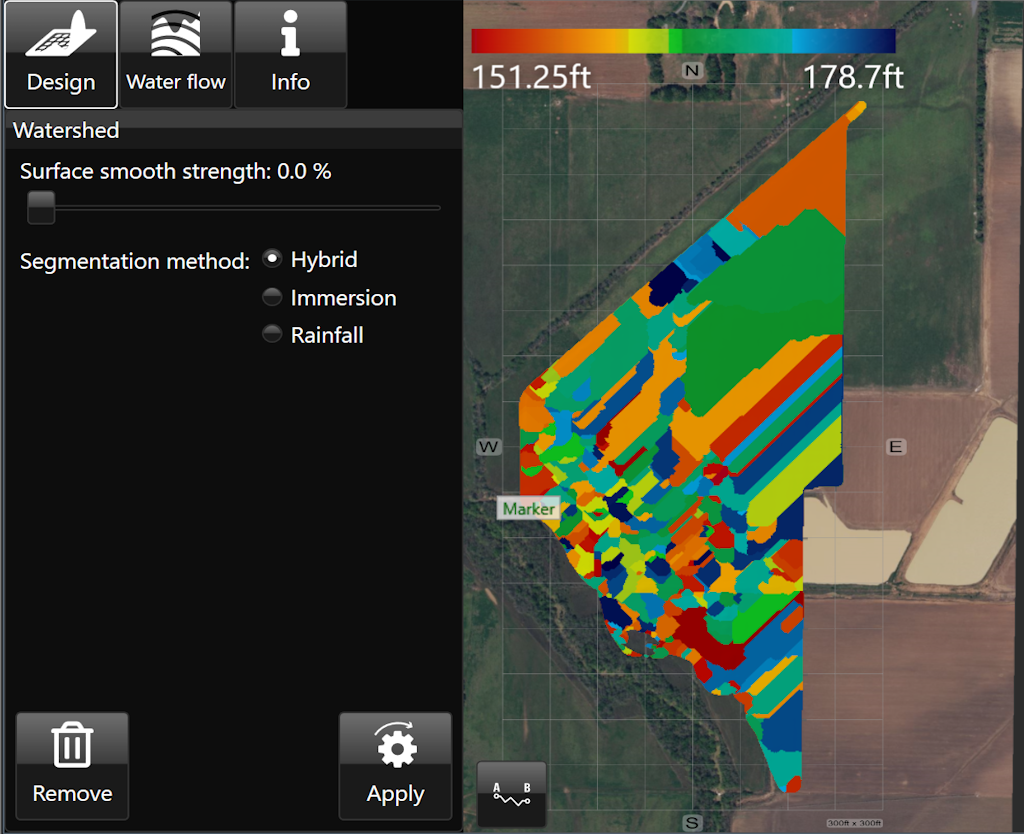
Here is a video on the **[Watershed Tool.](https://youtu.be/3auu7hyCDR4?feature=shared)**
# Edit Markers
'Edit Markers' allows you to view, edit, and create markers on the elevation surface. Each marker is listed by name and includes the Latitude/Longitude as well as the elevation. [**Markers**](https://t3rra.freshdesk.com/en/support/solutions/articles/51000404061-markers) can be moved, renamed, or deleted as desired. Additionally, coordinates and elevation can be entered manually.
# Completing Your Design
# Completing Your Design
Once satisfied with your design surface and/or drain.
1. Select the 'Return' button. (Top right corner)

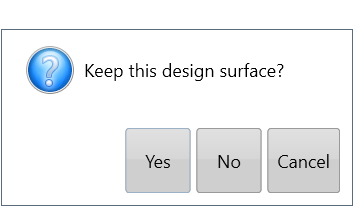
2. Select 'Yes' to keep the design surface.
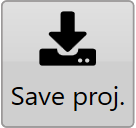
3. Select the **['Save proj.'](https://t3rra.freshdesk.com/en/support/solutions/articles/51000404411-save-project)** button to save the T3RRA project.
# Exporting Data
# Exporting Data
## 
Exporting allows data to be transferred to other programs. If you’re wanting to work within T3RRA, click the **[“Save Proj”](https://t3rra.freshdesk.com/en/support/solutions/articles/51000404411-save-project)** button at the top of the screen - it is far easier to work with this format than exporting and then re-importing the data.
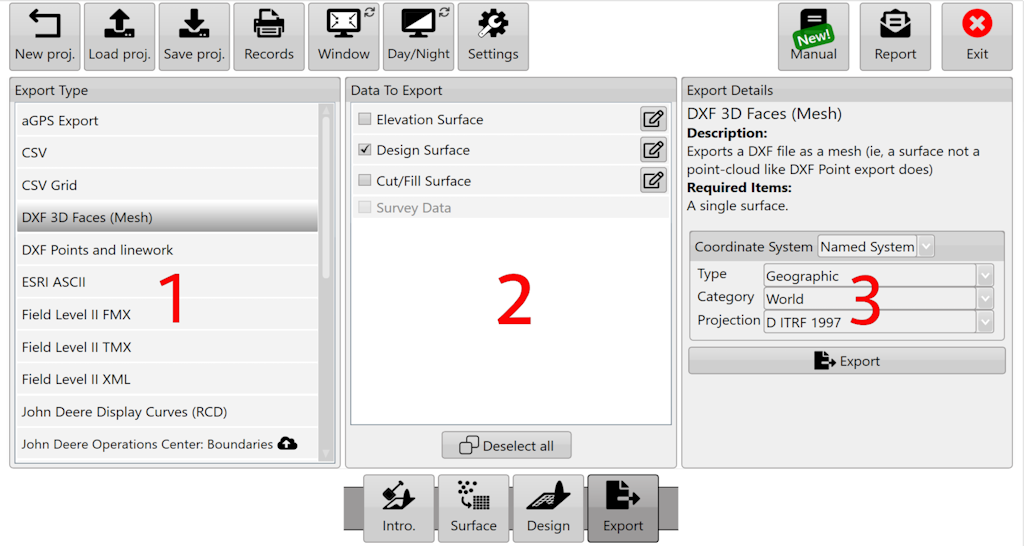
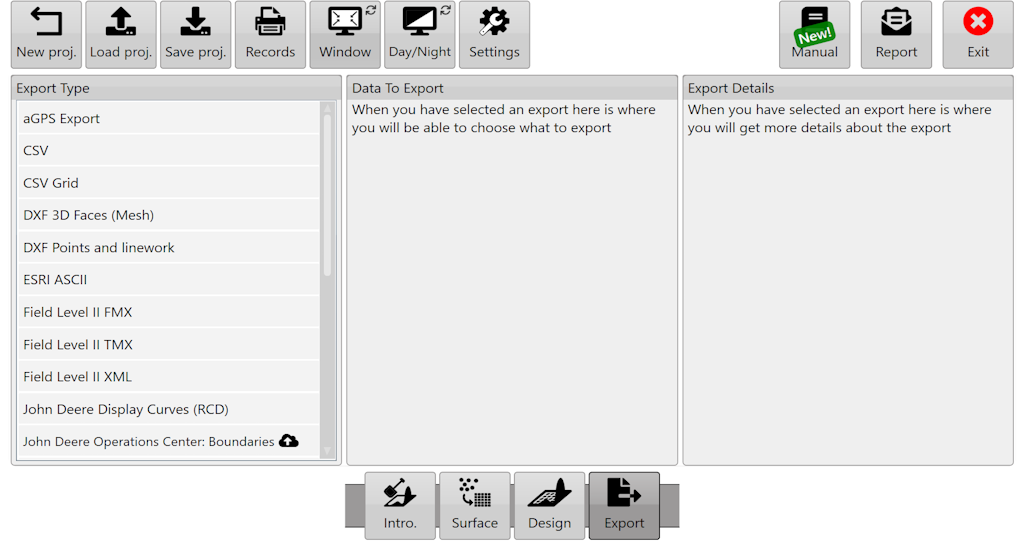
Steps to export data
1. Select the export format you want on the left.
2. Choose the data you wish to export. Clicking the button will allow you to change how the layer is exported (say if you wished to export a design surface as an elevation).
3. Provide any additional information required (such as which projection you need) and click “Export”.
Here is a video on **[Exporting Data.](https://youtu.be/m60FzuQGEdA?feature=shared)**
# Exporting Guidance lines from T3RRA™ and importing into AutoTrac
Remember that guidance lines are only available for Drains, Terraces, and Levees.
Should you wish to export guidance lines from T3RRA software for use with AutoTrac™ be sure to follow the following steps to be sure that the process is successful.
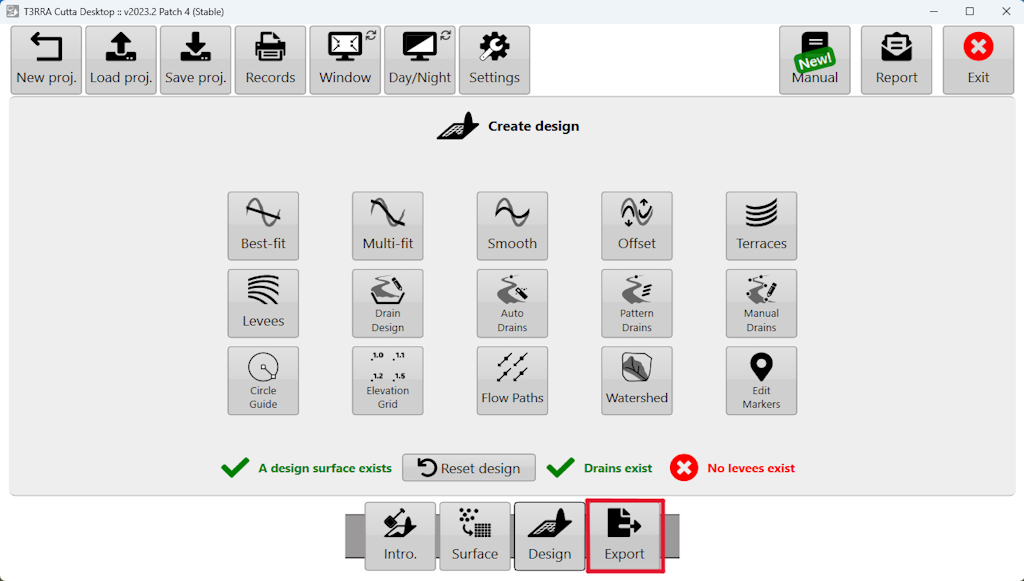
Exporting begins by pressing the Export button.
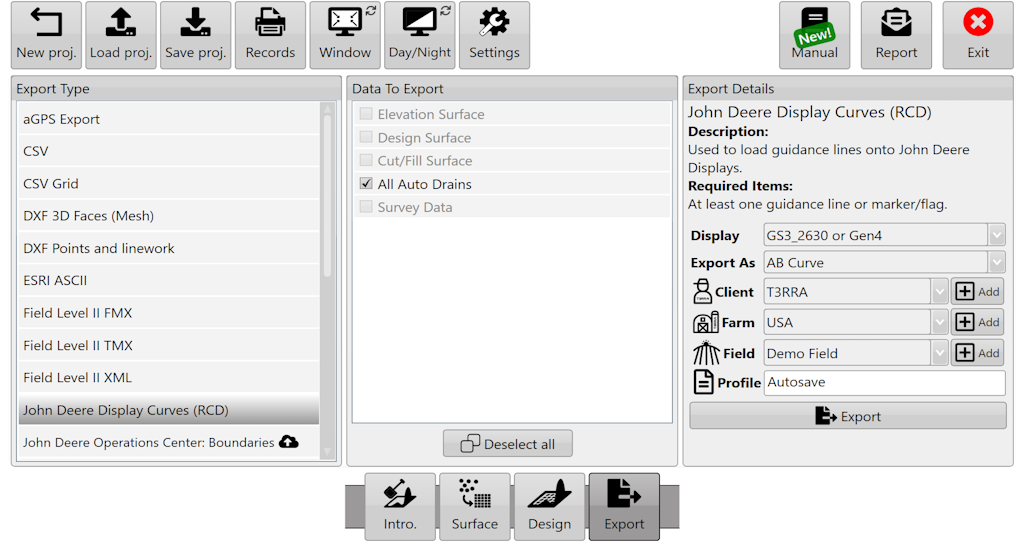
How to export guidance lines from T3RRA
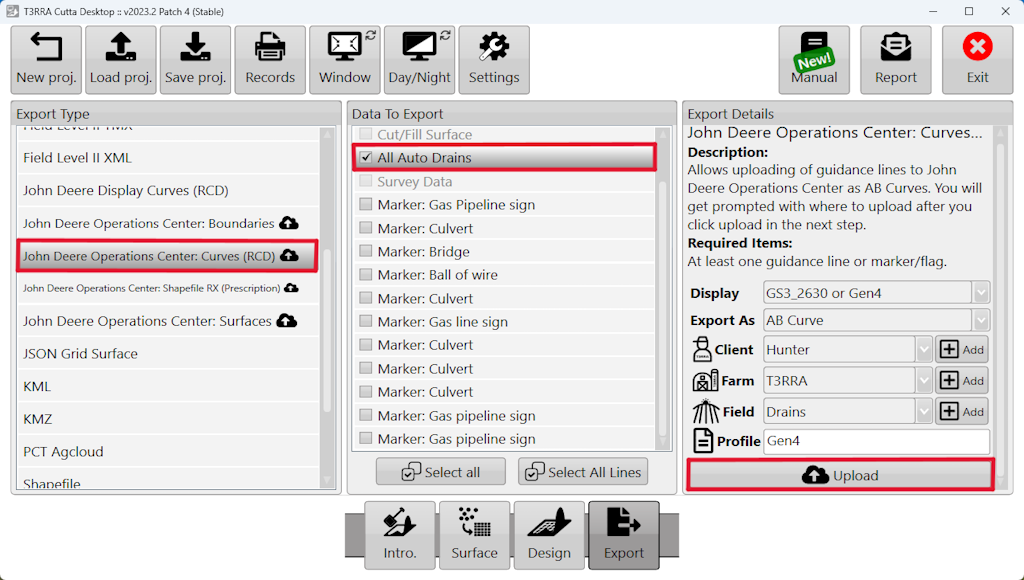
1. Select the data to Export.
2. Select curve type.
3. Set the display to the model number of the John Deere display you will be using.
4. Input project information into client, farm, field and profile.
5. Press “Save” and a file with your guidance lines will be saved in the set location if you chose ‘John Deere Display Curves (RCD)’.
6. Press “Upload” and a file will be uploaded to JDOC where it can be assigned to equipment if you chose “John Deere Operations Center Curves (RCD)’.
How to transfer guidance lines to a John Deere display
(Instructions given are for the GS3 2630 Display, steps for other displays may vary: refer to the appropriate display manual)
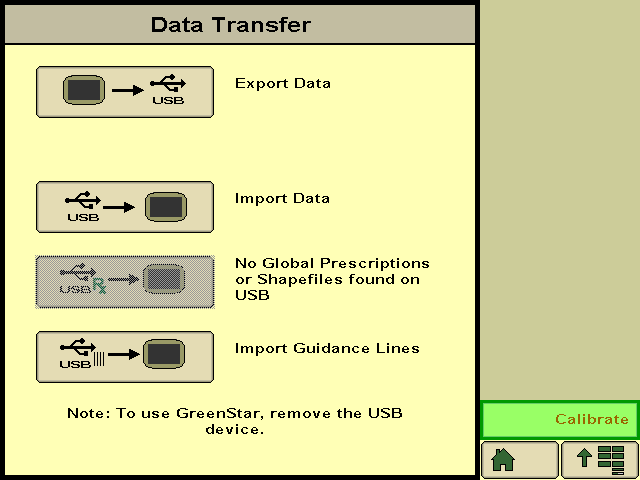
1. Insert USB with guidance lines saved on it into John Deere Greenstar display. (The display will automatically detect the USB and display the available options.)
2. Select “Import Guidance Lines” which should be the bottom option.
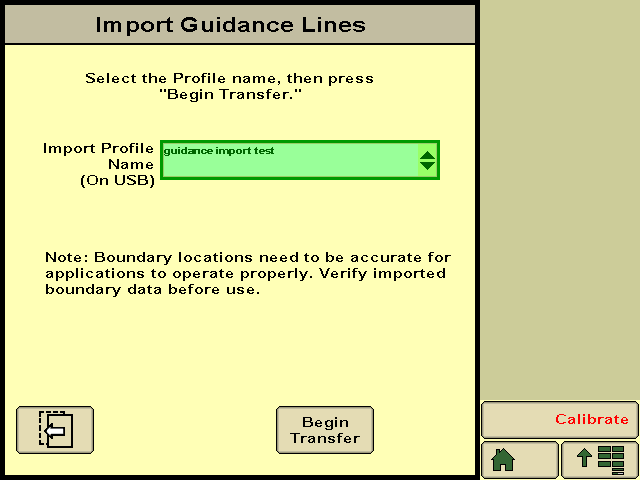
3. Select the desired profile and press “Begin Transfer”.\\
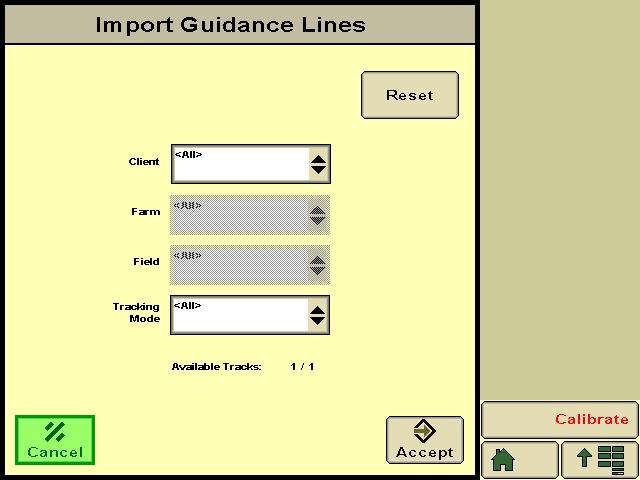
4. On this screen select which client, farm, field and tracking option of the file you want to import and press “Accept”. (The tracking option should be set to adaptive curves.)
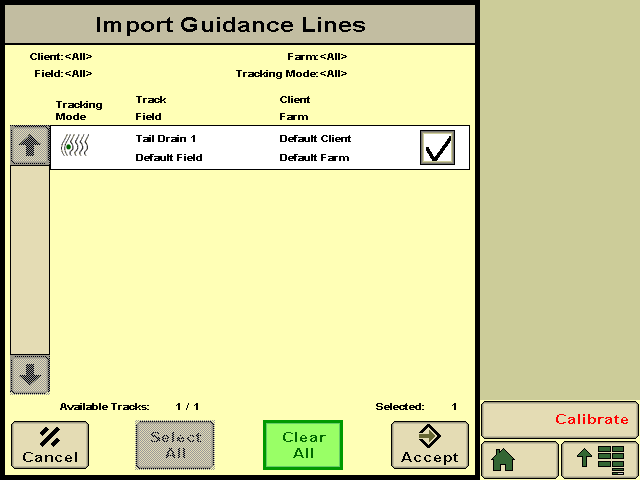
5. Make sure the correct line/s you want to import are ticked and press “Accept”.
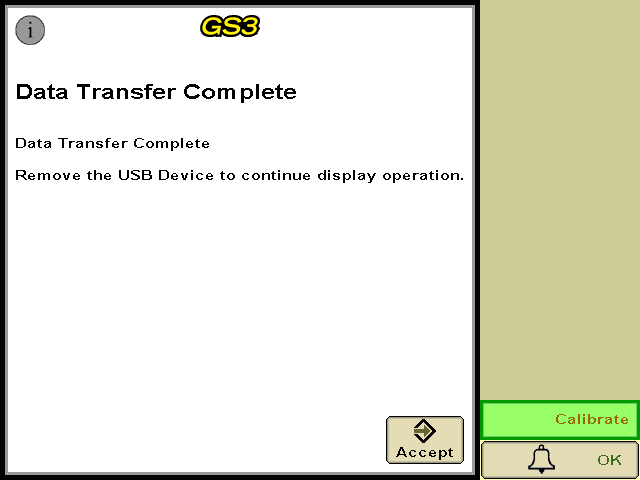
6. A loading bar should appear, if everything has been successful the Data Transfer Complete screen should appear and you will be able to press “Accept”.
7. Your guidance lines have been imported to your John Deere Greenstar display and are now ready to be used with Autotrac™.
# Importing Guidance Lines from USB to a John Deere Gen4/G5 Display
How to import guidance lines from a USB drive to a John Deere Gen4/G5 Display:
- Insert the USB into the USB port on the right hand side of the cab in a Gen4/G5 CommandCenter equipped machine, or into the USB port on the display if using a Gen4/G5 Universal display.
USB Prompt will show after USB is inserted

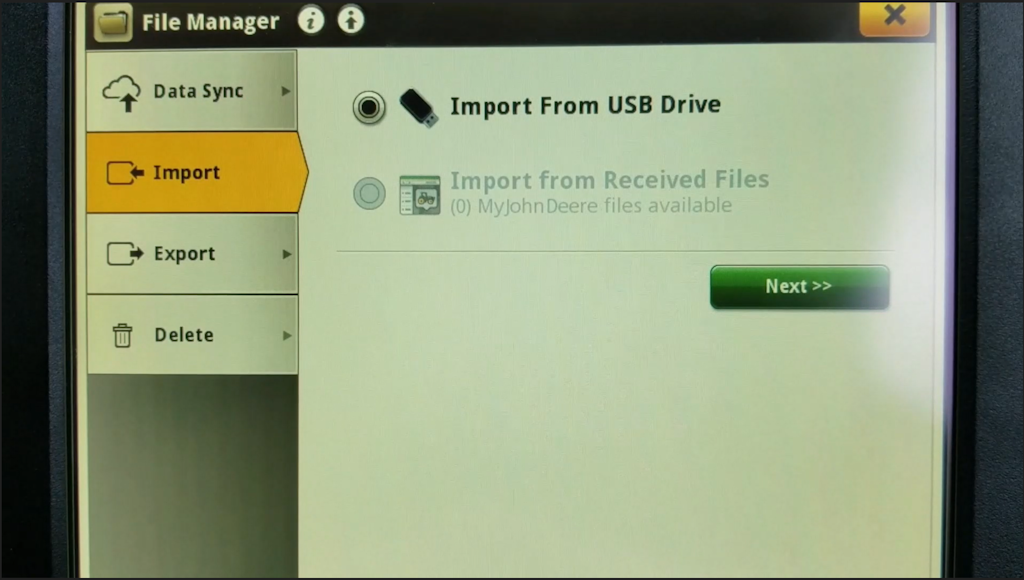
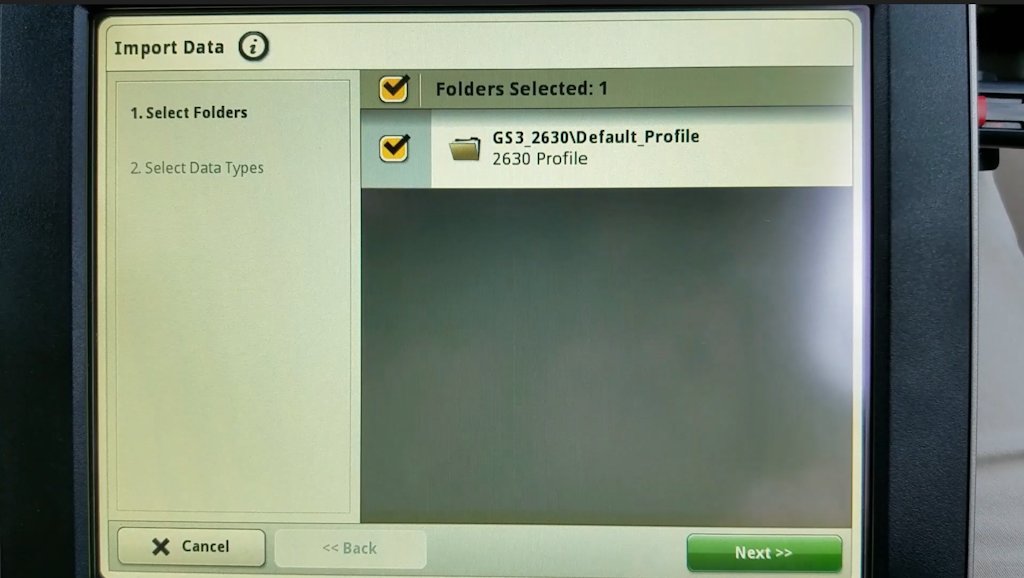
Access USB from Main Menu > System > File Manager > Import if not prompted or if the prompt screen is closed accidentally. Hit "Next" to view File Folders
Check the box next to the folder and then hit "Next" in the bottom right corner of the display.
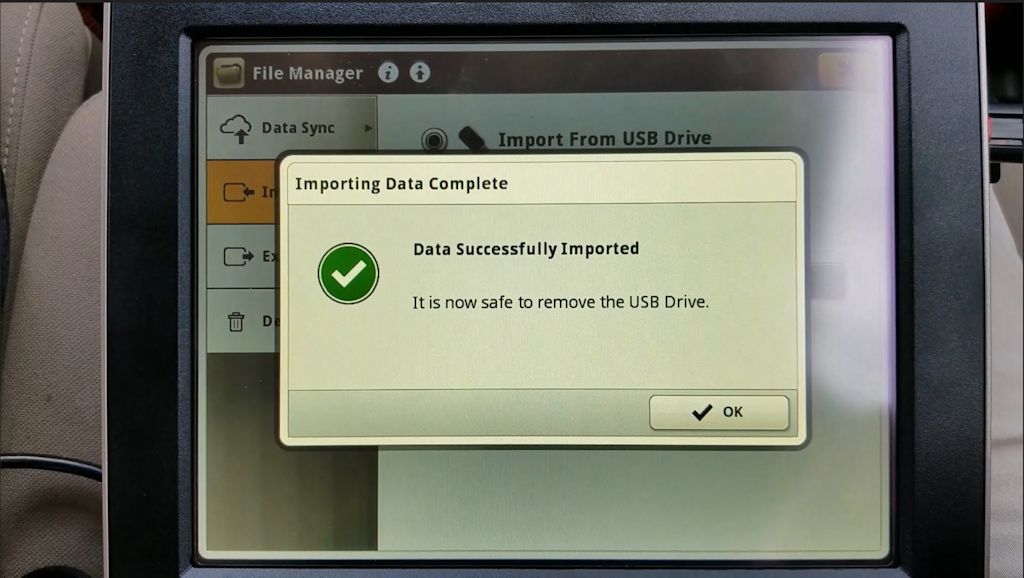
Make sure the boxes are checked and no unwanted data is listed. Hit "Import".

When the data imports you will see this prompt. If the import fails, format the flash drive, re-download the files, and attempt the import again.
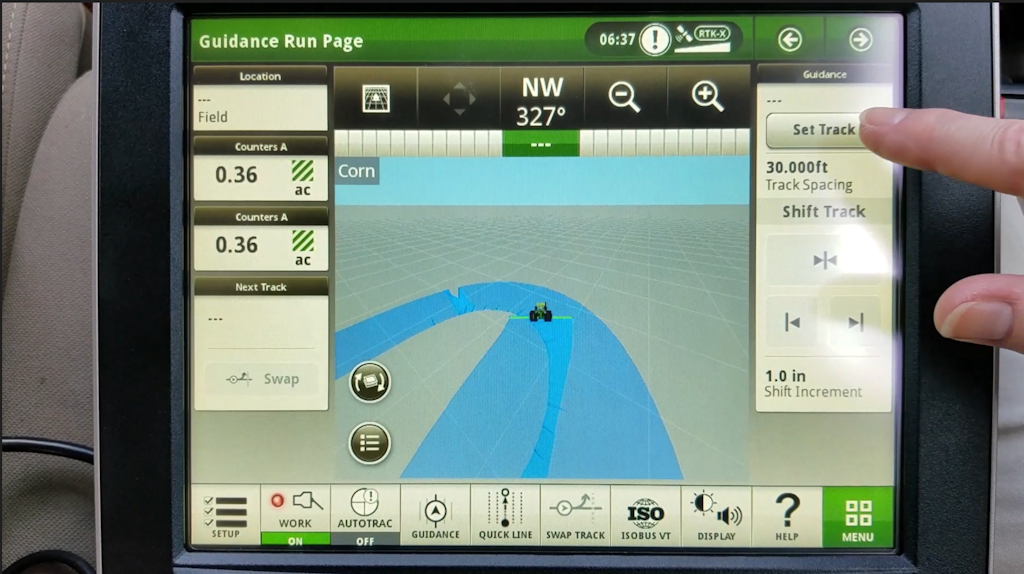
The file is now ready to use. From the Autotrac screen, hit "Set Track".
In the Guidance Track List page, select the desired Guidance Track and hit "OK".
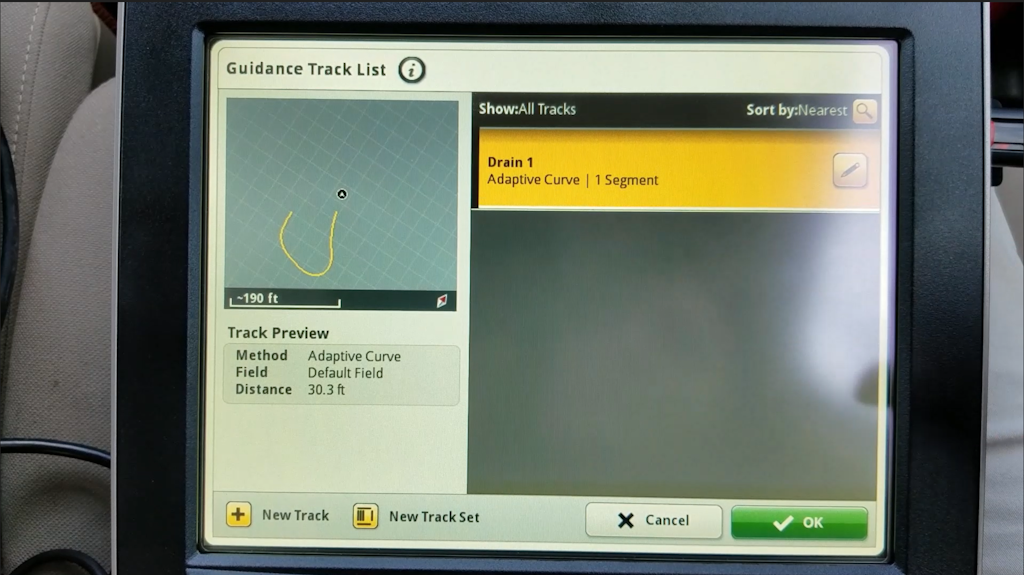
The Guidance track is now ready to be used.
# Exporting Guidance Lines to John Deere Operations Center
If desired, you can export guidance lines straight to John Deere Operations Center where they can be organized and transferred remotely to connected machines.
Design your drains, levees, or terraces or load the project with the desired linework.
Go to the **[Export](https://t3rra.freshdesk.com/en/support/solutions/articles/51000404051-exporting-data)** step.
Choose "John Deere Operations Center: Curves (RCD)", choose the linework, enter your Export Details, and select Upload. If this is the first time you have attempted to transfer files to Ops Center, you will be prompted to sign in to your MyJohnDeere account.
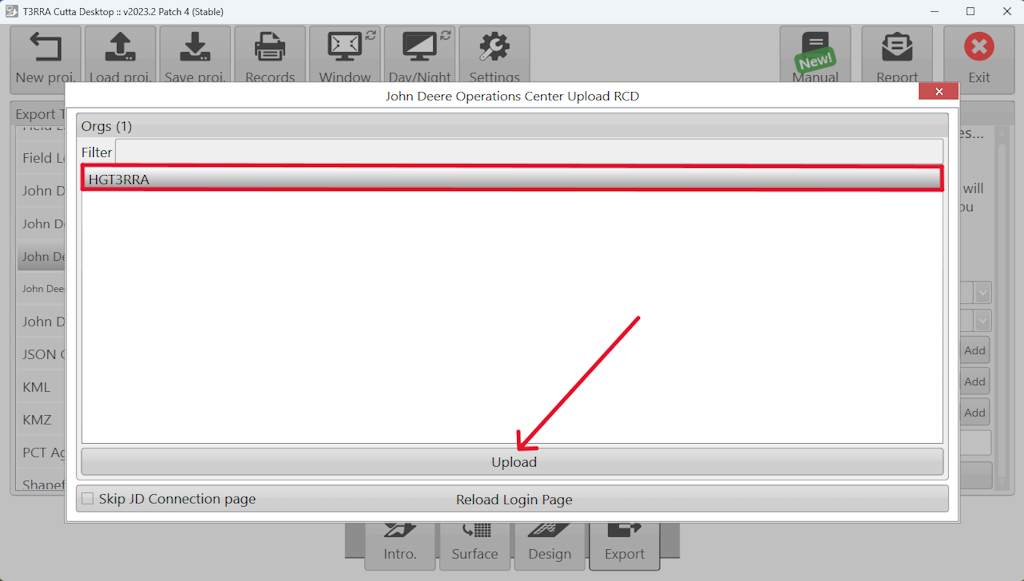
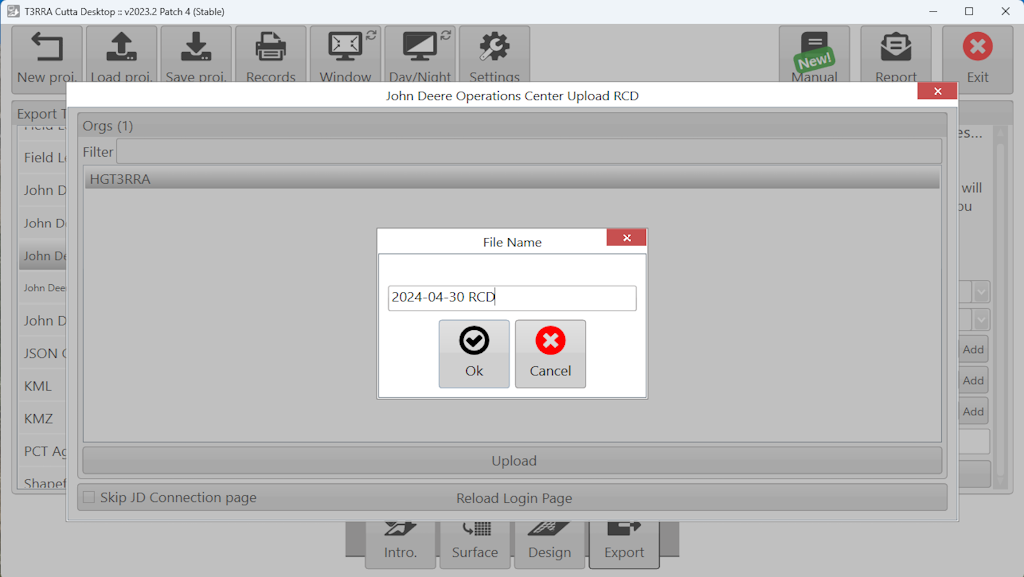
When prompted, choose your Ops Center organization and hit Upload.
Edit the file name if desired. This will make it easier to find in the Files page of your Ops Center account.
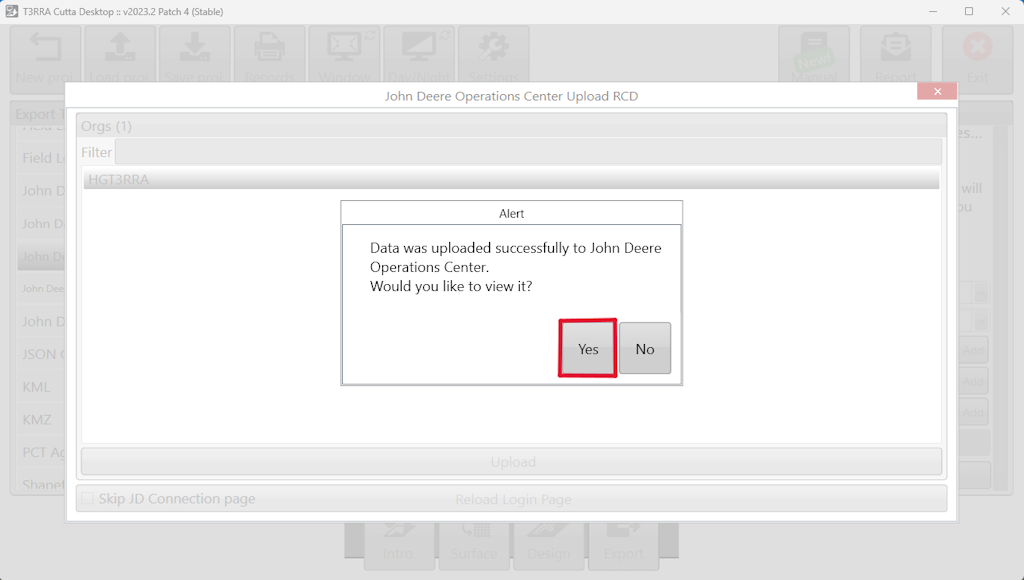
Once complete, you will be asked if you would like to view the exported file in Ops Center. If you would like to confirm the transfer, select Yes.
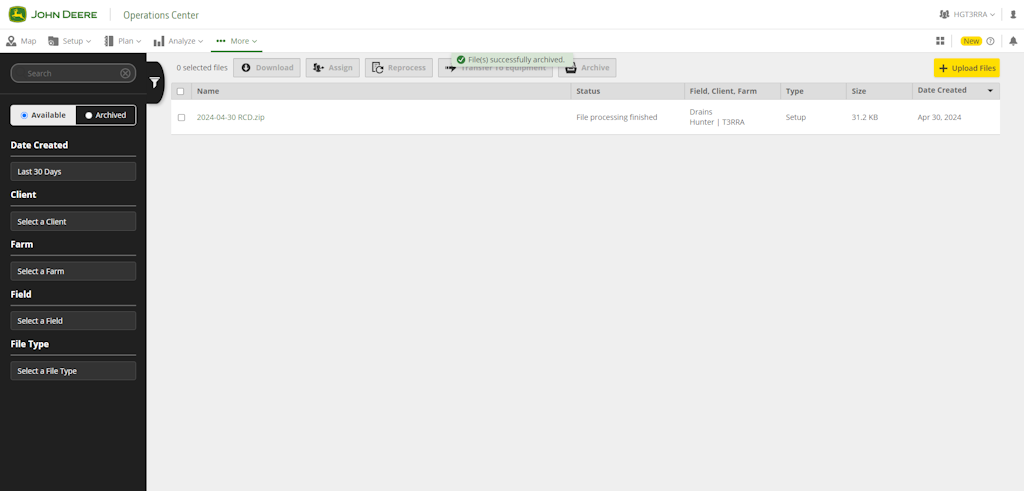
You will be directed to the Files page of your connected Ops Center account where the file containing the linework will be present.
To view the guidance lines, go to the Setup tab and select Land. From Land, you will be able to select the field you entered in the export step in T3CD. Choose the field.
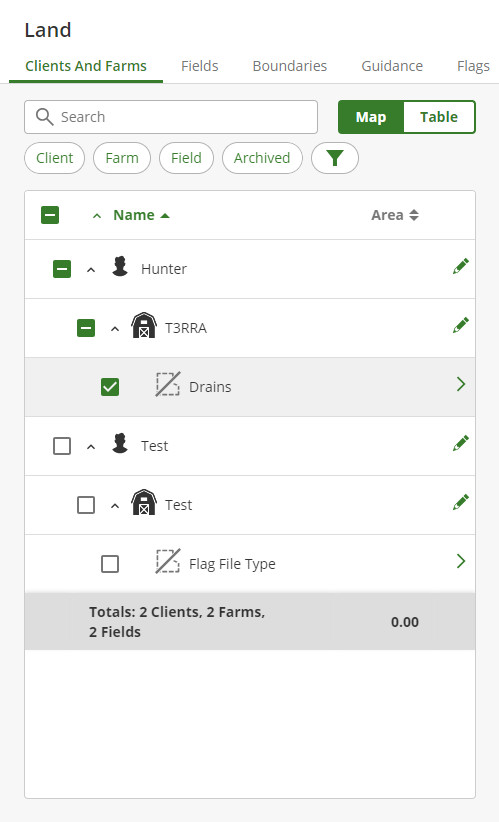
You can now see the linework you designed as guidance tracks. You can now use them in Setup Files or Work Plans and send them to the appropriate connected machines to use in conjunction with T3RRA In-Cab software while implementing your design.

# Exporting T3RRA Control File to JD Ops Center
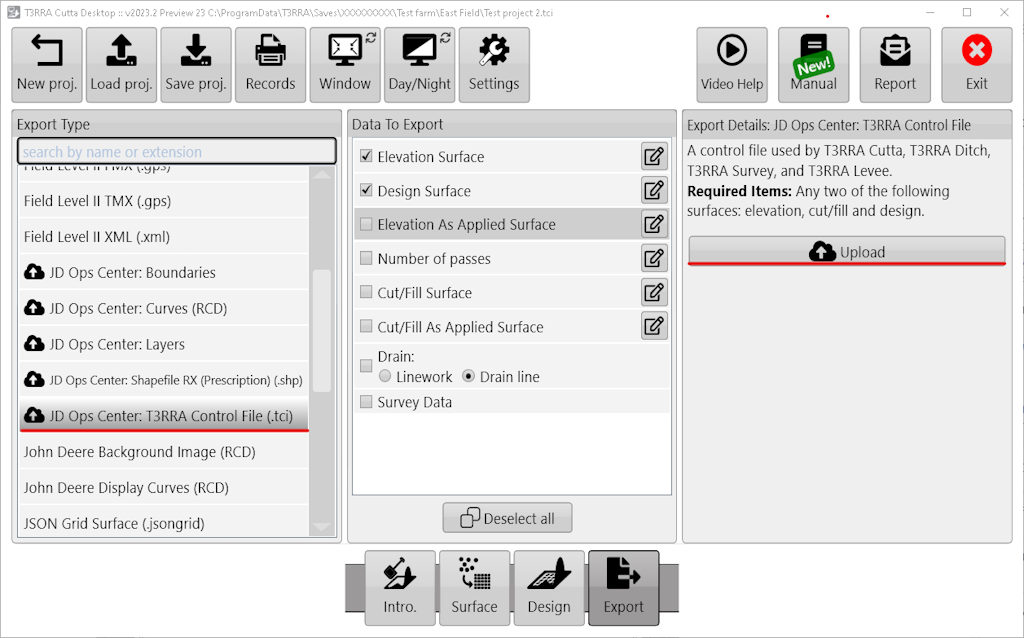
Go to the **[Export](https://t3rra.freshdesk.com/en/support/solutions/articles/51000404051-exporting-data)** step.

Choose "JD Ops Center: T3RRA Control File(.tci)", choose data to export and select Upload. If this is the first time you have attempted to transfer files to JD Ops Center, you will be prompted to sign in to your MyJohnDeere account.
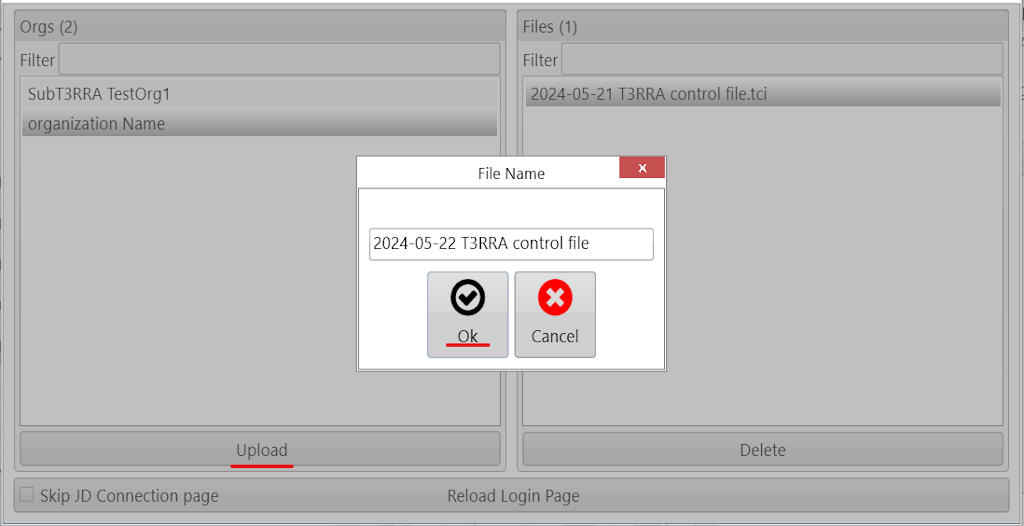
When prompted, choose your Ops Center organization and hit Upload.
Edit the file name if desired.
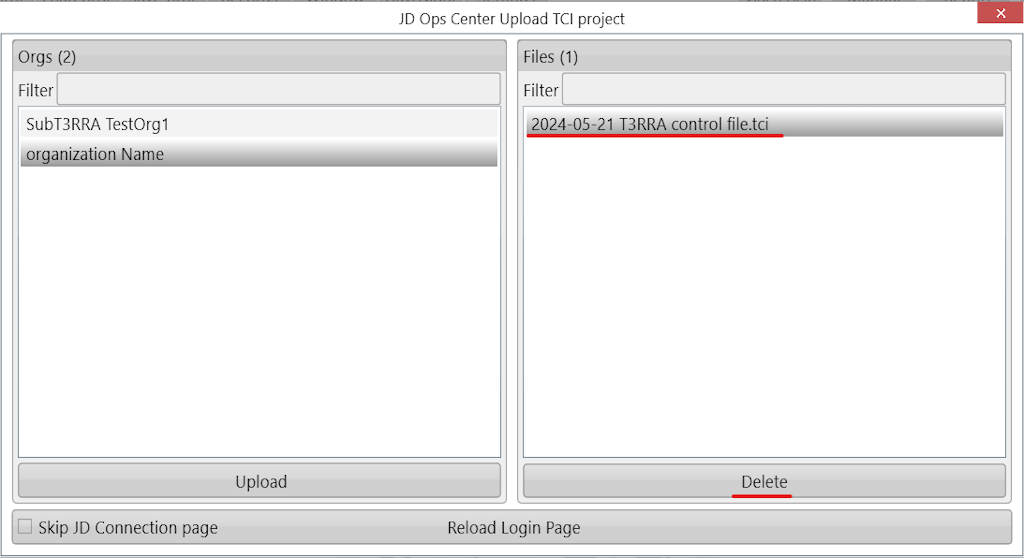
If you want to remove uploaded T3RRA Control File. Select uploaded file in the list and click "Delete" button.
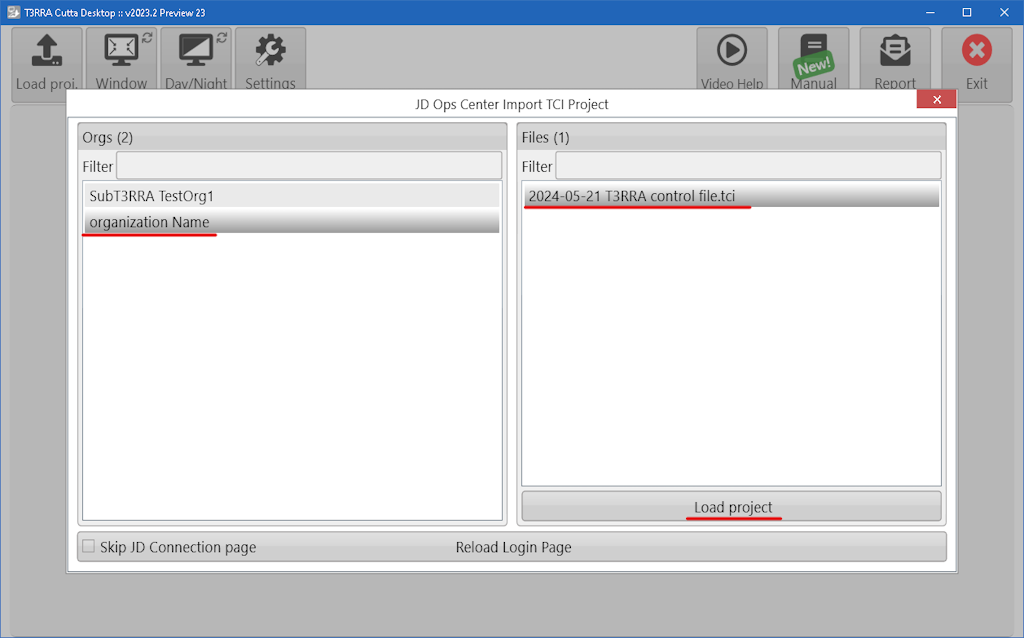
You can download the uploaded T3RRA Control File in Project Load window.
Hit "Load proj".

Click "Download project".
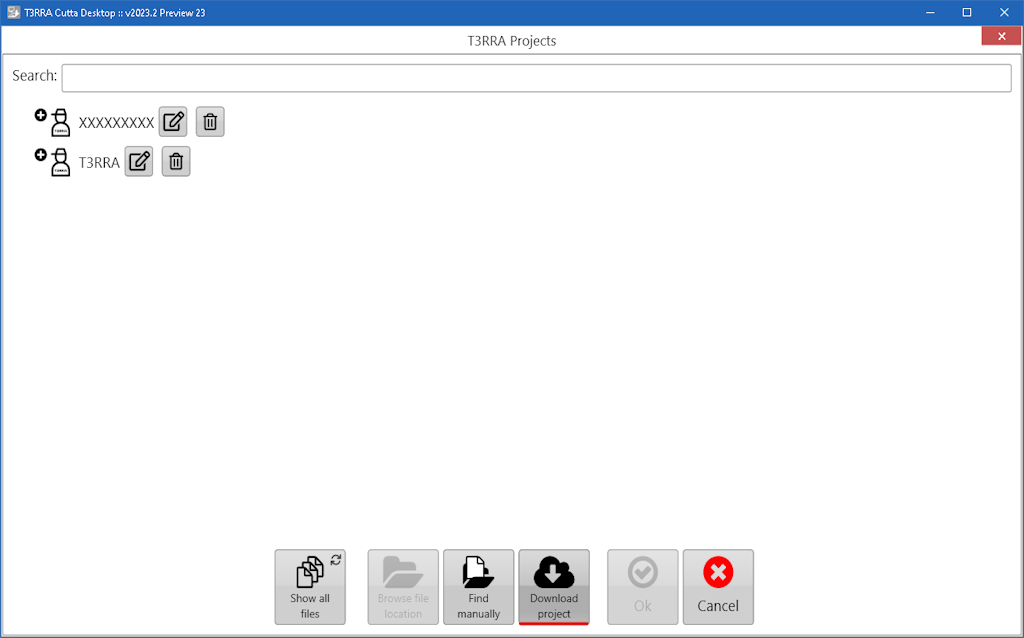
Select organization, T3RRA Control File and hit Load project.