7 | Tractor / External Valve Connection & Setup
COMMAND can interface with tractor hydraulic systems using different connection methods depending on tractor type and model.
Determine the correct connection method before proceeding:
- John Deere CAN (Modern tractors with ISOBUS control)
- John Deere Legacy (Analog SCV control systems)
- CNH AFS Connect / PLM Intelligence (Modern systems)
- CNH Pre AFS Connect / PLM Intelligence (Legacy systems)
- Supported Versatile L4WD and DeltaTrack tractors
- Fendt 800 SCR/S4 (CAN valve control via S/109 adapter)
- Fendt 900 SCR/S4 (CAN valve control via S/111 adapter)
- Fendt / Challenger MT (CAN valve control via S/082 adapter)
- 7.1 | Modern John Deere (CANBUS)
- 7.2 | John Deere Legacy (Analog)
- 7.3 | CNH Direct Connect (AFS Connect / PLM Intelligence)
- 7.4 | CNH Pre AFS Connect / PLM Intelligence
- 7.5 | Versatile — Analog Scraper Control
- 7.6 | External Proportional Solenoid Valves — Direct PWM Coil Drive
- 7.7 | Fendt ONE — 900 Gen 6/7 & 1000 Gen 2/3
- 7.8 | Fendt 800 SCR/S4
- 7.9 | Fendt 900 SCR/S4
- 7.10 | Fendt / Challenger MT
7.1 | Modern John Deere (CANBUS)
Applicable to:
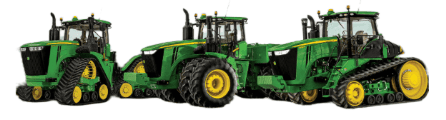
John Deere tractors with CANBUS-based SCV control (typically 2005+ models).
Connection Method
John Deere CANBUS-based SCV systems are controlled by COMMAND directly over the ISOBUS, so the only hardware requirement for direct control is that COMMAND be connected to the tractor ISOBUS via the 4-way Deutsch DT connections on either the cab (T3H-C006) or external (T3H-C005) breakout harnesses.
Installation Steps
1. Connect COMMAND to the ISOBUS using either:
- T3H-C006 (in-cab), or
- T3H-C005 (rear ISOBUS)
2. Ensure a secure connection at the 4-way Deutsch connector.
3. Power on the system and verify ISOBUS communication.
(See Section 5.4)
Operation Notes
COMMAND interfaces with modern John Deere tractors by sending CANBUS messages to the integrated valve controller, commanding either port A or port B flow of the rear tractor SCVs.
To operate the SCVs in automatic control mode, the user must push the respective SCV lever into the detent position (not float). This will cause "AUTO" to appear on the console/display to indicate that the SCV is ready for automatic control commands.
Moving the lever will disengage AUTO mode on the console/armrest but "AUTO" may remain visible in the SCV status area as it's still in automatic control mode. To re-enter AUTO mode, push the SCV lever into detent position again.
IMPORTANT: Moving the SCV lever will disengage AUTO mode in modern JD tractors, so movements based on any current valve signals will cease. Always keep this in mind during operation - the lever must be pushed into detent position again to resume automatic control.
7.2 | John Deere Legacy (Analog)
Applicable to:
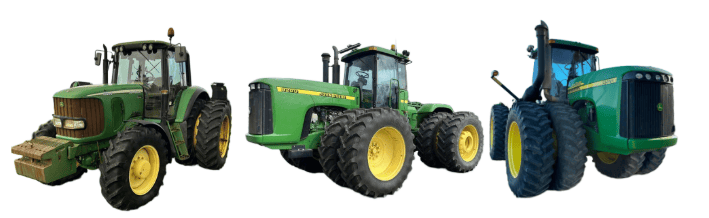
John Deere tractors with analog SCV control (typically pre-2005 models).
Connection Method
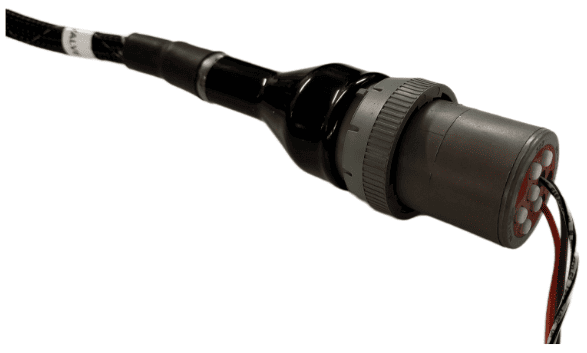
COMMAND can control John Deere legacy valve systems through the use of a T3H-V001 COMMAND Legacy Output Adapter.
Installation Steps
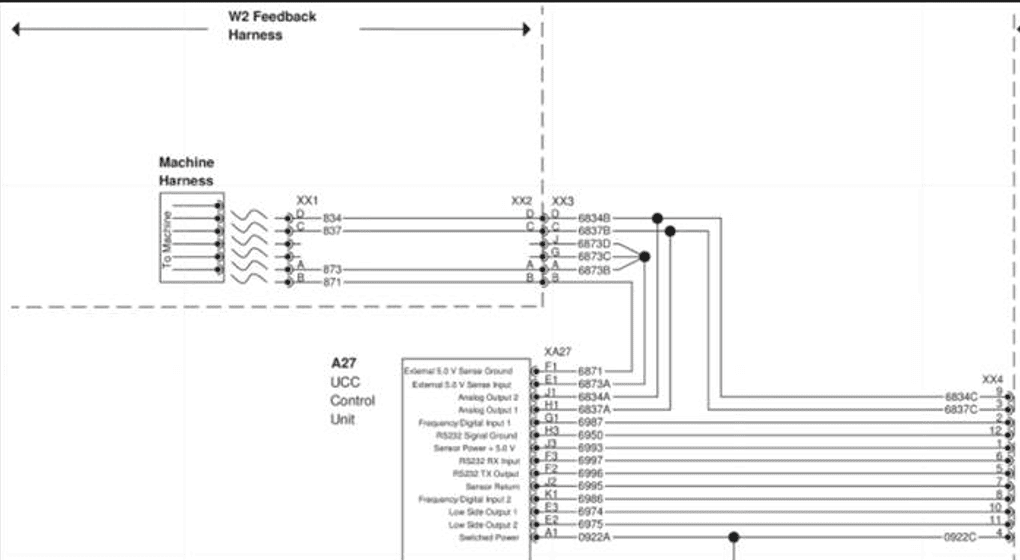
10-way Metripack 150 Series Connection
- Connect the T3H-V001 adapter to the T3H-C002 ECU breakout harness at the round Deutsch HD series connector.
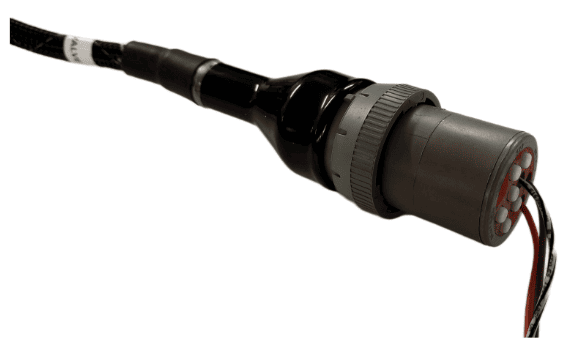
2. Connect the 10-way Metripack connector on T3H-V001 to the tractor's SCV signal input plug.
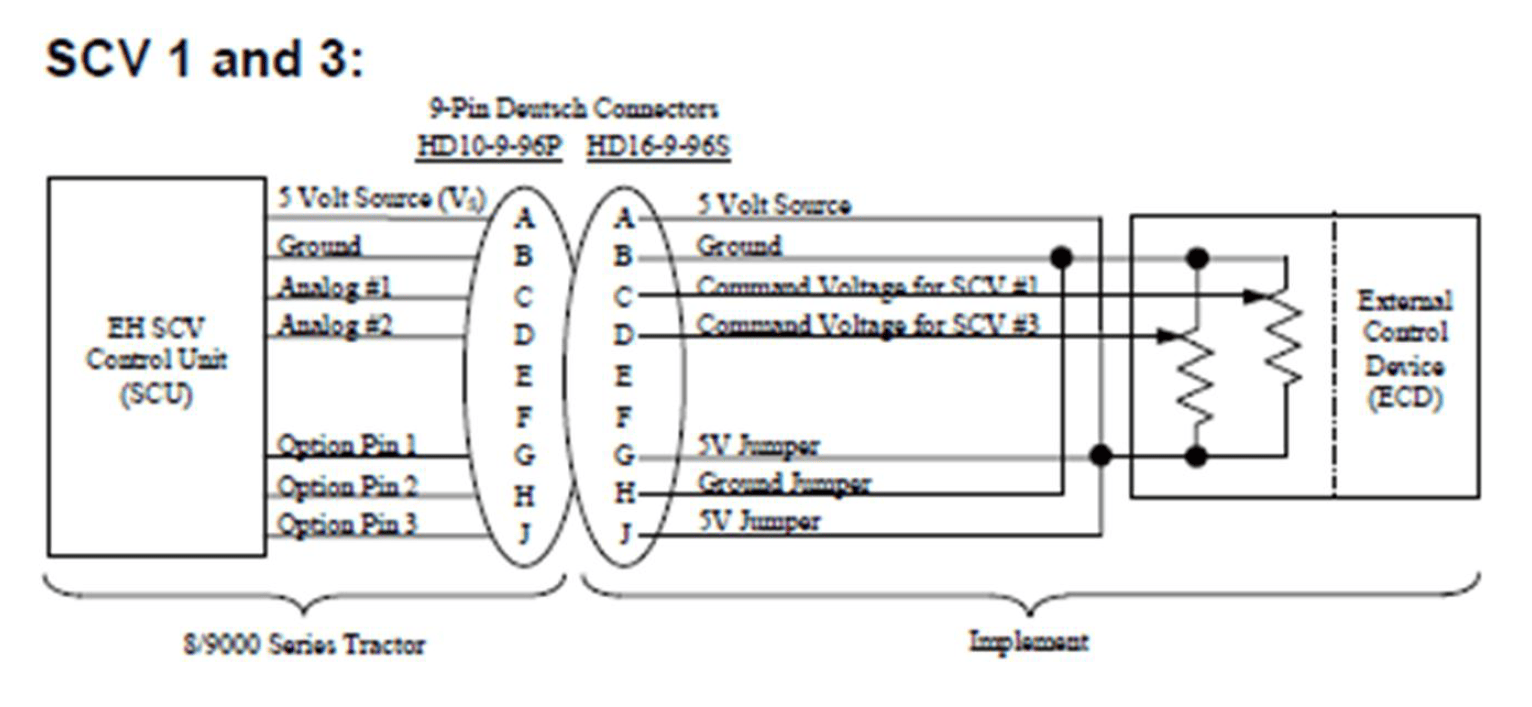
John Deere SCV Controller Connection Overview
Operation Notes
COMMAND interfaces with legacy John Deere tractor SCVs by sending analog voltage signals to the integrated valve controller, commanding either port A or port B flow of two of the rear tractor SCVs (generally SCV1 and SCV3).
To operate the SCVs in automatic control mode, the user must push the respective SCV lever forward into the detent position. This will cause "AUTO" to appear on the console/display to indicate that the SCV is ready for automatic control commands.
Moving the lever will disengage AUTO mode on the console/armrest. To re-enter AUTO mode, push the SCV lever into detent position again.
IMPORTANT: Moving the SCV lever will disengage AUTO mode in modern JD tractors, so movements based on any current valve signals will cease. Always keep this in mind during operation - the lever must be pushed into detent position again to resume automatic control.
7.3 | CNH Direct Connect (AFS Connect / PLM Intelligence)
Applicable to:
Case IH / New Holland tractors with AFS Connect or PLM Intelligence systems.

Connection Method
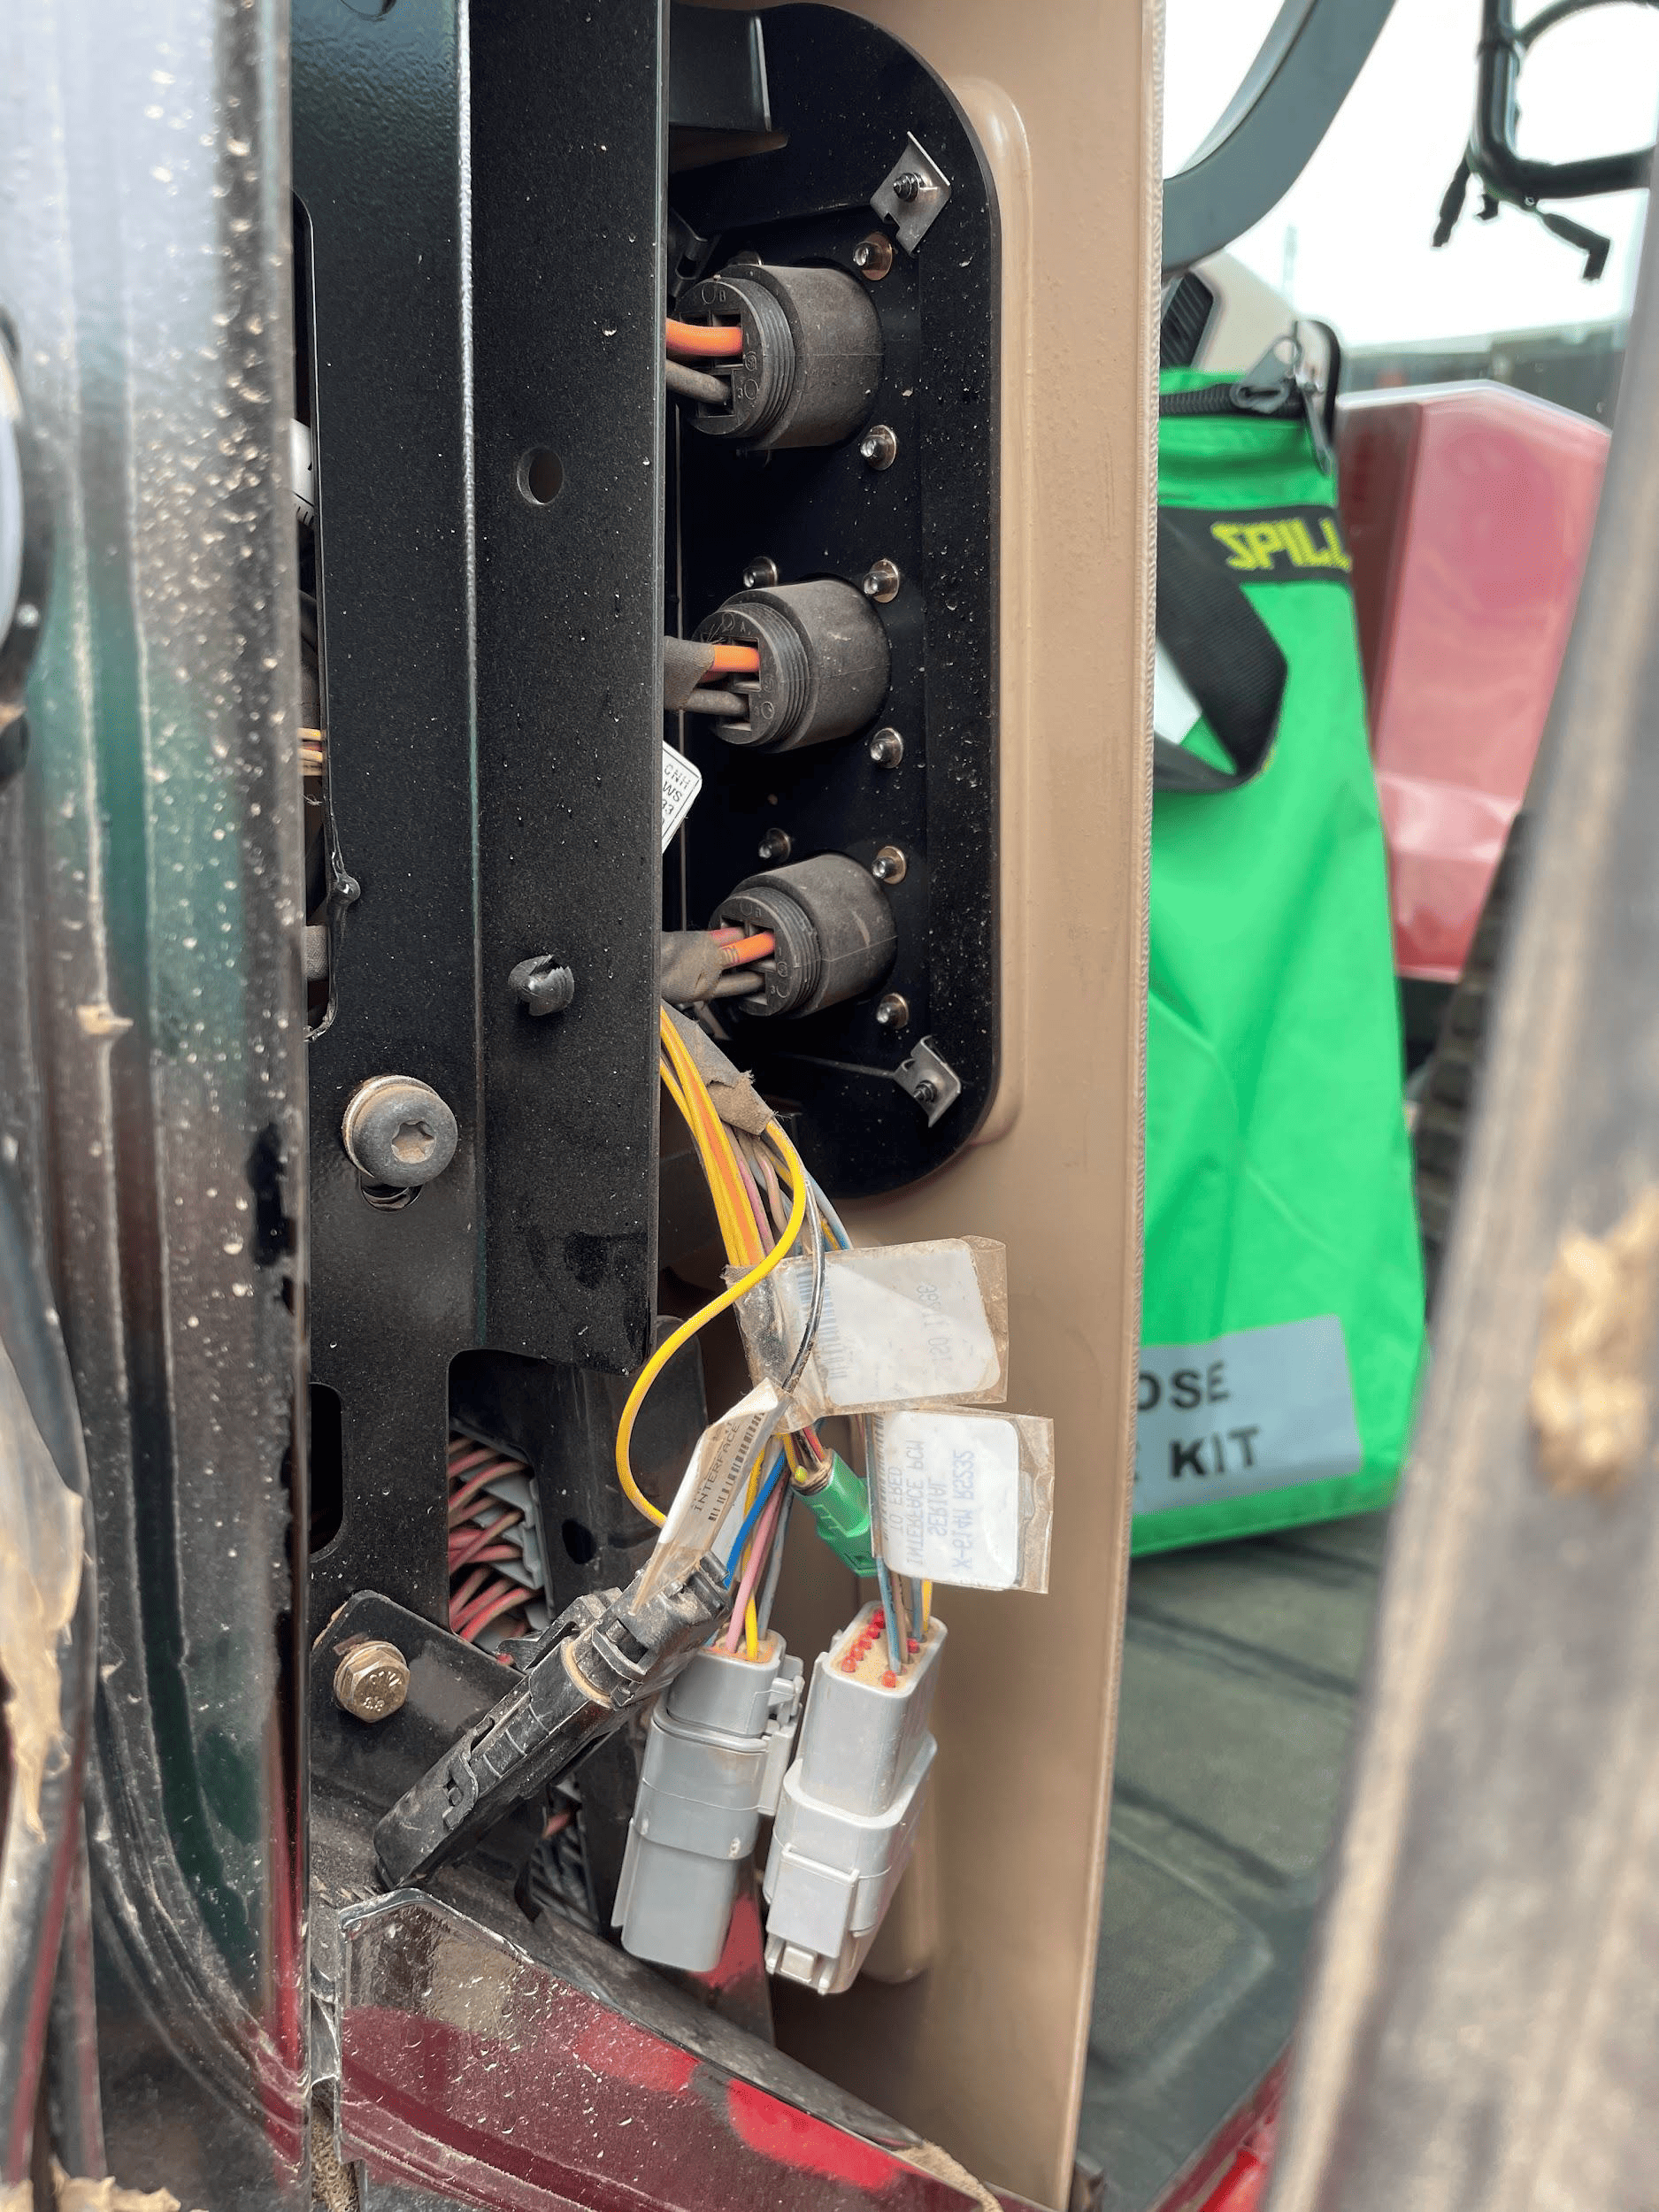 COMMAND can control Case & New Holland rear tractor valve (EHR) systems through the use of a T3H-V001 COMMAND Legacy Output Adapter.
Installation Steps
The Case / New Holland tractor connection for analog control signal inputs via the T3H-V001 adapter are generally found in one of three locations depending on tractor model:
1. Locate the tractor SCV signal input connector:
- Fuse compartment
- Behind driver seat
- Under cab exterior (4WD models)
2. Connect the T3H-V001 adapter to the tractor connection.
3. Connect the T3H-V001 adapter to the T3H-C002 harness.
Tractor Valve Configuration
1. After completing the physical connection, the system must be configured on the tractor armrest display.
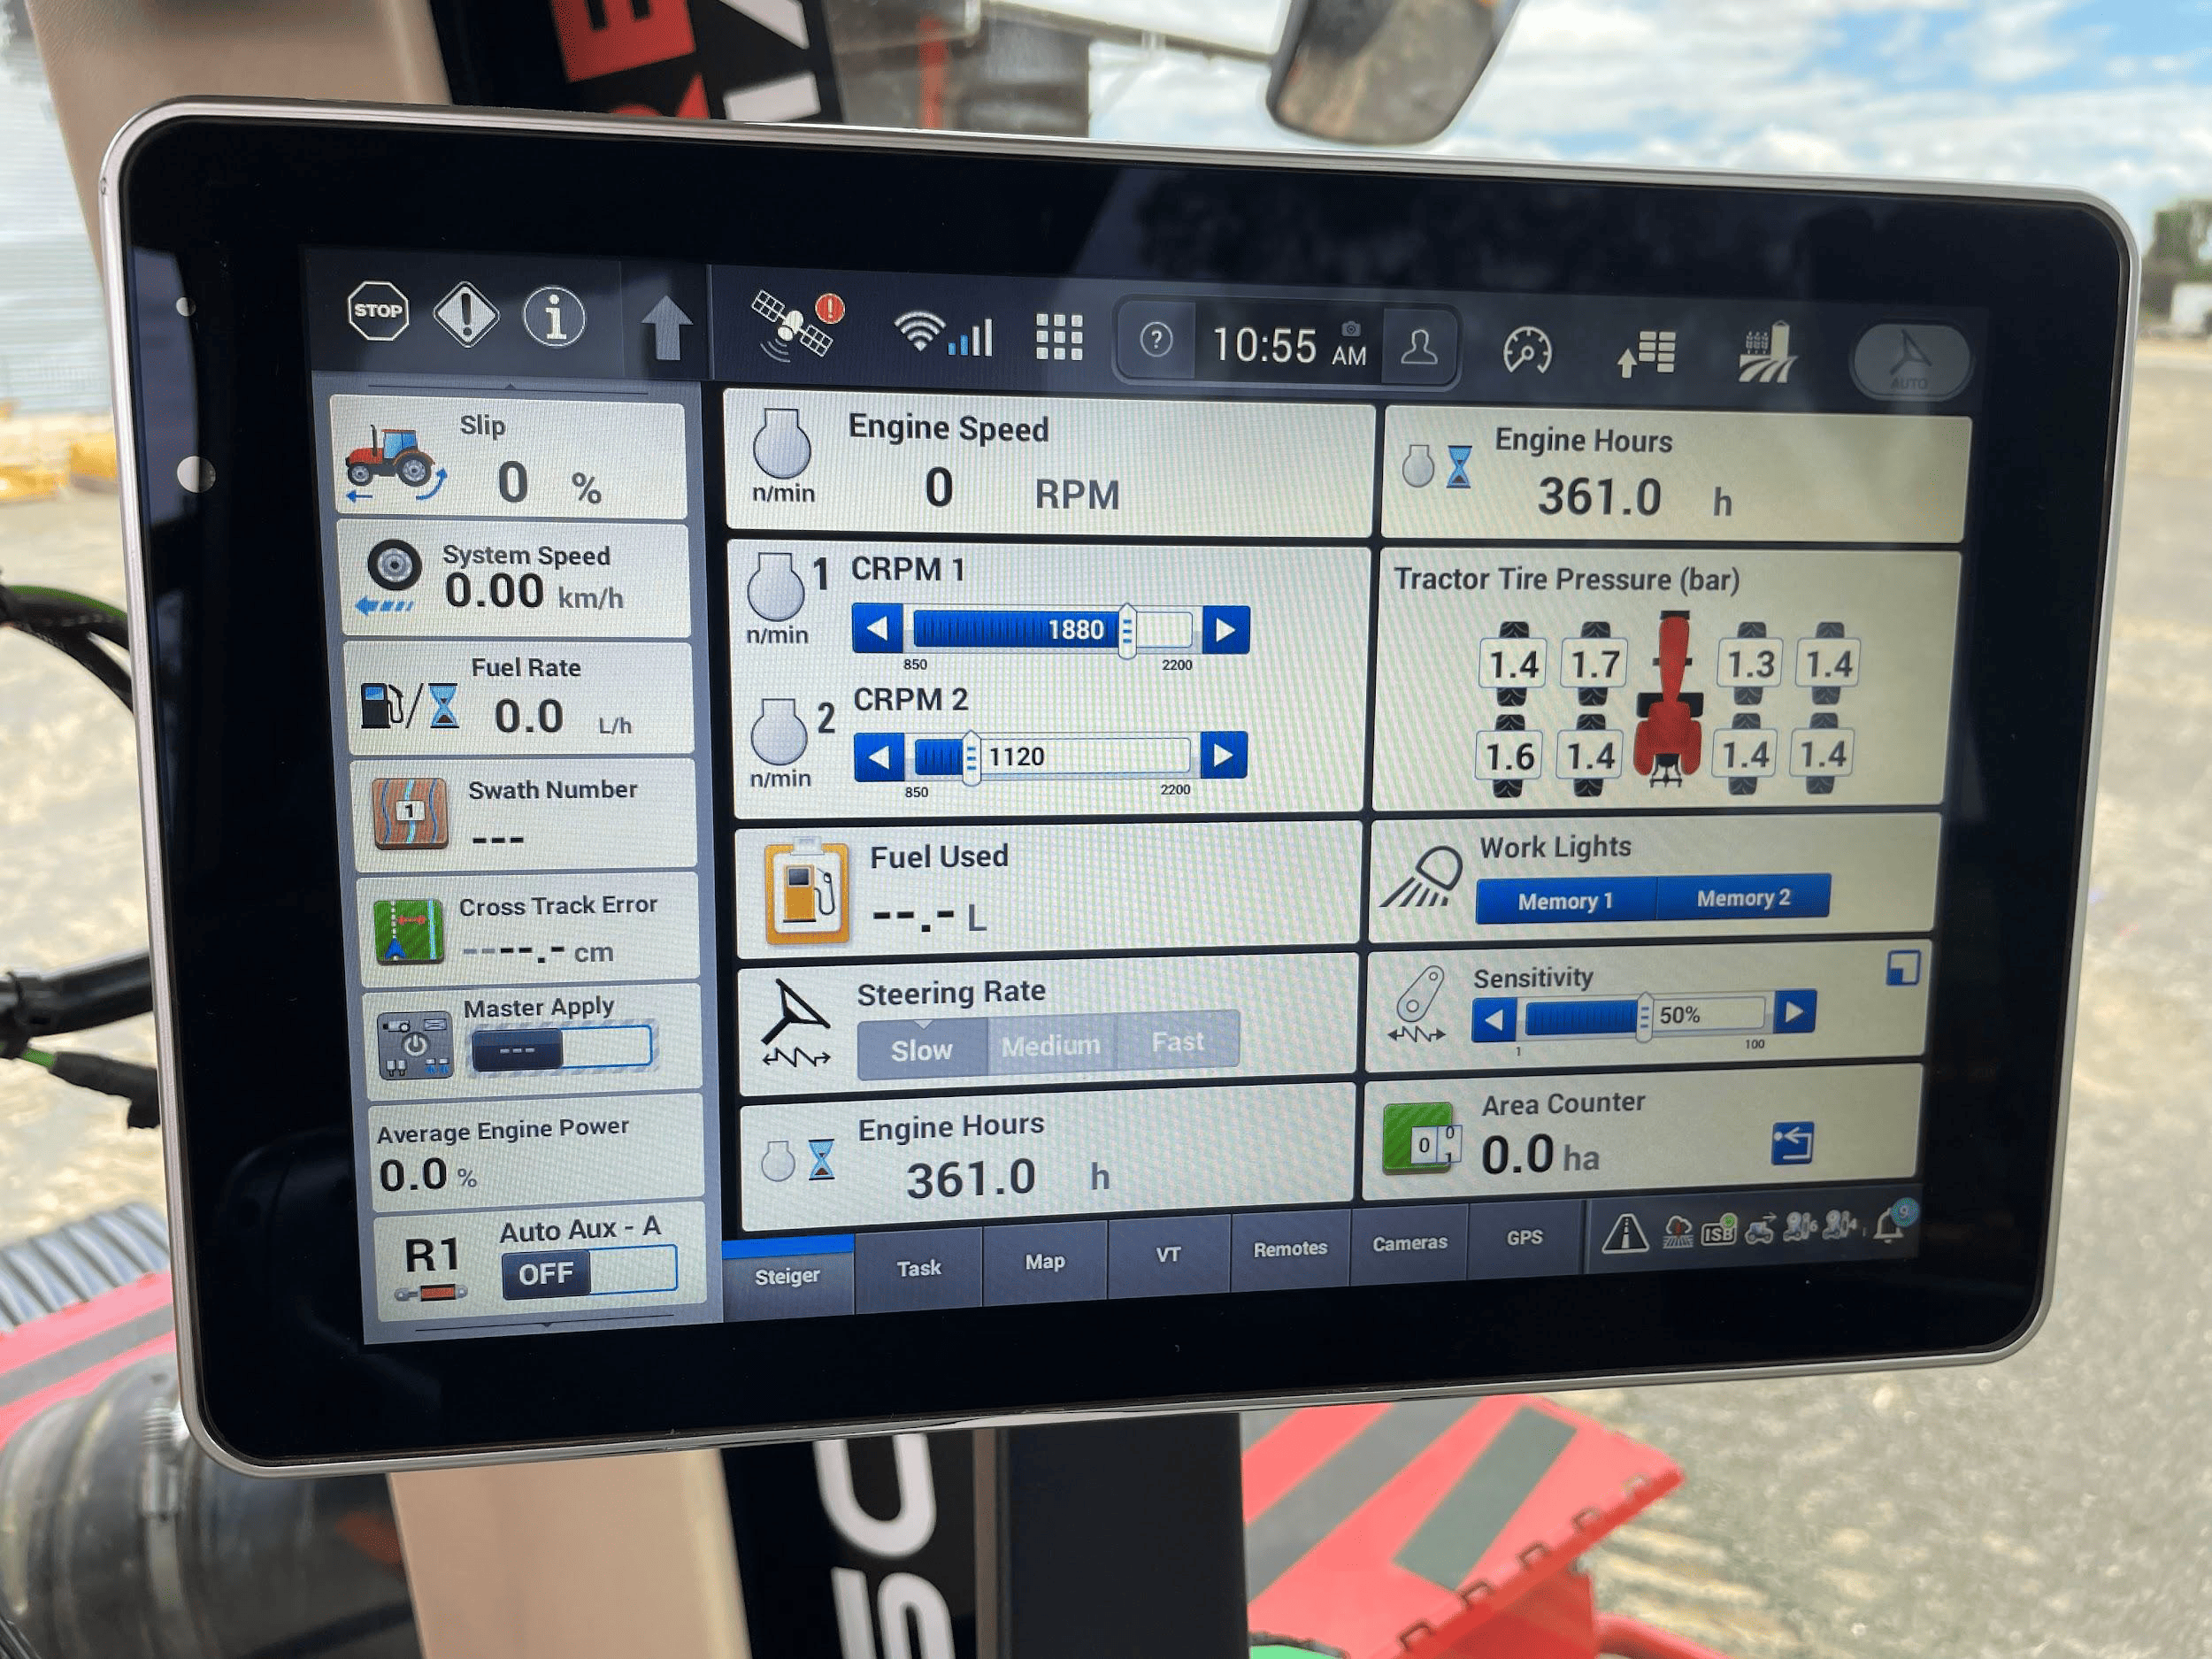
2. Ensure that a new implement profile has been created for use with the scraper, or that the currently selected profile is
appropriate.
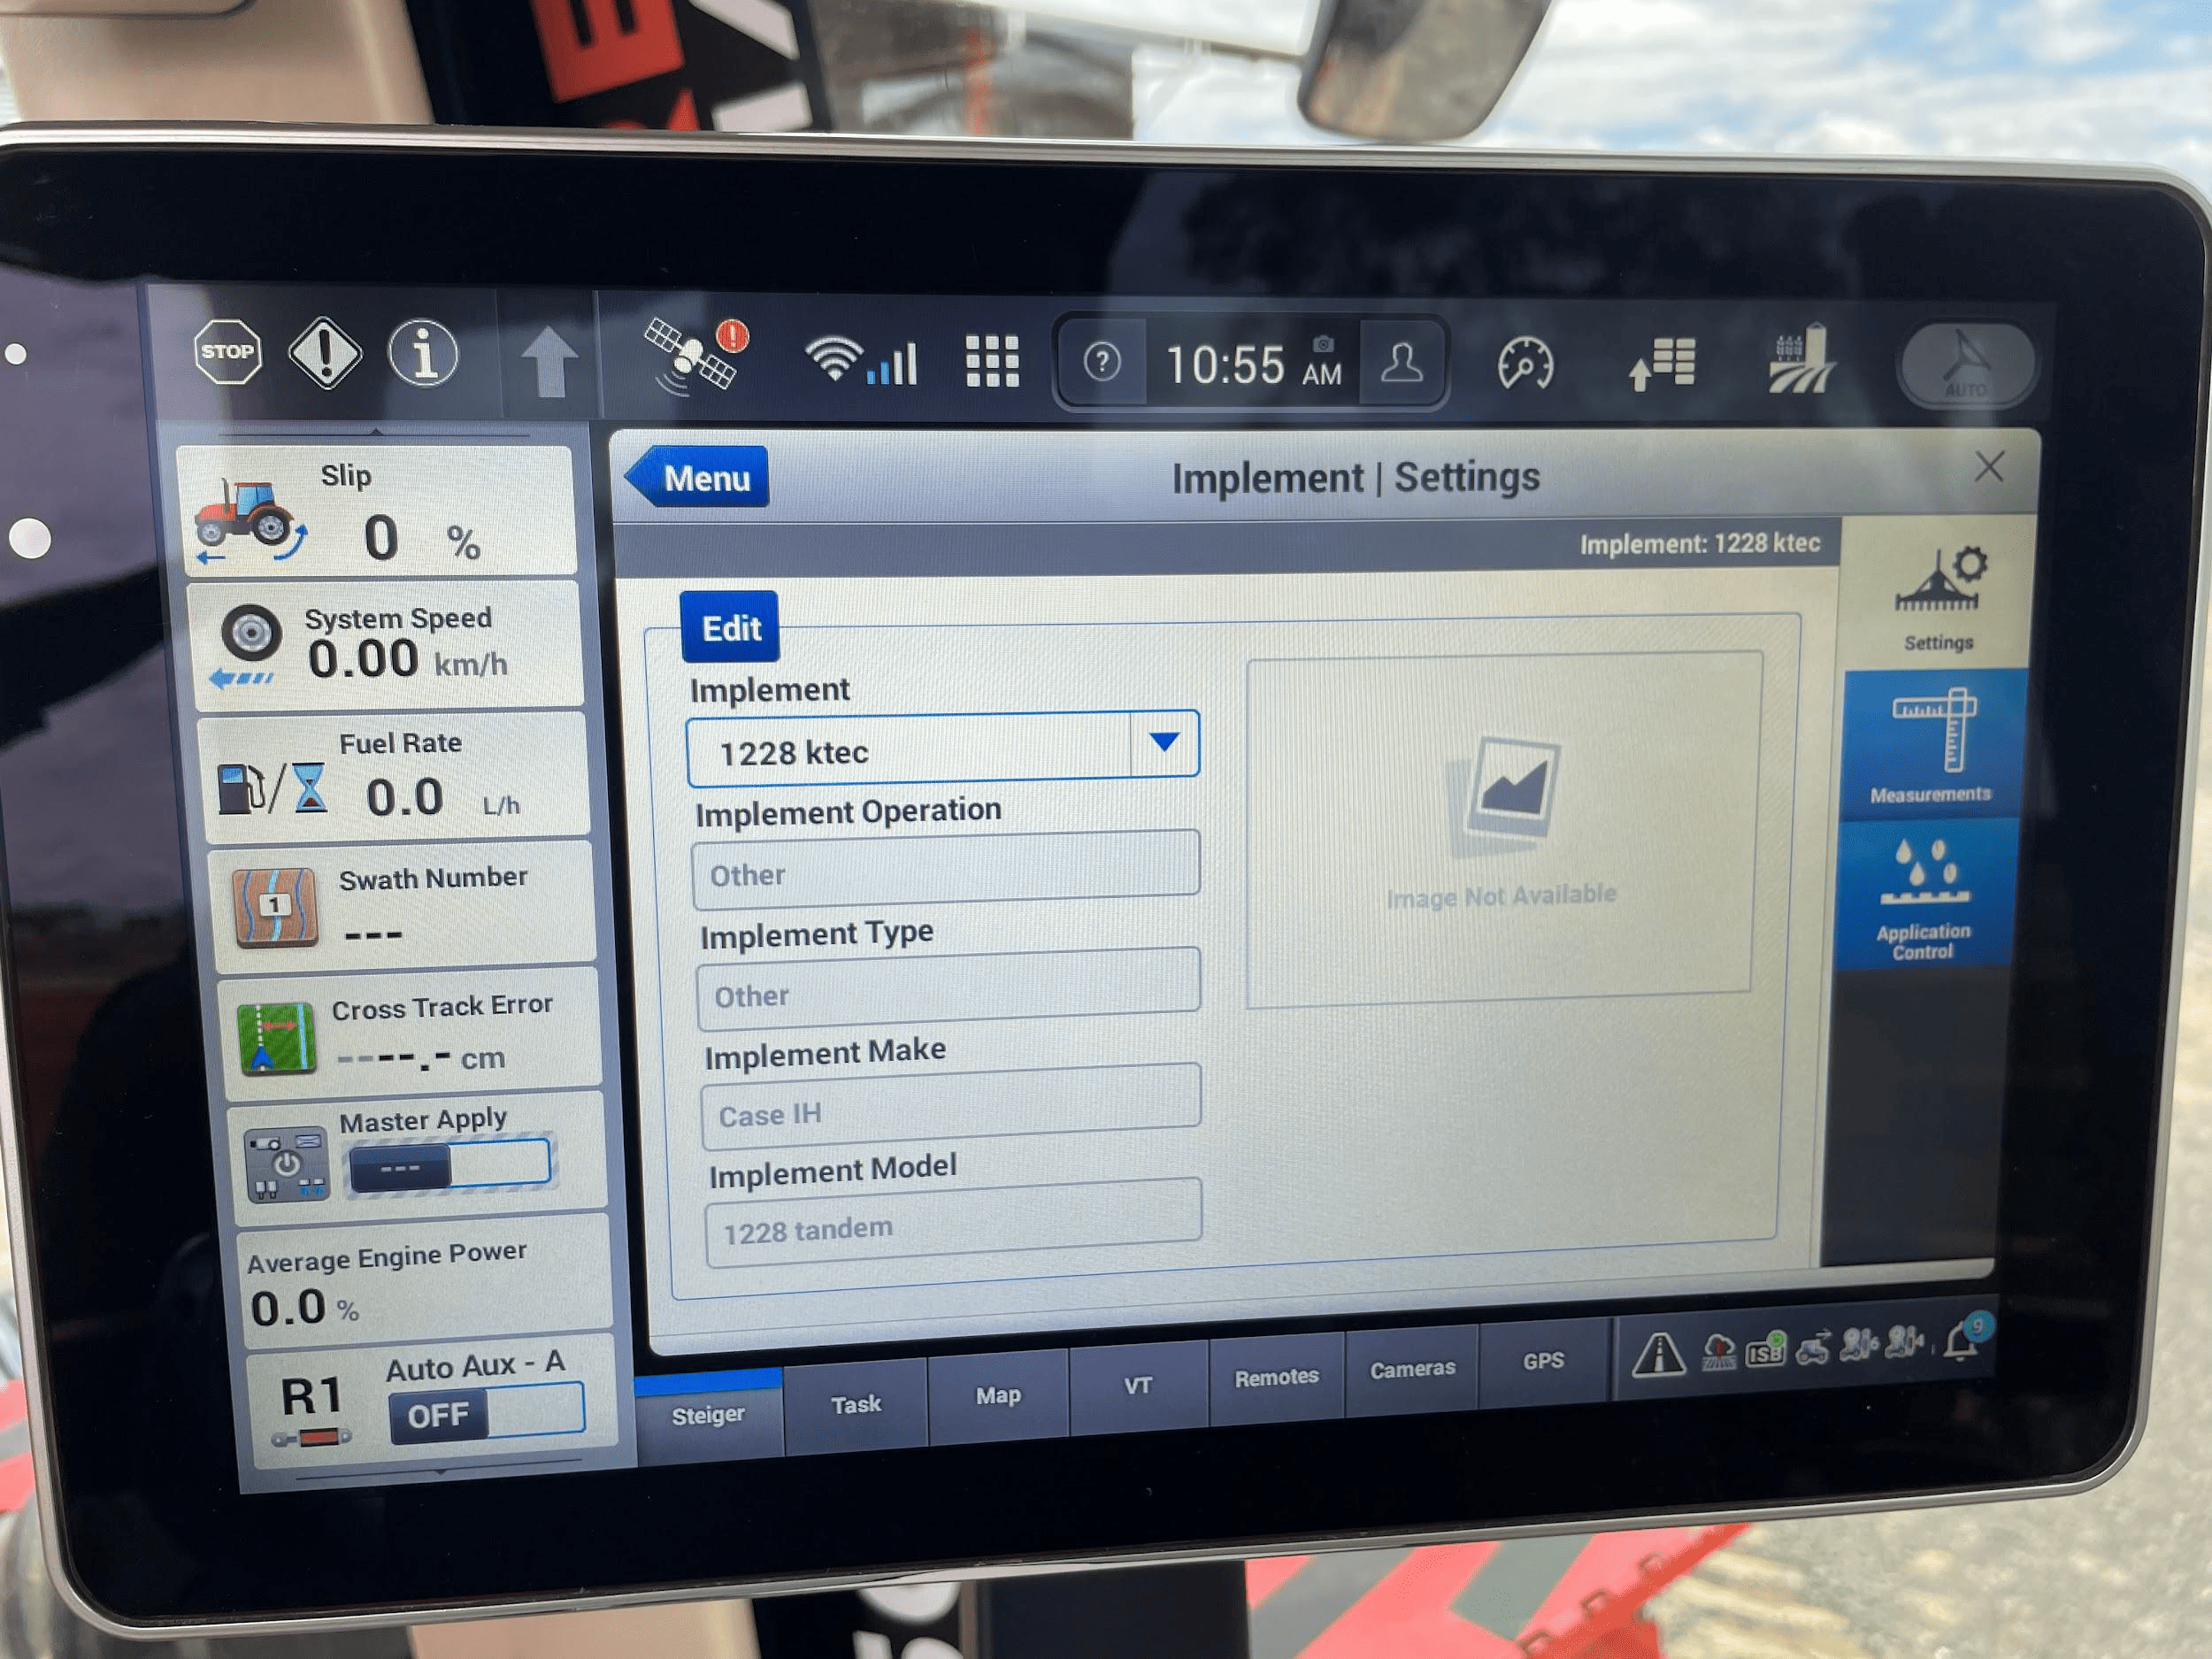
3. Open the “Remotes” settings tab to display remote valve configuration.
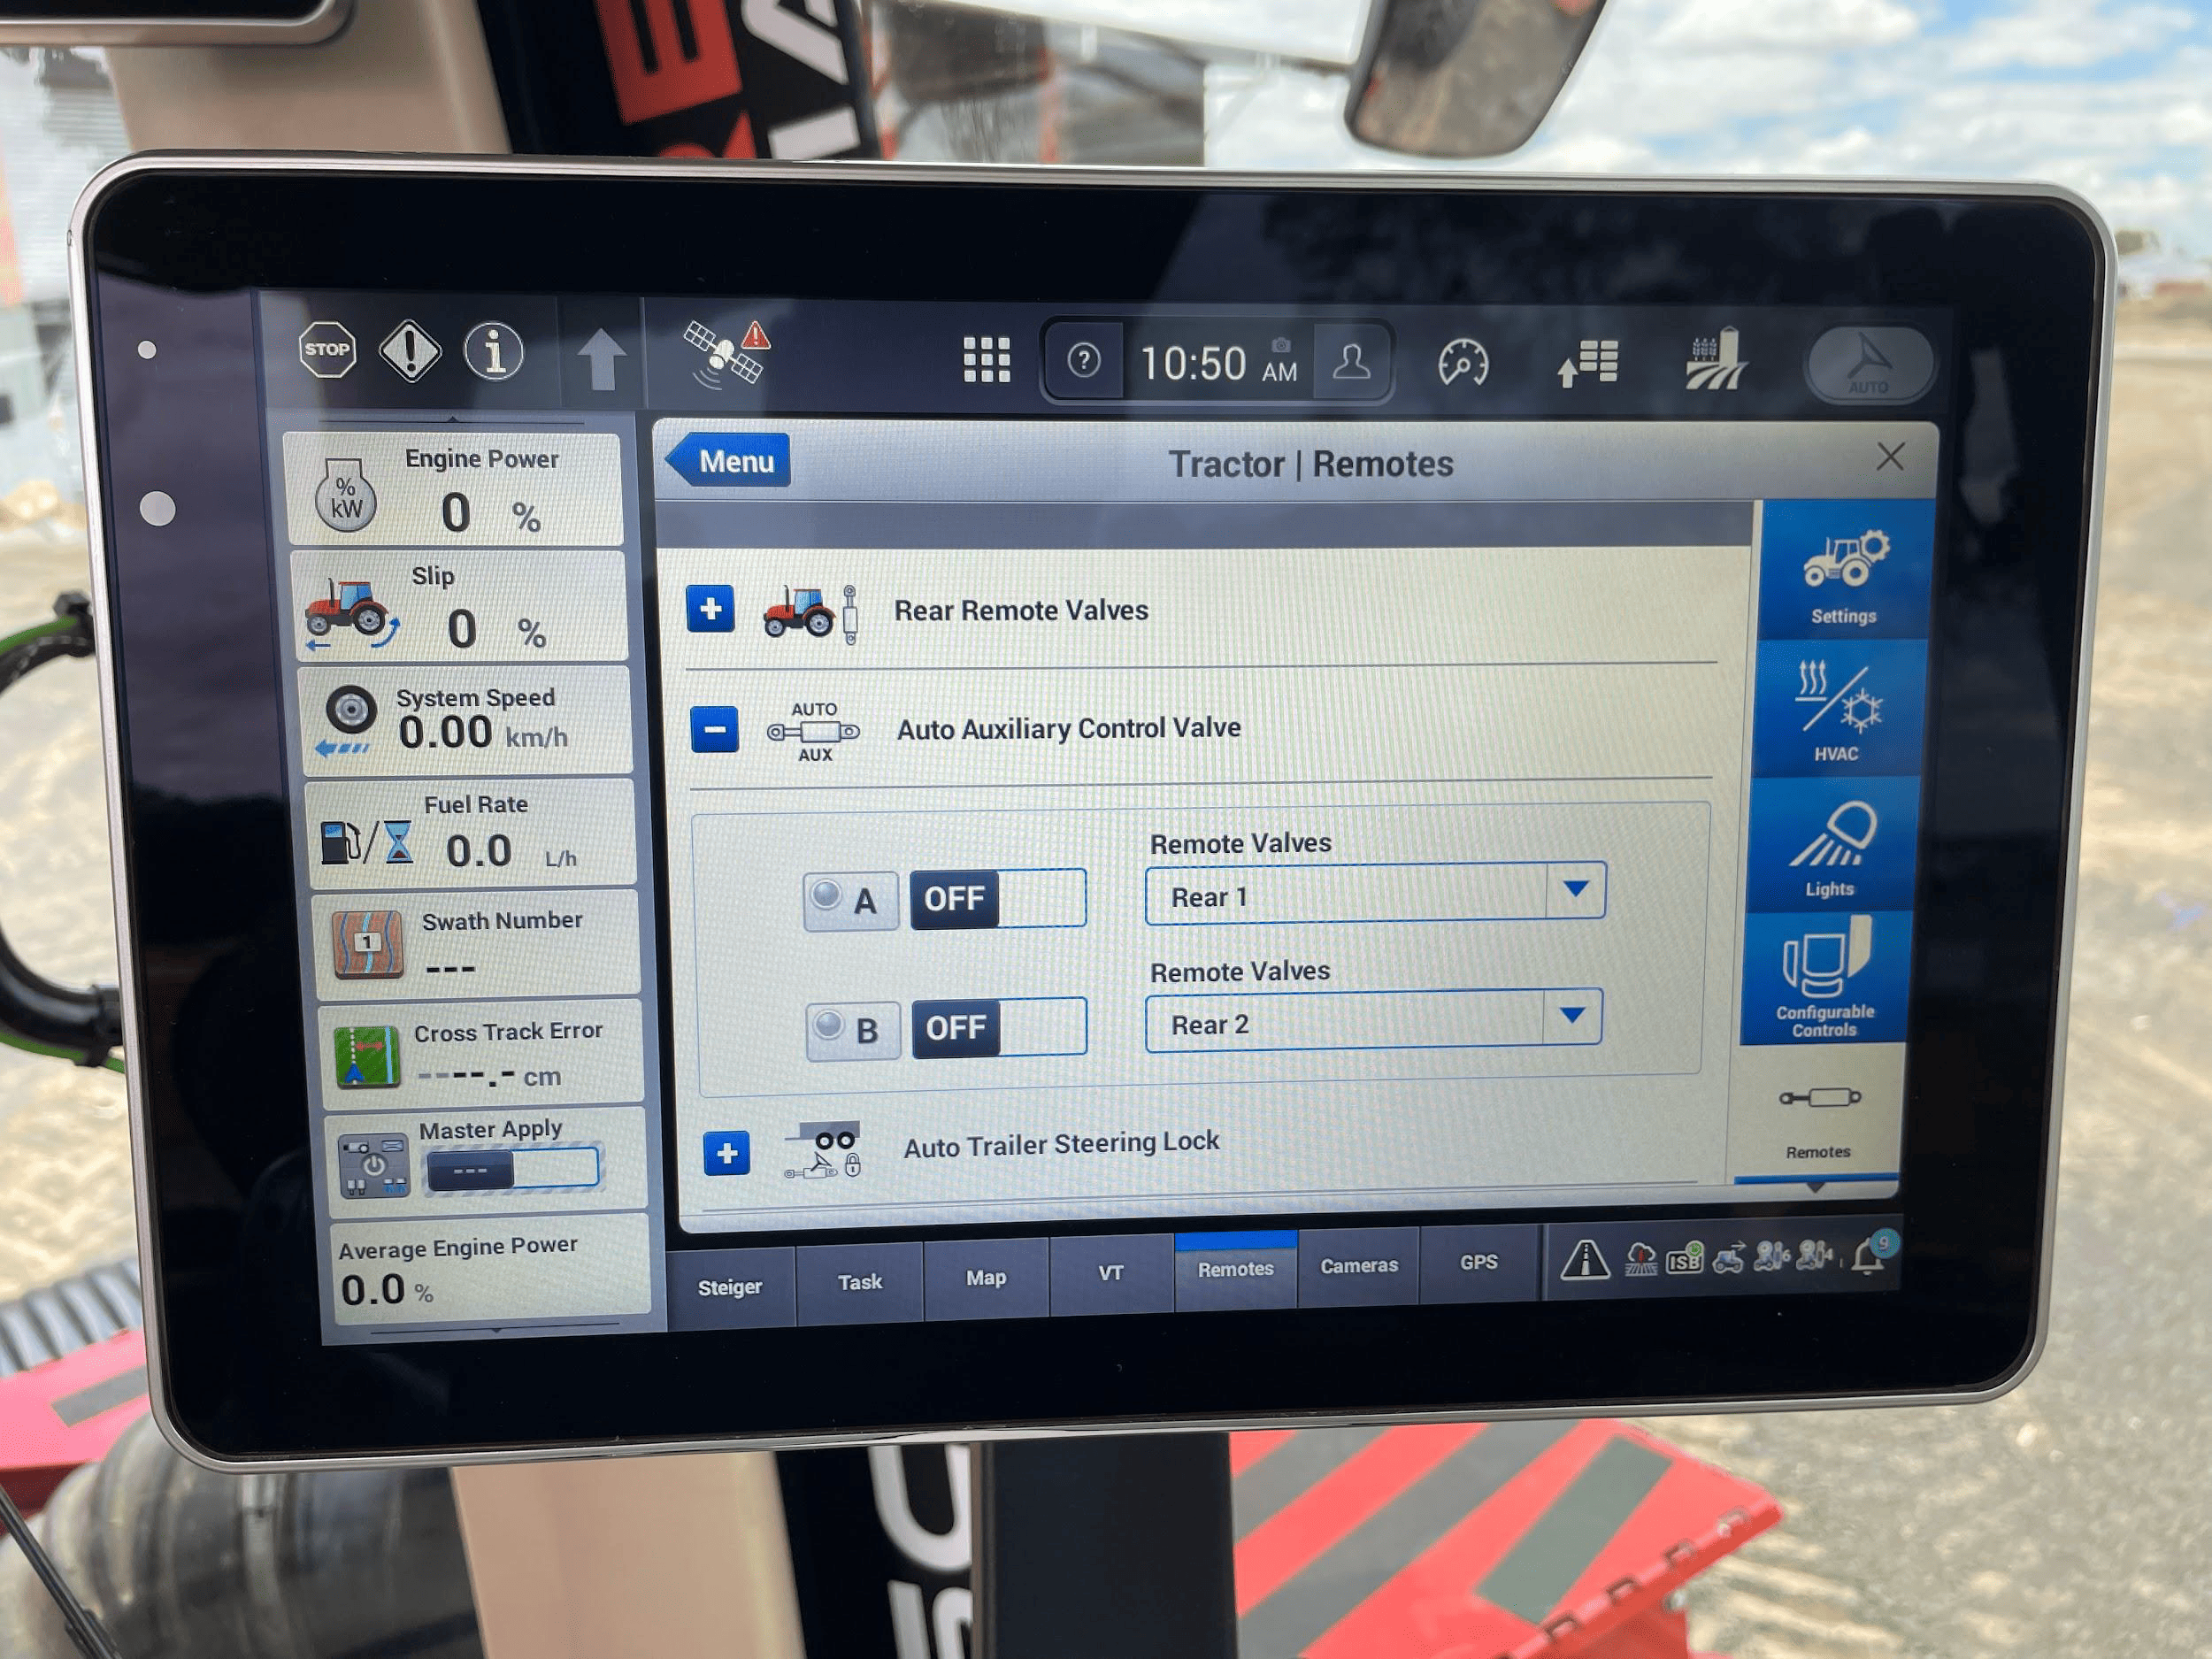
4. Set the desired remote valve outputs at the back of the tractor to the desired function (A or B).
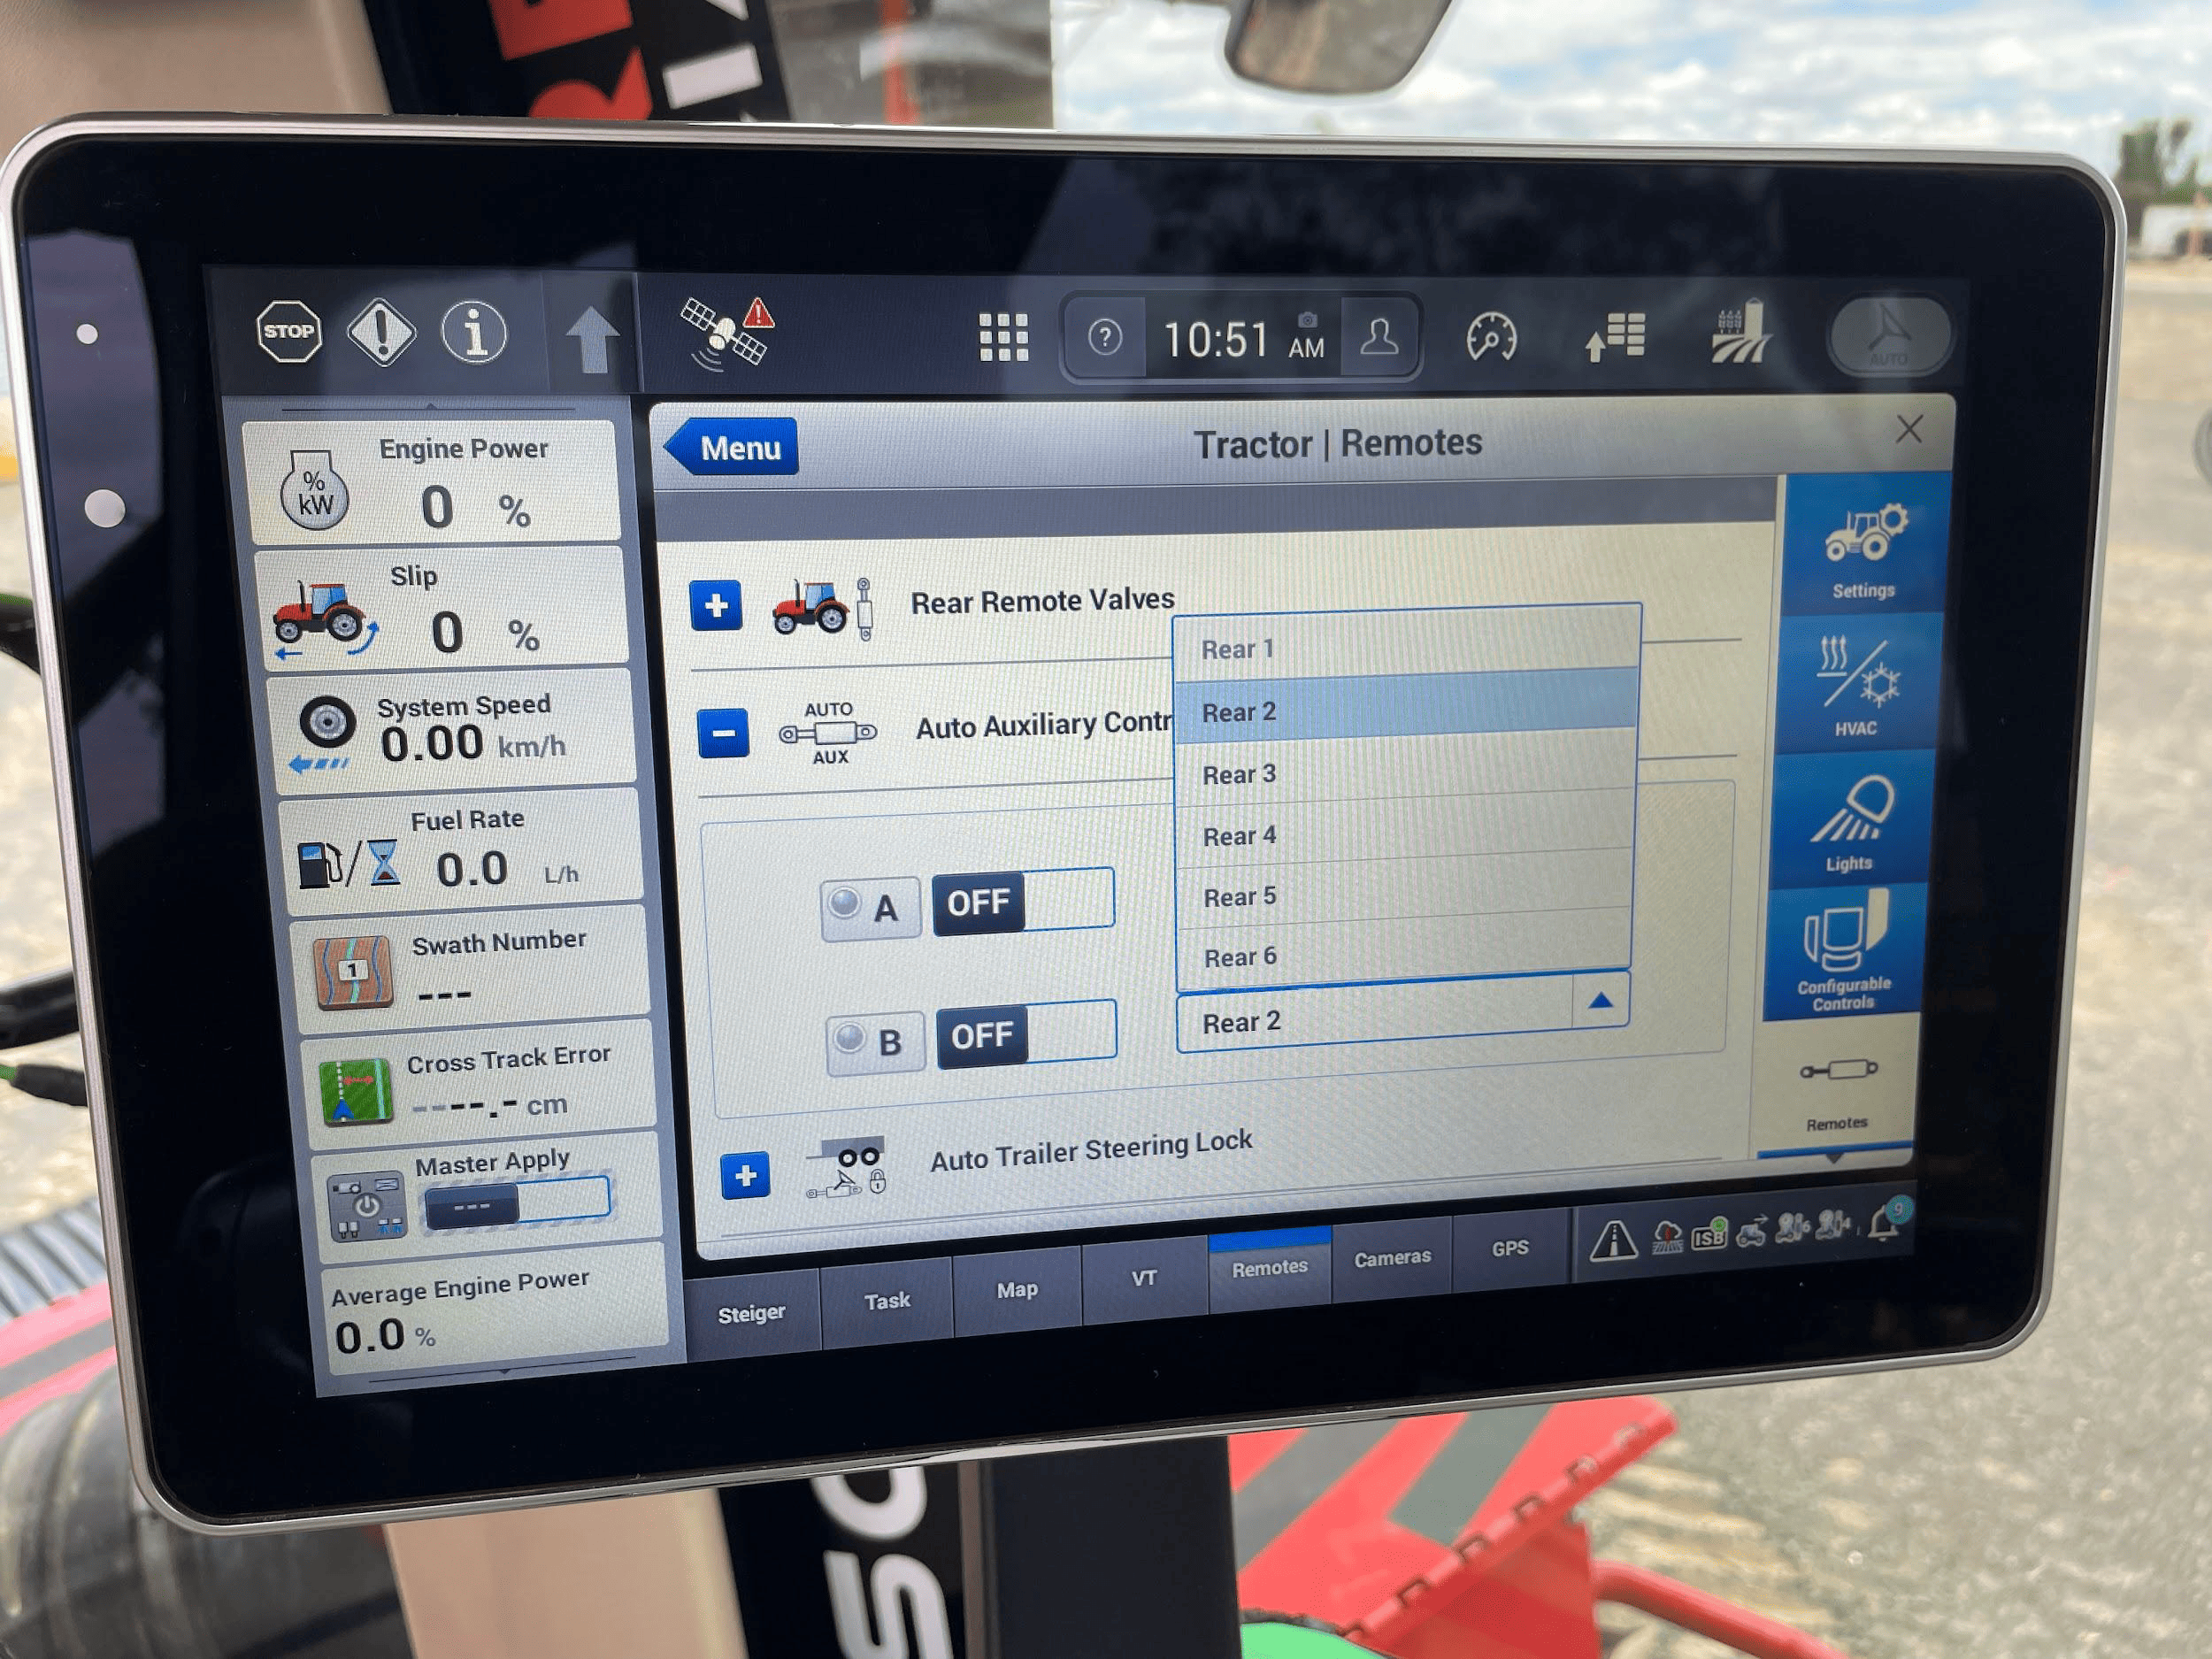
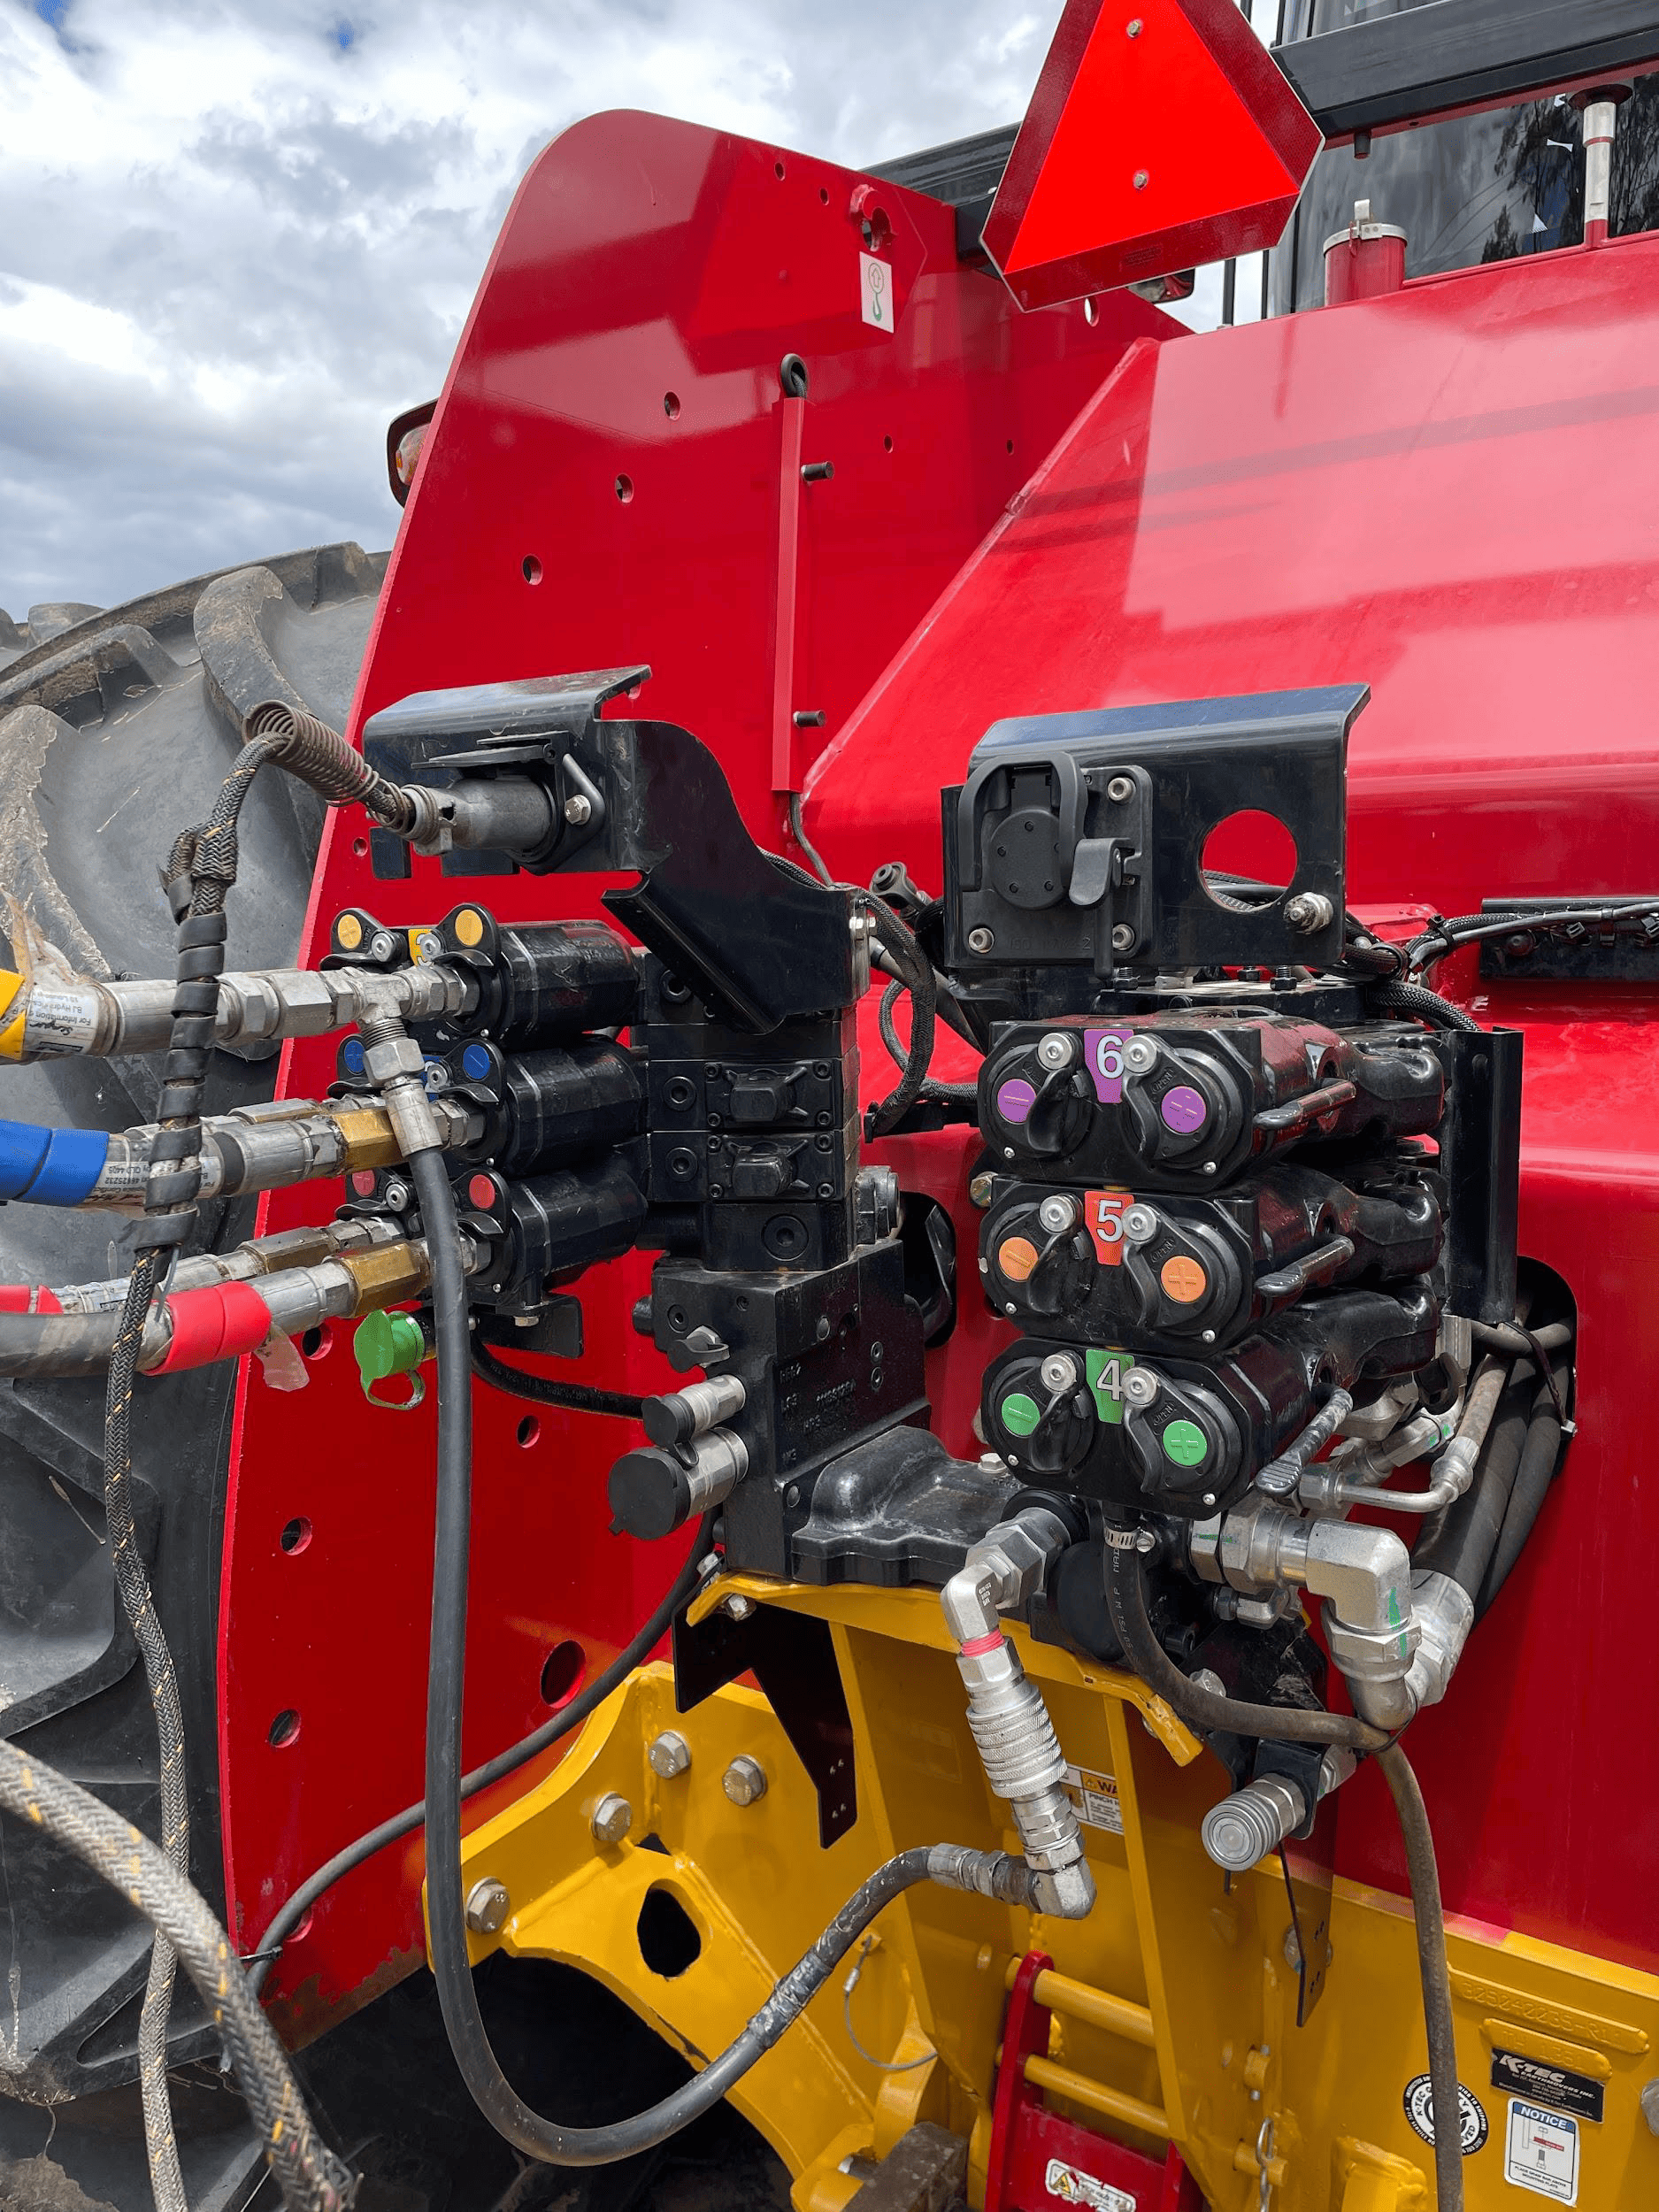
NOTE: The remote valves selected for A and B should be matched to the valve connections at the back of the tractor pictured
below. We recommend setting auxiliary valve A to remote valve “Rear 1”, and setting auxiliary valve B to remote valve “Rear 2”,
which will configure remote valves 1 and 2 at the back of the tractor for use with COMMAND.
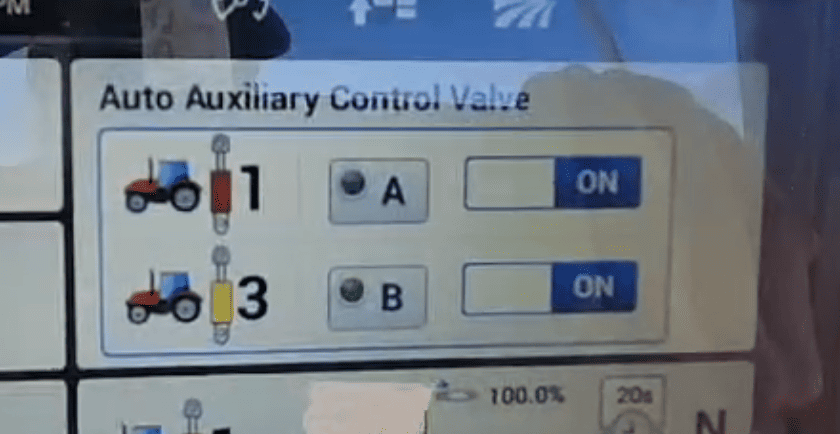
5. Once the remote valves on the tractor have been set to the desired auxiliary function, the machine should now be fully configured and ready for use. In order to engage auxiliary control, the user must ensure that the Auto Auxiliary Control Valves A & B have been turned on in the relevant area on the “Remotes” page.
6. The “Auto Auxiliary Control Valve” can be accessed either by the hydraulic cylinder shortcut next to the display navigation dial on the armrest, or by adding the menu to the display home page. Once this menu is accessed, turn either or both required function to the on position and briefly push the selected remote valve lever forward until it clicks, then release it. The lever returns to its resting position.
Operation Notes
COMMAND interfaces with the Case / New Holland tractor valves by sending analog signals to the integrated valve controller, commanding either port A or port B flow of two of the rear tractor SCVs (For AFS Connect models any SCV can be linked to either of the two analog inputs).
To operate the SCVs in automatic control mode, the user first needs to arm one or both of the configured auto SCVs by toggling the Auto Auxiliary Control Valve toggles to ON.
Then, either push the respective SCV lever forward into the detent position or press the respective SCV button in front of the levers. This will cause the A and/or B LEDs on the pro 1200 screen to change to solid green, indicating the valves are active for automatic control.
Levers can be moved manually, which will override automatic control and once let go, automatic control will resume. To disable automatic control, pull or push the respective SCV lever until it clicks. The A or B LED on the pro 1200 screen should now begin flashing, meaning that automatic control is paused until the operator resumes by pushing the lever to detent or pressing the SCV button again.
IMPORTANT: Moving the SCV lever alone will NOT disengage AUTO mode in modern case tractors, so movements based on any current valve signals will continue. Always keep this in mind during operation.
7.4 | CNH Pre AFS Connect / PLM Intelligence
Applicable to:
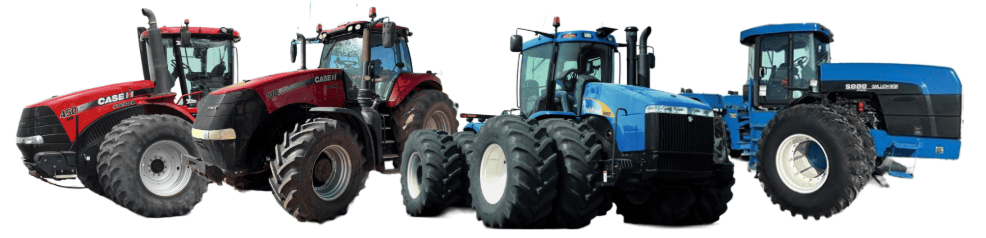
Case IH / New Holland tractors prior to AFS Connect or PLM Intelligence systems.
Connection Method
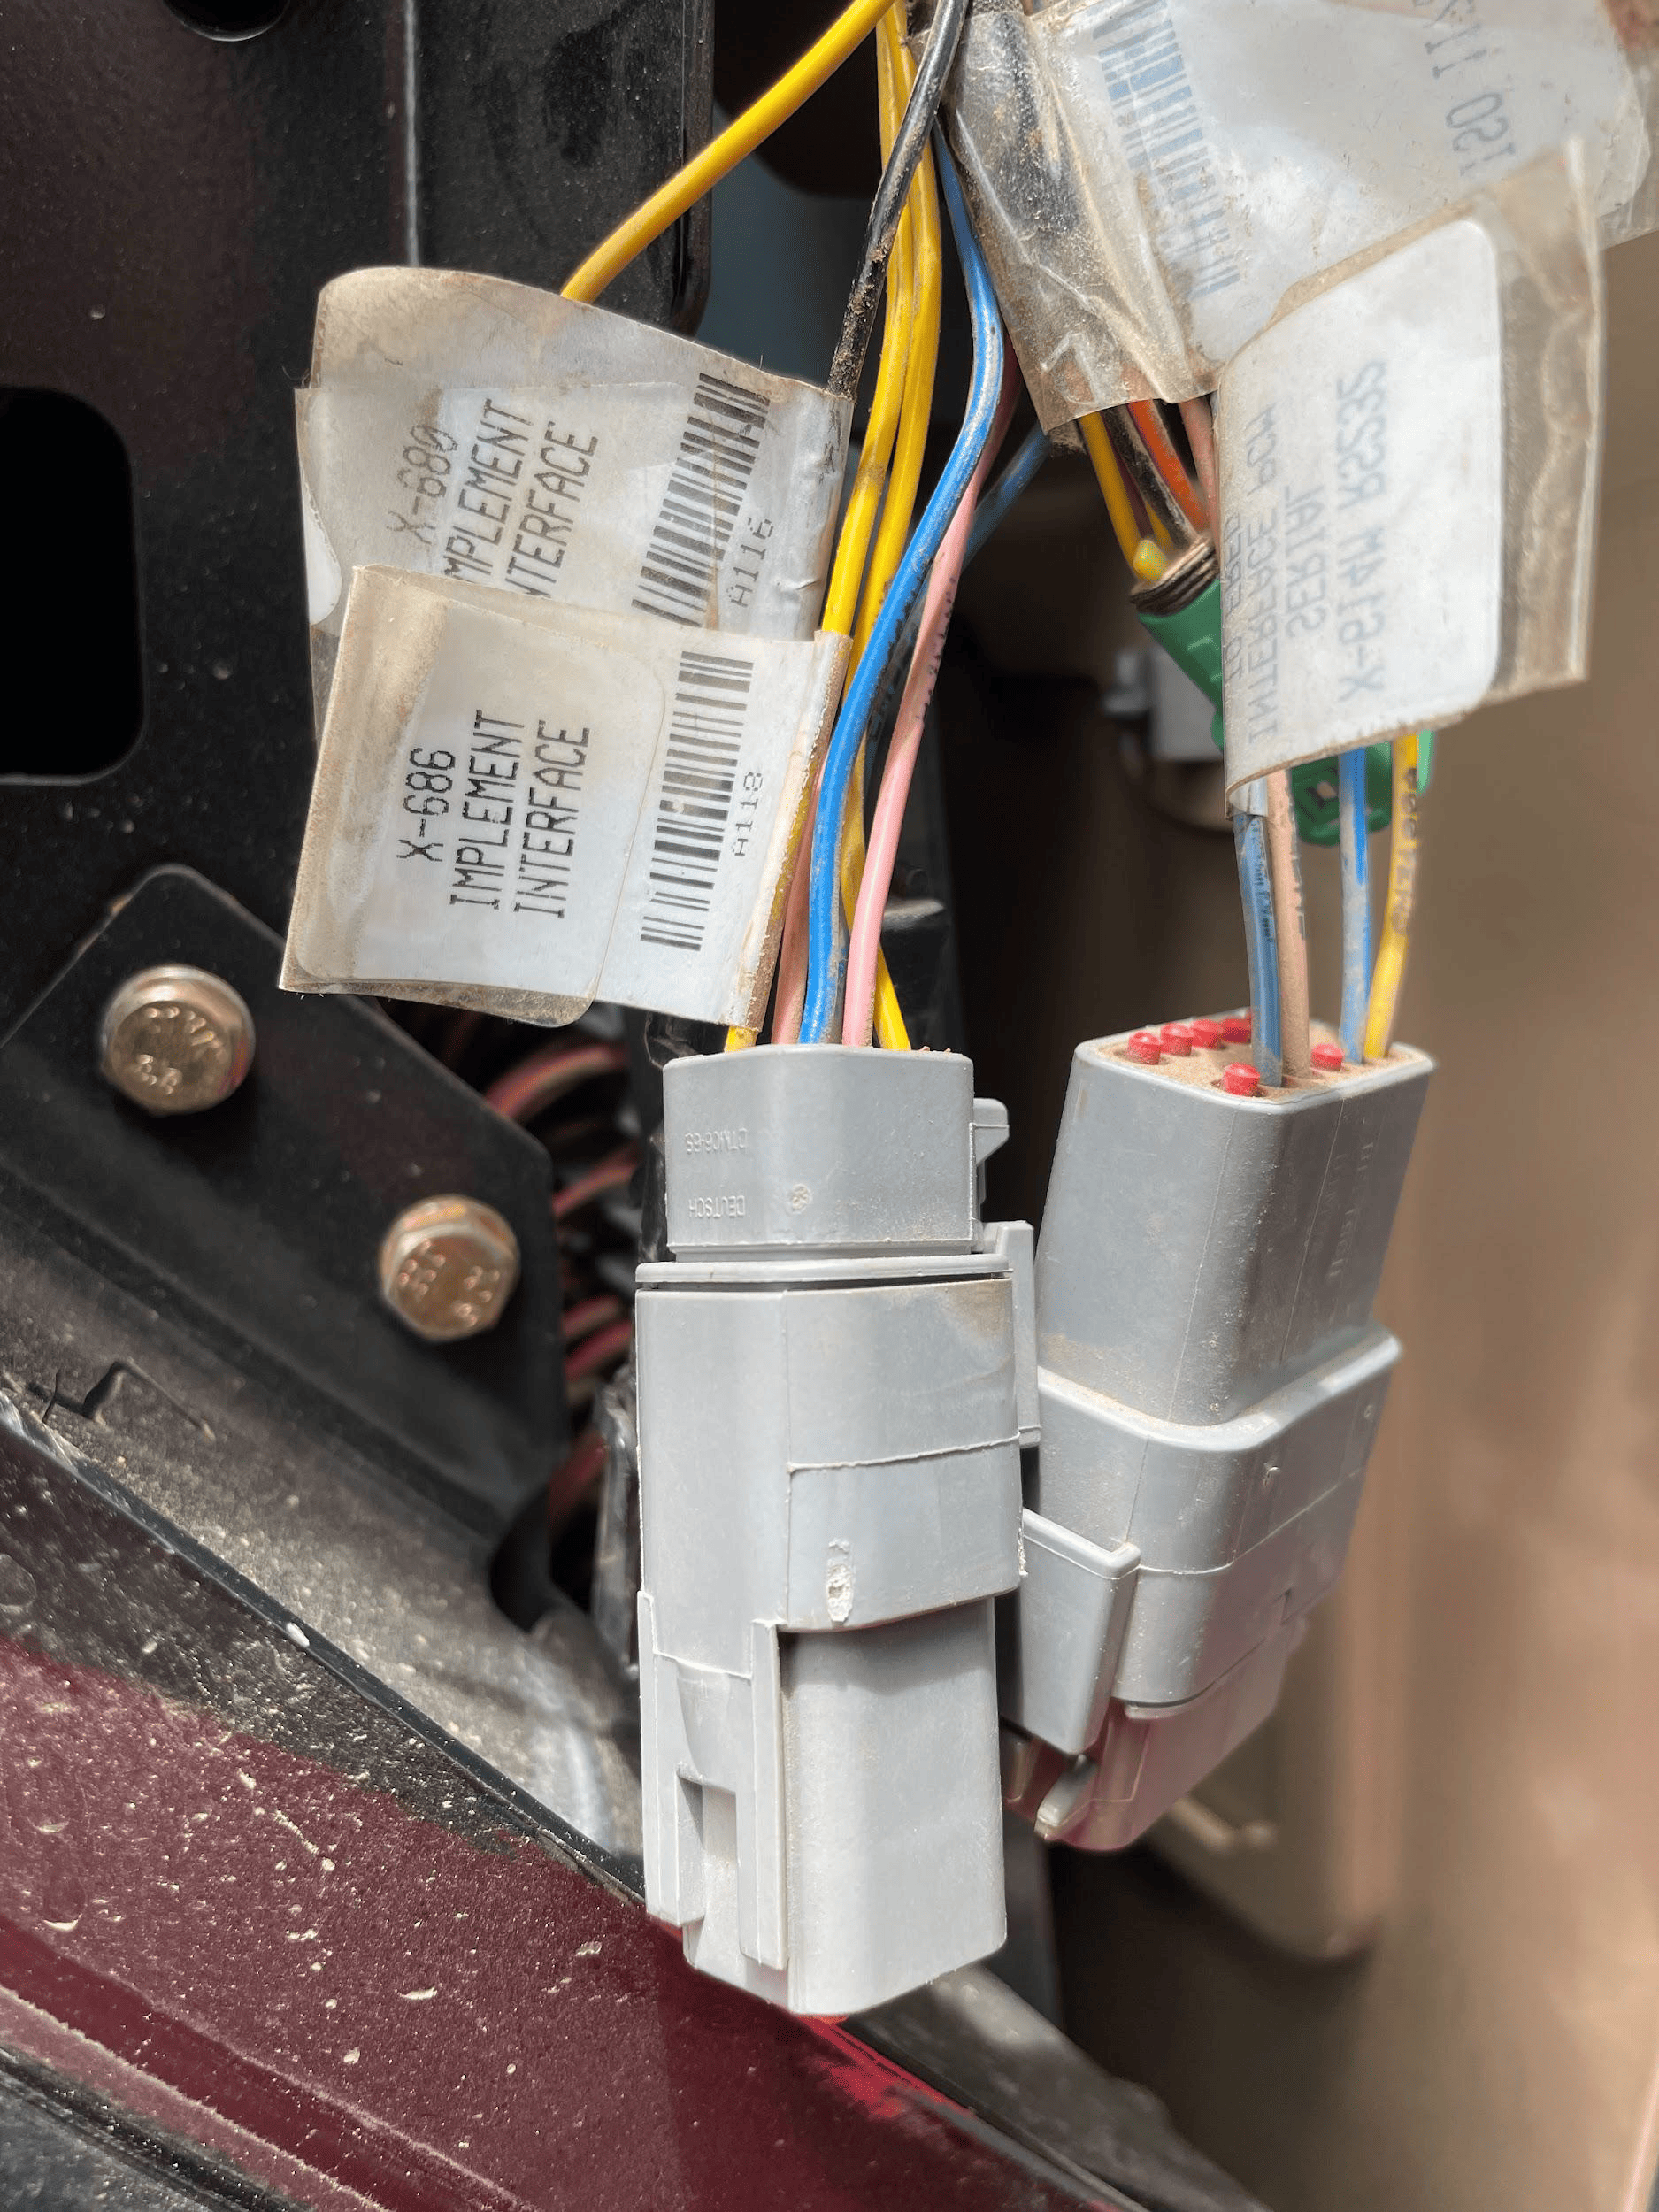 COMMAND can control Case analog input (EHR) valve systems through the use of a T3H-V001 COMMAND Legacy Output Adapter.
Installation Steps
The Case / New Holland tractor connection for analog control signal inputs via the T3H-V001 adapter are generally found in one of three locations depending on tractor mode:
1. Locate the tractor SCV signal input connector:
- Fuse compartment
- Behind driver seat
- Under cab exterior (4WD models)
2. Connect the T3H-V001 adapter to the tractor connection.
3. Connect the T3H-V001 adapter to the T3H-C002 harness.
Tractor Valve Configuration
Select the applicable configuration method:
- New-style instrument cluster
- Old-style instrument cluster
- Tier IV systems
New-style Instrument Cluster
Entering The Configuration Menu
- Locate the corner post instrument cluster in the tractor cab (Pictured right).
- Power up the tractor and press the PROG button on the instrument cluster until “CONFIG MENU” appears.
- Press the “DECR” button until AUX/Hitch/PTO is highlighted and then press the “PROG” button.
- Navigate to “EHR MENU” using the up and down arrow buttons and press the “PROG” button.
Setting Auxiliary Mode
- Use the Up/Down arrow buttons to find “AUX VIEW” and then press the “PROG” button.
- Use the Up/Down arrow buttons until “SCRPR OPTION” appears and then press the “PROG” button.
- Depending on the implement being used, select the correct option using the Up/Down arrow buttons and then press the “PROG” button.
- For single implement height control only - “1 LASER”
- For dual implement height control - “2 LASER”
- For single implement height & cross-slope control - “2 LASER”
Exiting The Configuration Menu
- Press the Up/Down arrow buttons until “AUX EXIT” is shown and then press the “PROG” button.
- Press the Up/Down arrow buttons until “EXIT TMF MENU” is shown and then press the “PROG” button.
- Press the Up/Down arrow buttons until “EXIT” is shown and then press the “PROG” button.
Auto/Manual System Operation
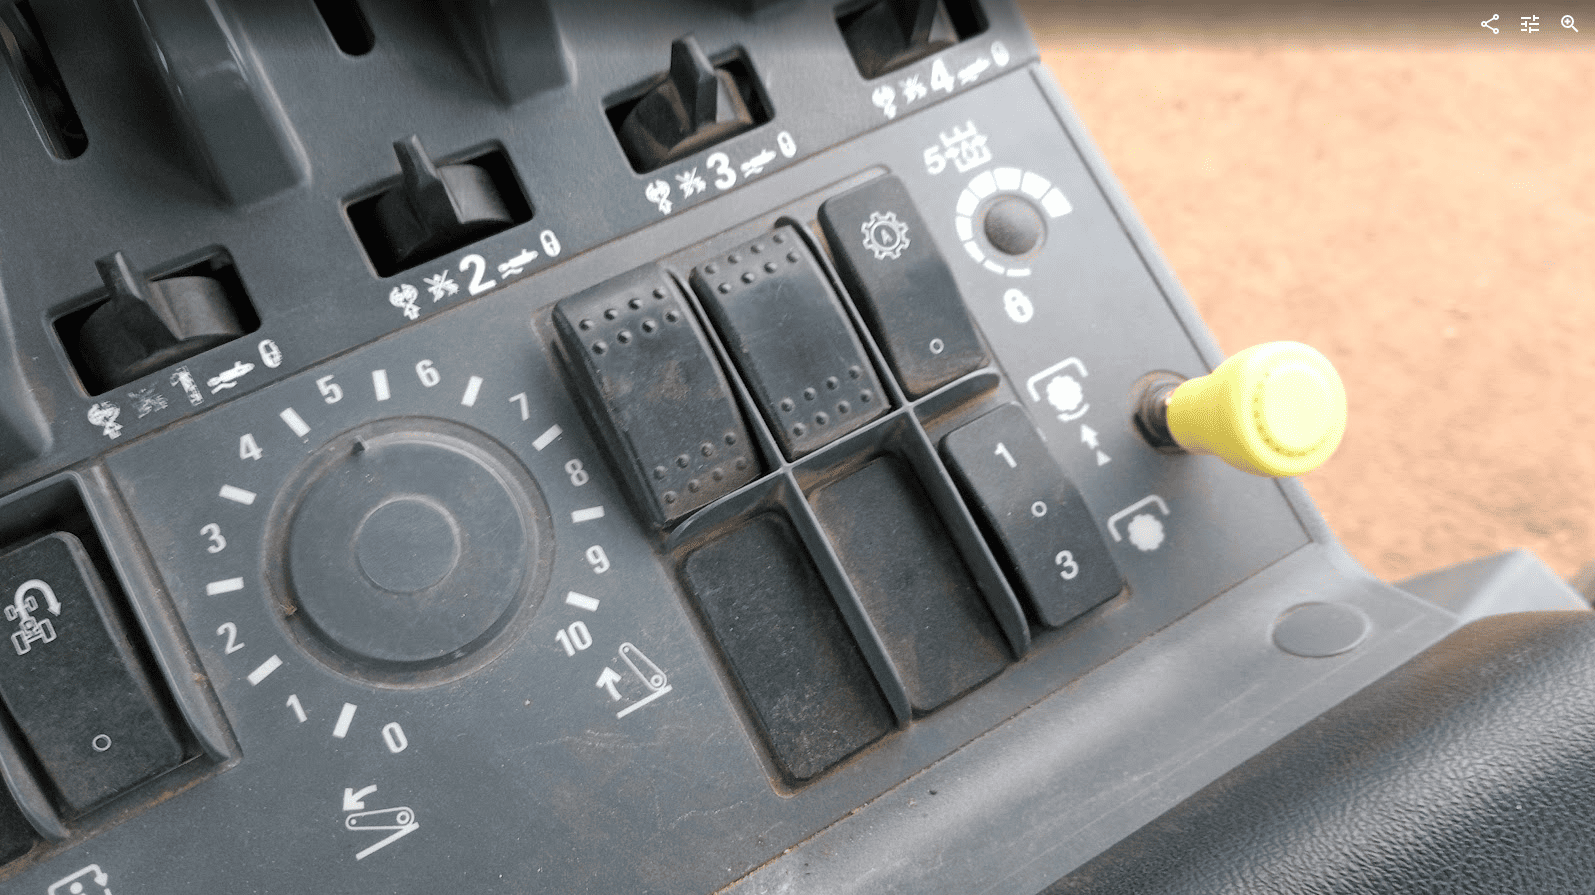
- The tractor will require an Auxiliary (1-3) switch, which is used to toggle between automatic and manual operation for
the two auxiliary inputs. - To toggle between Automatic and Manual operation for either SCV1 or SCV3, press the relevant side of the auxiliary
(1-3) switch.
Old-style Instrument Cluster
Enabling Auxiliary/Remote Valve Control
- Turn on the tractor key switch and within 10 seconds, press and hold the “PROG” button on the instrument cluster for 3 seconds - “INST SET MENU” should appear.
- Press the “INCR” or “DECR” buttons until “AUX SET MENU” is displayed, then press the “PROG” button.
- Press the “INCR” or “DECR” buttons until “AUX SETUP” is displayed, then press the “PROG” button.
- Press the “INCR” or “DECR” buttons to set the required number of “scrapers” between NONE, 1 and 2. In this situation a “scraper” can be considered equivalent to an SCV.
- For single implement height control - select 1 SCRAPER
- For dual implement height control - select 2 SCRAPER
- For single implement height & cross-slope control - select 2 SCRAPER
- Press the “PROG” button to accept the number of scrapers on the display.
Exiting The Configuration Menu
- Press the “INCR” or “DECR” buttons until “AUX EXIT” is displayed, then press the “PROG” button.
- Press the “INCR” or “DECR” buttons until “EXIT SET MENU” is displayed, then press the “PROG” button.
- To complete the calibration process, use the key to turn the ignition off.
CNH Tier IV
Enabling Auxiliary/Remote Valve Control
- Turn on the tractor ignition key switch and within 10 seconds, press and hold the “ENTER” button on the keypad to enter the Config Menu.
- Press the Up or Down arrow keys until “TCU” is displayed and then press “ENTER”.
- Press the Up or Down arrow keys until “EHR MENU” appears and then press “ENTER”.
- Press the Up or Down arrow keys until “EHR SETUP” is displayed and then press “ENTER”.
- “SCRPR NONE” will likely be displayed on the screen. Press the Up or Down arrow button until either “SCRPR 1 LASER” or “SCRPR 2 LASER” is displayed depending on the user’s application and then press “ENTER”.
- For single implement height control only - select 1 LASER
- For dual implement height control - select 2 LASER
- For single implement height & cross-slope control - select 2 LASER
- For single implement height control only - select 1 LASER
- The user can now navigate out of the setup screens or turn the key off - the selected setting will be saved.
Auto-Auxiliary Mode Operation
- The user can toggle between Automatic and Manual operation of the auxiliary outputs using the “1” and “3” buttons on
the console. - The LED on the relevant button will be illuminated when in Automatic operation mode.
- During operation in automatic mode, the upper portion of the programmable display will show the auto state of the auxiliary
outputs. - Automatic control can be temporarily overridden by the operator using the remote hydraulic lever, which will cause the indicator LED on the “1” or “3” console button to flash.
Operation Notes
COMMAND interfaces with the CNH external remotes/valves by sending analog signals to the integrated valve controller, commanding either port A or port B flow of two of the rear tractor SCVs (For AFS Connect models any SCV can be linked to either of the two inputs, whereas older models are limited to SCV1 and SCV3).
To operate the SCVs in automatic control mode, the user first needs to arm one or both of the configured auto SCVs using the 1/3 switch, display or buttons on the armrest .
IMPORTANT: Moving the SCV lever alone will NOT disengage AUTO mode in modern case tractors, so movements based on any current valve signals will continue. Always keep this in mind during operation.
7.5 | Versatile — Analog Scraper Control
Applicable to: Supported Versatile L4WD and DeltaTrack tractors fitted with the 6-pin C920 laser/scraper control interface connected to the tractor Gateway Control Module (GCM).
NOTE: MFWD models may use a different interface arrangement. The 400 HP R3T3 MFWD documentation specifies separate installation instructions; the connection and setup procedure below has not been verified for that arrangement.

Connection Method
COMMAND controls the tractor’s rear electrohydraulic remote valves through the T3H-V001 analog output adapter and the tractor’s 6-pin scraper interface connection.
The tractor interface provides control of two remote valves:
- Input 1: Remote valve 1
- Input 2: Remote valve 3
Installation Steps
1. Complete the machine preparation steps in Section 5.1 and isolate the tractor electrical supply.
2. Remove the electrical compartment cover at the rear of the cab, behind the operator’s seat.
3. Locate the 6-pin scraper interface connector near the Gateway Control Module. In the Versatile installation documentation, this connector is identified as C920.

4. Connect the tractor-side 6-pin connection of the T3H-V001 adapter arrangement to the scraper interface.
5. Connect the T3H-V001 adapter to the valve output connection on the T3H-C002 ECU breakout harness.

6. Secure the harness clear of moving parts and sharp edges, refit the compartment cover and restore the electrical supply.
NOTE: If the scraper interface is not fitted, the appropriate tractor interface harness must be installed first. Versatile specifies interface kit 86053584 for the models covered by installation instructions 89004246.
The documented 400 HP R3T3 MFWD arrangement uses kit 86094592, with installation instructions 89007622. Have the Versatile dealer confirm the correct kit for the tractor model and serial number and follow the corresponding installation instructions.
Tractor Valve Configuration
The tractor’s scraper control interface is disabled by default and must be enabled through the Electronic Instrument Cluster.
1. Keep COMMAND disarmed and turn on the tractor ignition.
2. Use the display Up/Down buttons to navigate to CALIBRATION.
3. Press OK (SELECT) until Scraper Control is displayed.

4. Press Show subscreen.
5. Press OK to change the setting from OFF to ON.

6. Press EXIT to complete the setup.
7. On the EHR monitor, select Manual Operation for remote valves 1 and 3, and leave both hydraulic control levers in neutral.
IMPORTANT: Do not select Continuous mode for remote valves 1 and 3 when using the scraper control interface.
NOTE: Compatible tractor software is required. Versatile instructions 89004246 specify gateway software D2T411 or later for the covered Tier 4i models, D2T311 or later for the covered Tier 3 models, and dash software EICD214.
Software requirements for other models must be confirmed with the Versatile dealer. If the Scraper Control option is unavailable, have the dealer verify the tractor’s software and interface configuration.

Operation Notes
Once Scraper Control is enabled and the remotes are configured as above, the tractor accepts external control signals while the remote levers are in neutral. No lever detent action is required to activate the interface.
Use the COMMAND Arm/Engage switch to arm the system and engage automatic control.
The remote levers can temporarily override automatic hydraulic control. Returning a lever to neutral allows the tractor to respond to COMMAND again if automatic control remains engaged.
IMPORTANT: Moving a tractor remote lever does not disengage COMMAND automatic control. To stop automatic control, disengage it directly using the COMMAND Arm/Engage switch. Disengage by pressing the momentary side or move the switch to OFF to disarm COMMAND and disable its hydraulic control outputs.
7.6 | External Proportional Solenoid Valves — Direct PWM Coil Drive
Applicable to: External proportional valves with solenoid coils driven directly by COMMAND’s PWM outputs. For valves fitted with Danfoss PVE electronic actuators, refer to the Danfoss PVE installation section.
IMPORTANT: Confirm that the external valve’s electrical requirements are compatible with COMMAND. The ECU supports a maximum coil current of 2 A. If a coil would draw more than 2 A at full output (100% PWM), reduce the corresponding Max % setting in Level COMMAND before operating the valve. This limits the maximum output to prevent an overcurrent fault.
Connection Method
COMMAND directly controls the valve solenoids using current-controlled PWM outputs. The T3H-V002 valve extension connects to the T3H-C002 ECU breakout harness and provides a 6 m extension to the implement-mounted valves.
The T3H-V003 — Valve Adapter – Prop. Solenoid (2-way DT) connects the extension to valves fitted with compatible 2-pin Deutsch connections.
NOTE: For valves using other connector types, such as Hirschmann, the dealer or installer must provide a suitable adapter. T3RRA currently supplies the 2-pin Deutsch valve adapter only. Any alternative adapter must maintain the correct circuit connections and comply with the valve manufacturer’s polarity requirements.
Installation Steps
1. Complete the machine preparation steps in Section 5.1 and isolate the tractor electrical supply.
2. Connect the T3H-V002 valve extension to the valve output connector on the T3H-C002 ECU breakout harness.
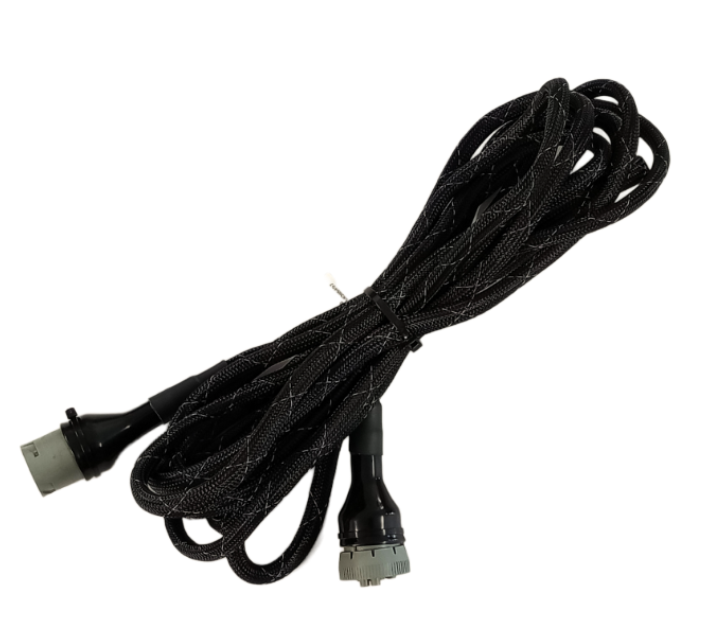
3. Route the extension to the external valve block. Allow sufficient slack for tractor articulation and implement movement, and secure the harness clear of moving parts, hot surfaces and pinch points.
4. Connect the T3H-V003 valve adapter, or suitable alternative adapter, to the implement end of the T3H-V002 extension.
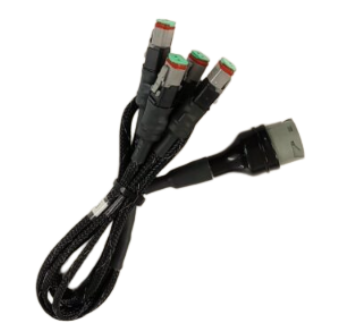
5. Connect the adapter’s solenoid plugs to the appropriate valve coils for each controlled function, such as height and cross-slope. Identify the raise/lower or tilt directions for verification during setup.
6. Secure the connections and protect any unused connectors against moisture and dirt.
7. Keep COMMAND disarmed and restore the electrical supply.
Valve Configuration
Confirm that the valve’s electrical requirements are compatible with COMMAND before operating the outputs. Refer to Section 2.4 for proportional solenoid compatibility.
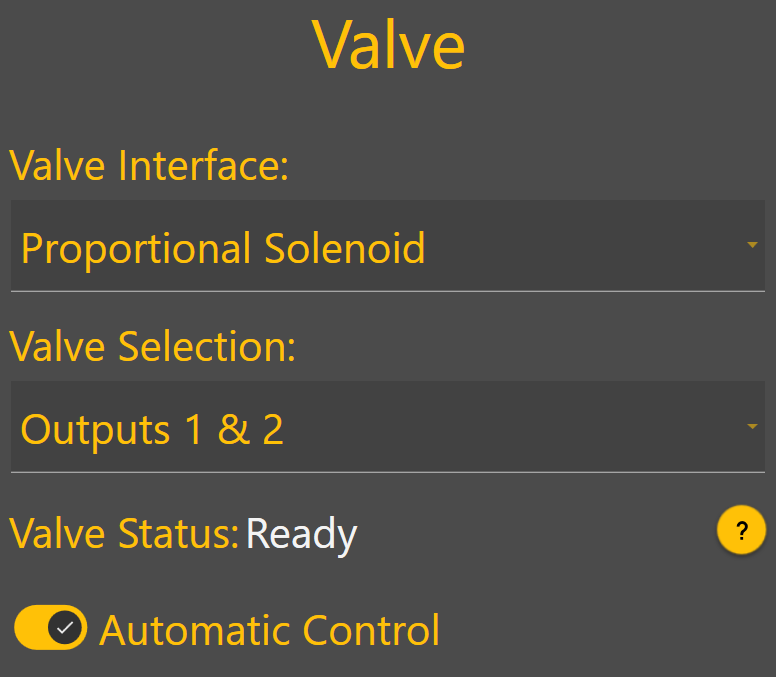
In Level COMMAND:
- Select Proportional Solenoid as the valve interface.
- Assign the required valve outputs to each controlled function.
- Verify that each function moves in the intended direction, then complete valve threshold and cylinder calibration.
For detailed configuration and calibration instructions, refer to the Level COMMAND Manual.
NOTE: The external valve block must have the hydraulic supply and return connections required by the implement manufacturer. Configure any tractor remote supplying the valve block according to those instructions.
Operation Notes
NOTE: If manual control is not already provided, install a compatible joystick as described in Section 6.3.
COMMAND must be armed for a connected joystick to operate the valve outputs. Use the COMMAND Arm/Engage switch to arm the system and engage automatic control.
Joystick movement can disengage automatic control or temporarily override it, depending on the selected joystick configuration. Confirm the configured behaviour during commissioning and demonstrate it to the operator.
IMPORTANT: To stop automatic control, press the momentary side of the COMMAND Arm/Engage switch. Move the switch to OFF to disarm COMMAND and disable its hydraulic control outputs. Disarming also disables valve operation from a COMMAND-connected joystick.
7.7 | Fendt ONE — 900 Gen 6/7 & 1000 Gen 2/3
Applicable to: Supported Fendt 900 Gen 6/7 and Fendt 1000 Gen 2/3 tractors using the COMMAND Fendt ONE valve interface.
Connection Method
COMMAND connects to the tractor’s rear SCV system using the T3H-V005 ISO Valve Adapter.
The adapter is installed inline between the tractor chassis harness and the SCV-bank harness. It connects the tractor-side and valve-side CAN networks to COMMAND through the CAN Interface connection on the T3H-C002 ECU breakout harness.
The tractor connection is located at the rear of the machine, on the right-hand side behind the ISOBUS socket.
Installation Steps
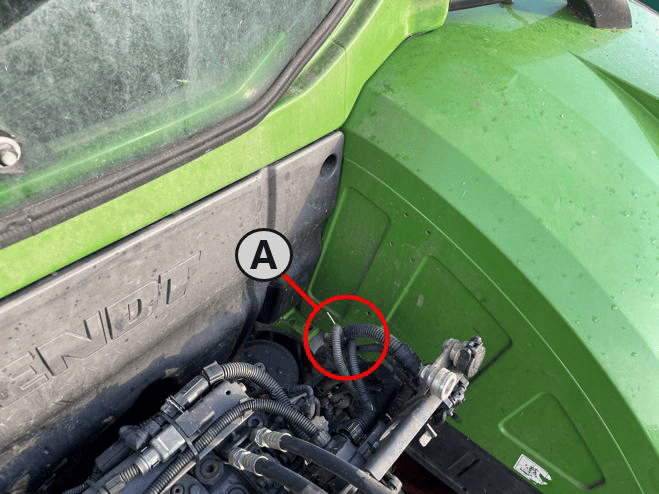 1. Complete the machine preparation steps in Section 5.1 and isolate the tractor electrical supply.
2. Locate the SCV-bank harness connection behind the rear ISOBUS socket, shown as A in the location image.
(A) – SCV / Chassis Harness connection
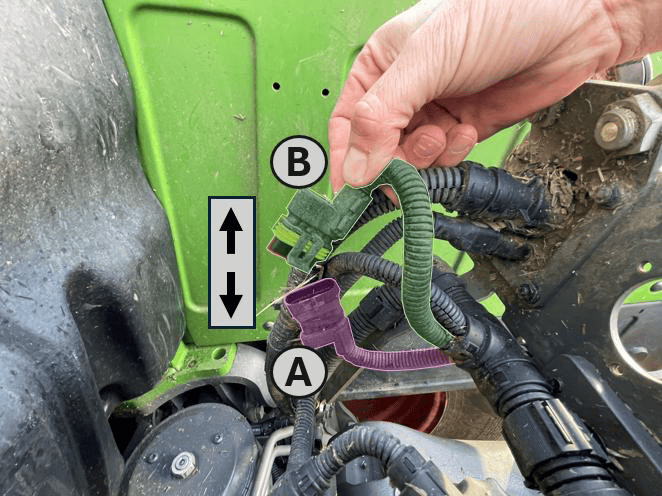
3. Release the connector latch and disconnect the SCV-bank harness receptacle (A) from the tractor chassis harness plug (B).
(A) – SCV Bank Harness Receptacle
(B) – Tractor Chassis harness plug
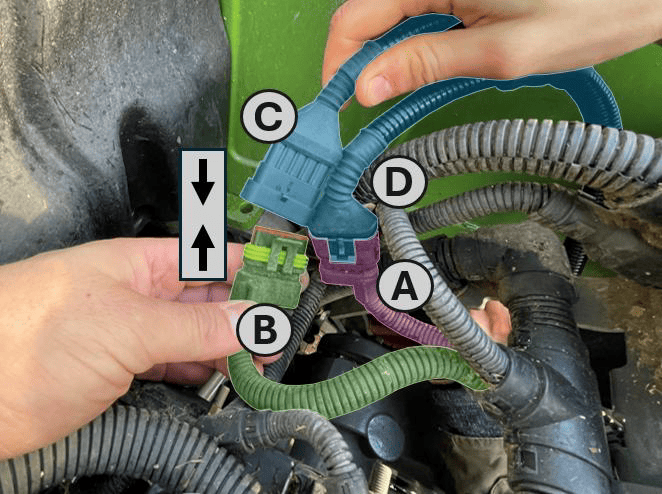
4. Connect the tractor-side receptacle (C) on the T3H-V005 adapter to the tractor chassis harness plug (B).
5. Connect the valve-side plug (D) on the T3H-V005 adapter to the SCV-bank harness receptacle (A).
(A) – SCV Bank Harness Receptacle
(B) – Tractor Chassis Harness Plug
(C) – T3H-V005 Harness ‘Tractor’ Receptacle
(D) – T3H-V005 Harness ‘Valve Block’ Plug
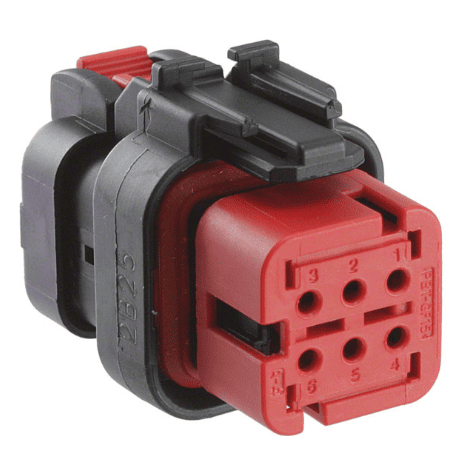 6. Route the adapter to the COMMAND ECU and connect it to the Tractor/Valve CAN Interface connector (pictured right) on the T3H-C002 ECU breakout harness.
7. Ensure all connectors are fully seated and latched. Secure the harness clear of moving parts, hot surfaces and sharp edges, leaving sufficient slack to avoid strain on the connectors.
8. Keep COMMAND disarmed and restore the electrical supply.
IMPORTANT: The SCV-bank harness connection and the nearby ISOBUS socket connection serve different purposes. Connect T3H-V005 to the SCV-bank harness as shown.
Where an ISOBUS connection is required for the installation, follow Section 5.4 using the appropriate COMMAND cab or exterior breakout harness.
Tractor Valve Configuration
- Ensure the required tractor SCVs are enabled and unlocked using the tractor’s controls.
- In Level COMMAND, select Fendt ONE as the valve interface.
- Assign the required SCVs to the controlled functions, such as height and cross-slope. These assignments must match the implement’s hydraulic hose connections.
- Verify valve communication and confirm that each function operates the intended valve in the correct direction.
- Complete valve configuration and calibration before automatic operation.
Operation Notes
To prepare the selected SCVs for automatic control:
- Ensure the required tractor SCVs are enabled and unlocked.
- Move the COMMAND Arm/Engage switch to the middle ON position to arm COMMAND.
- Move each selected SCV’s tractor control lever into the float position to enable external control of that valve.
- Press the momentary side of the COMMAND Arm/Engage switch to engage automatic control once the system is ready.
NOTE: For SCVs configured for COMMAND control, the lever’s float position enables external hydraulic control. It does not place the valve into hydraulic float.
Before handing over the installation, verify manual valve operation and demonstrate how to enable, disengage and resume automatic control.
IMPORTANT: To disengage COMMAND automatic control, press the momentary side of the COMMAND Arm/Engage switch. Move the switch to OFF to disarm COMMAND and disable its hydraulic control commands.
7.8 | Fendt 800 SCR/S4
Applicable to: Supported Fendt 800 SCR/S4 tractors using the COMMAND Fendt SCR/S4/MT valve interface.
Connection Method
COMMAND connects to the tractor’s rear SCV system using the T3H-V005 ISO Valve Adapter and the S/109 — Fendt 800 SCR/S4 Adapter Harness, specified for SolSteer kit K/SCV/008.
The S/109 harness is installed inline between the tractor chassis harness and the valve harness. It connects to T3H-V005, which routes the tractor-side and valve-side CAN networks to the CAN Interface connection on the T3H-C002 ECU breakout harness.
The tractor connection consists of a pair of 4-way connectors, located behind the panel under the rear-right wheel arch.
NOTE: Depending on the tractor specification, an additional valve harness may be connected in series, providing two identical connections in this harness chain. Either of these connections can be used.
Installation Steps
1. Complete the machine preparation steps in Section 5.1 and isolate the tractor electrical supply.
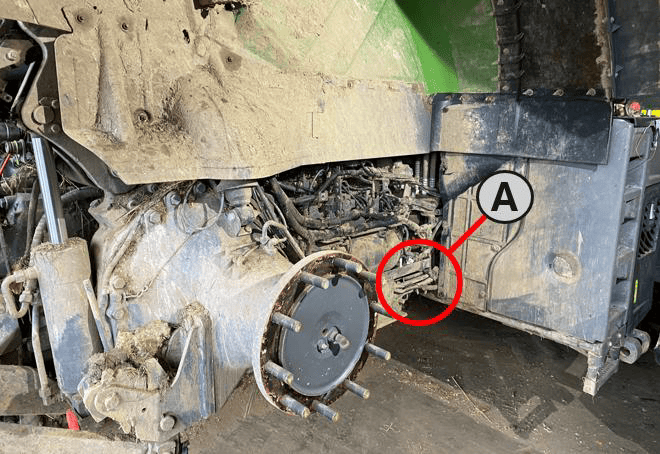
2. Locate the valve/chassis harness connection behind the panel under the rear-right wheel arch, shown as A in the location image.
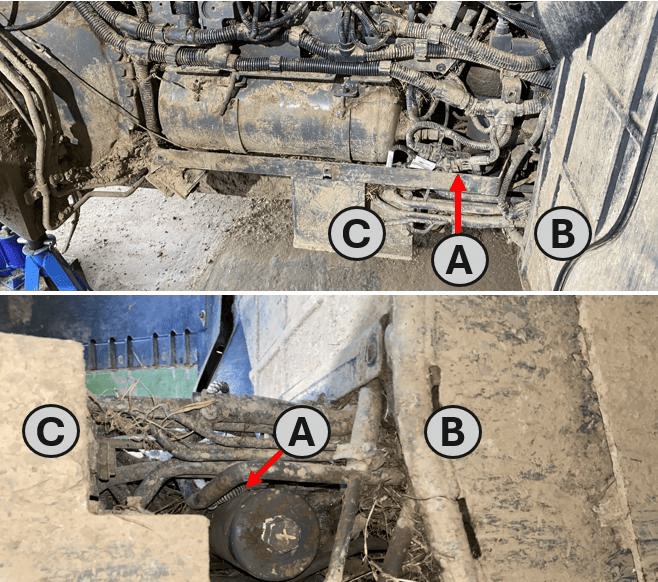
3. Alternatively, it may be accessed from underneath the machine (A) – the bundle can be found amongst the hydraulic lines between the front of the wheel arch (B) and the valve block bracket (C).
(A) - Valve/Tractor Harness bundle
(B) - Front of the Rear Right Wheel Arch
(C) - Valve Bracket, behind Rear Right Wheel
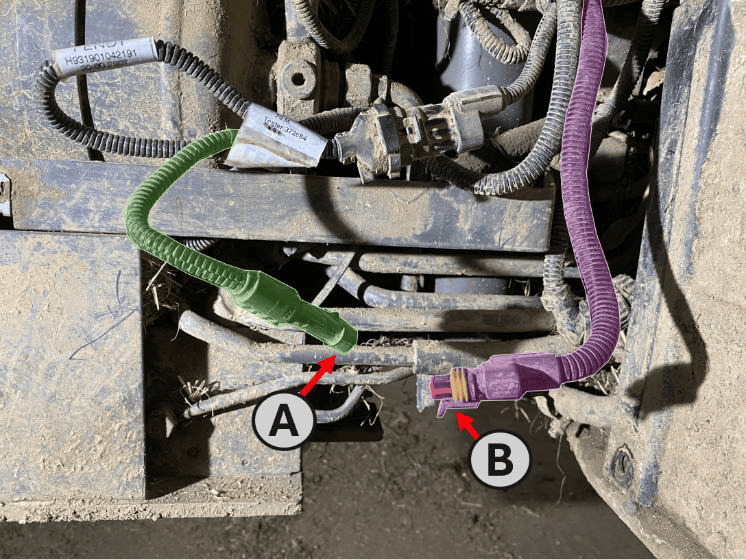
3. Release the connector latch and disconnect the 4-way valve harness receptacle (A) from the tractor chassis harness plug (B).
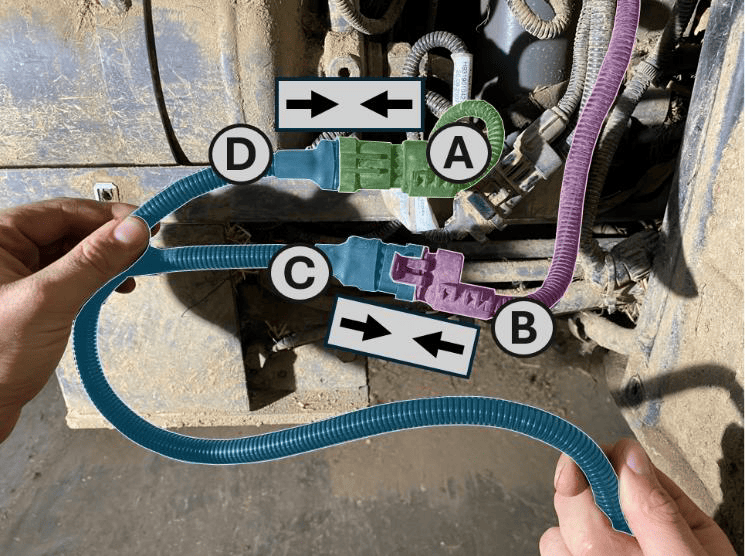
4. Connect the 4-way “Tractor” receptacle (C) on the S/109 harness to the tractor chassis harness plug (B).
5. Connect the 4-way “Valve” plug (D) on the S/109 harness to the valve harness receptacle (A).
(A) – Receptacle on Machine Valve Harness
(B) – Plug on Tractor Chassis Harness
(C) – ‘Tractor’ Receptacle on S/109 Adaptor Harness
(D) – ‘Valve’ Plug on S/109 Adaptor Harness
6. Route the S/109 harness towards the rear of the tractor.
7. Connect the 5-way receptacle on the S/109 harness to the valve-side plug on T3H-V005.
8. Connect the 5-way plug on the S/109 harness to the tractor-side receptacle on T3H-V005.
9. Route T3H-V005 to the COMMAND ECU and connect it to the CAN Interface connector on the T3H-C002 ECU breakout harness.
10. Ensure all connectors are fully seated and latched. Secure the harness clear of the tyre, moving parts, hot surfaces and sharp edges, leaving sufficient slack to avoid strain on the connectors.
11. Refit any components removed for access. Keep COMMAND disarmed and restore the electrical supply.
IMPORTANT: The valve-harness connection and the connection at the rear ISOBUS socket serve different purposes. Connect S/109 to the valve/chassis harness connection identified above.
Where an ISOBUS connection is required for the installation, follow Section 5.4 using the appropriate COMMAND cab or exterior breakout harness.
Tractor Valve Configuration
- Ensure the required tractor SCVs are enabled and unlocked using the tractor’s controls.
- In Level COMMAND, select Fendt SCR/S4/MT as the valve interface.
- Assign the required SCVs to the controlled functions, such as height and cross-slope. These assignments must match the implement’s hydraulic hose connections.
- Prepare the selected SCVs for external control as described below, then verify that each function operates the intended valve in the correct direction.
- Complete valve configuration and calibration before automatic operation.
Operation Notes
To prepare the selected SCVs for automatic control:
- Ensure the required tractor SCVs are enabled and unlocked.
- Move the COMMAND Arm/Engage switch to the middle ON position to arm COMMAND.
- Move each selected SCV’s tractor control lever into the float position to enable external control of that valve.
- Press the momentary side of the COMMAND Arm/Engage switch to engage automatic control once the system is ready.
NOTE: For SCVs configured for COMMAND control, the lever’s float position enables external hydraulic control. It does not place the valve into hydraulic float.
IMPORTANT: To disengage COMMAND automatic control, press the momentary side of the COMMAND Arm/Engage switch. Move the switch to OFF to disarm COMMAND and disable its hydraulic control commands.
Before handing over the installation, verify manual valve operation and demonstrate how to enable, disengage and resume automatic control.
7.9 | Fendt 900 SCR/S4
Applicable to: Supported Fendt 900 SCR/S4 tractors using the COMMAND Fendt SCR/S4/MT valve interface.
Connection Method
COMMAND connects to the tractor’s rear SCV system using the T3H-V005 ISO Valve Adapter and the S/111 — Fendt 900 S4/SCR Adapter Harness.
The S/111 harness is installed inline between the tractor chassis harness and the valve harness. It connects to T3H-V005, which routes the tractor-side and valve-side CAN networks to the Tractor & Valve CAN Interface 6-way connection on the T3H-C002 ECU breakout harness.
Installation Steps
NOTE: The connection may be accessed from beneath the tractor, between the front of the rear-right wheel arch and the valve-block bracket. Removing the rear-right wheel and access panel provides additional access where required; follow the tractor manufacturer’s service instructions.
1. Complete the machine preparation steps in Section 5.1 and isolate the tractor electrical supply.
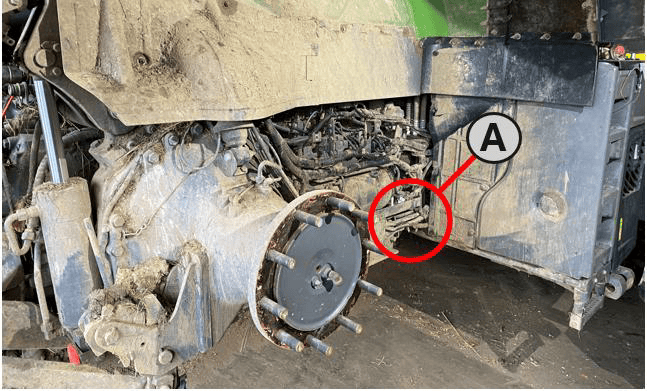 2. Locate the valve/chassis harness connection behind the panel under the rear-right wheel arch, shown as A in the location image.
(A) - Valve/chassis harness connection
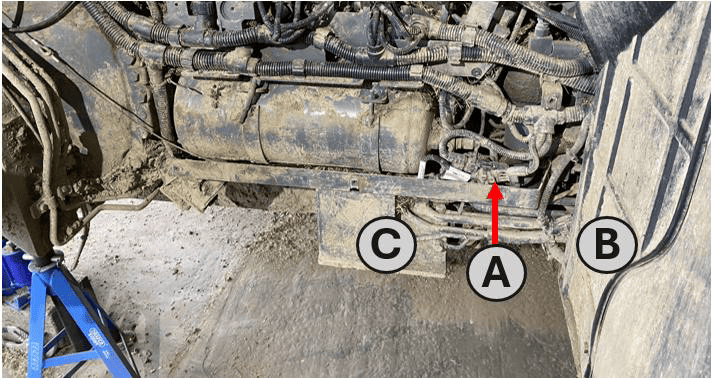
3. Release the connector latch and disconnect the valve harness receptacle (A — X1587_P) from the tractor chassis harness plug (B — X1586_S).
(A) - Valve/Chassis Harness connection
(B) - Front of the Rear Right Wheel Arch
(C) - Valve Bracket, Inside Rear Right Wheel
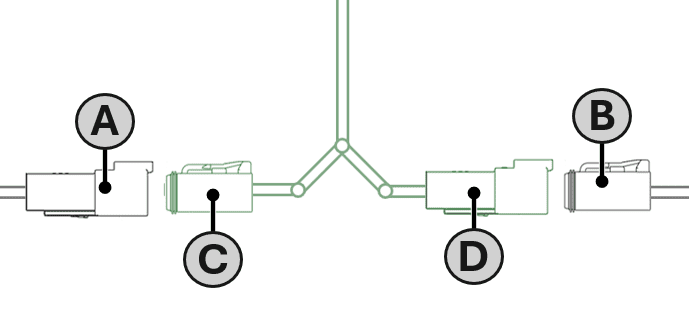
4. Connect the 4-way “VALVES” plug (C) on the S/111 harness to the valve harness receptacle (A).
(A) - Valve harness receptacle (X1587_P)
(B) - Chassis harness plug (X1586_S)
(C) - ‘VALVES’ Plug S/111 Adaptor Harness
(D) - ‘TRACTOR’ Receptacle S/111 Adaptor Harness
5. Connect the 4-way “TRACTOR” receptacle (D) on the S/111 harness to the tractor chassis harness plug (B).
6. Connect the 5-way plug on the S/111 harness to the tractor-side receptacle on T3H-V005.
7. Connect the 5-way receptacle on the S/111 harness to the valve-side plug on T3H-V005.
8. Route T3H-V005 to the COMMAND ECU and connect it to the CAN Interface connector on the T3H-C002 ECU breakout harness.
9. Ensure all connectors are fully seated and latched. Secure the harness clear of the tire, moving parts, hot surfaces and sharp edges, leaving sufficient slack to avoid strain on the connectors.
10. Refit any components removed for access. Keep COMMAND disarmed and restore the electrical supply.
IMPORTANT: The 4-way valve-harness connection and the 4-way connection at the rear ISOBUS socket serve different purposes. Connect S/111 to the valve/chassis harness connection identified above.
Where an ISOBUS connection is required for the installation, follow Section 5.4 using the appropriate COMMAND cab or exterior breakout harness.
Tractor Valve Configuration
- Ensure the required tractor SCVs are enabled and unlocked using the tractor’s controls.
- In Level COMMAND, select Fendt SCR/S4/MT as the valve interface.
- Assign the required SCVs to the controlled functions, such as height and cross-slope. These assignments must match the implement’s hydraulic hose connections.
- Prepare the selected SCVs for external control as described below, then verify that each function operates the intended valve in the correct direction.
- Complete valve configuration and calibration before automatic operation.
Operation Notes
To prepare the selected SCVs for automatic control:
- Ensure the required tractor SCVs are enabled and unlocked.
- Move the COMMAND Arm/Engage switch to the middle ON position to arm COMMAND.
- Move each selected SCV’s tractor control lever into the float position to enable external control of that valve.
- Press the momentary side of the COMMAND Arm/Engage switch to engage automatic control once the system is ready.
NOTE: For SCVs configured for COMMAND control, the lever’s float position enables external hydraulic control. It does not place the valve into hydraulic float.
IMPORTANT: To disengage COMMAND automatic control, press the momentary side of the COMMAND Arm/Engage switch. Move the switch to OFF to disarm COMMAND and disable its hydraulic control commands.
Before handing over the installation, verify manual valve operation and demonstrate how to enable, disengage and resume automatic control.
7.10 | Fendt / Challenger MT
Applicable to: Supported Fendt and Challenger MT tractors using the COMMAND Fendt SCR/S4/MT valve interface.
Connection Method
COMMAND connects to the tractor’s rear SCV system using the T3H-V005 ISO Valve Adapter and the S/082 — Fendt/Challenger MT Adapter Harness.
The S/082 harness is installed inline between the tractor chassis harness and the SCV-bank harness. It connects to T3H-V005, which routes the tractor-side and valve-side CAN networks to the Tractor & Valve CAN Interface connection on the T3H-C002 ECU breakout harness.
The tractor connection is located at the rear-left of the machine. The SCV-bank harness receptacle is a flange-mounted 12-way Deutsch connector, secured to a bracket behind the SCV bank.
Installation Steps
1. Complete the machine preparation steps in Section 5.1 and isolate the tractor electrical supply.
2. Connect the 5-way plug on the S/082 harness to the tractor-side receptacle on T3H-V005.
3. Connect the 5-way receptacle on the S/082 harness to the valve-side plug on T3H-V005.
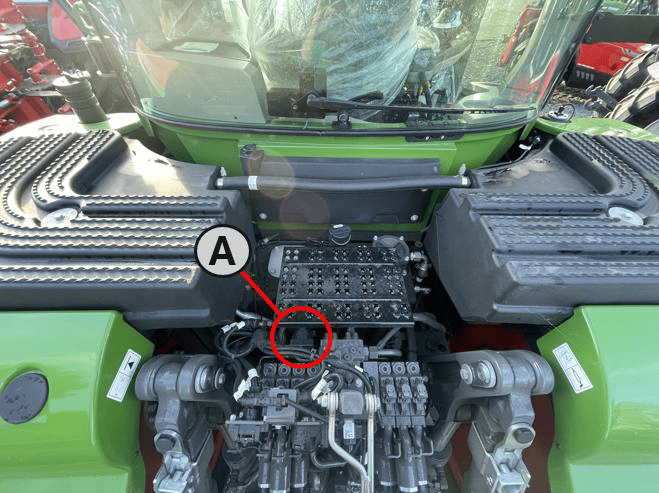
4. Locate the 12-way SCV-bank harness connection at the rear-left of the tractor.
(A) - SCV Bank Harness connections
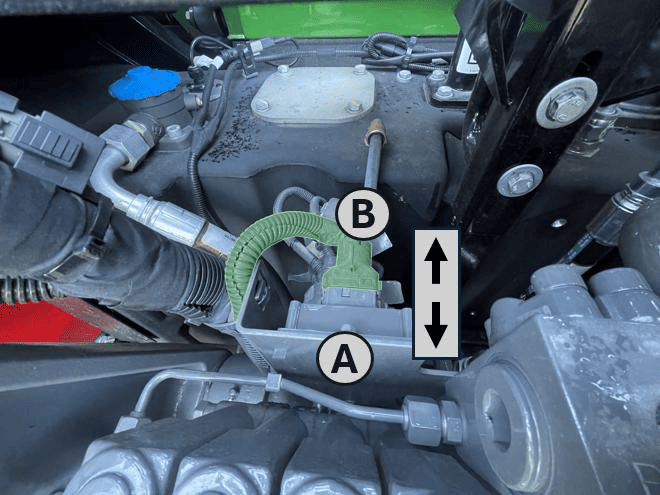
5. Release the connector latch and disconnect the tractor chassis harness plug (B) from the SCV-bank harness receptacle (A).
(A) – SCV Bank Harness Receptacle
(B) – Tractor Chassis Harness Plug
6. Connect the tractor chassis harness plug (B) to the 12-way “Tractor” receptacle (D) on the S/082 harness.
7. Connect the 12-way “Implement PCB” plug (C) on the S/082 harness to the SCV-bank harness receptacle (A).
(A) – SCV Bank Harness Receptacle
(B) – Tractor Chassis Harness Plug
(C) – Implement PCB Plug, S/082 Harness Adaptor
(D) – Tractor Receptacle, S/082 Harness Adaptor
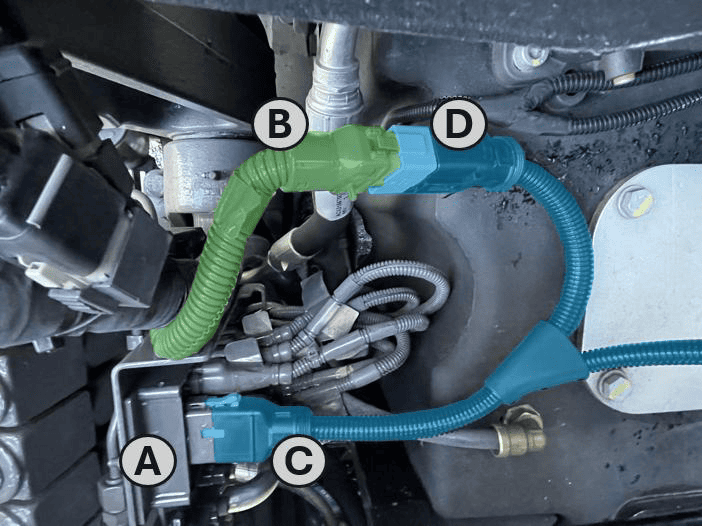
8. Route T3H-V005 to the COMMAND ECU and connect it to the CAN Interface connector on the T3H-C002 ECU breakout harness.
9. Ensure all connectors are fully seated and latched. Secure the harness clear of moving parts, hot surfaces and sharp edges, leaving sufficient slack to avoid strain on the connectors.
10. Keep COMMAND disarmed and restore the electrical supply.
IMPORTANT: The 12-way SCV-bank harness connection and the connection at the rear ISOBUS socket serve different purposes. Connect S/082 to the SCV-bank harness connection identified above.
Where an ISOBUS connection is required for the installation, follow Section 5.4 using the appropriate COMMAND cab or exterior breakout harness.
Tractor Valve Configuration
- Ensure the required tractor SCVs are enabled and unlocked using the tractor’s controls.
- In Level COMMAND, select Fendt SCR/S4/MT as the valve interface.
- Assign the required SCVs to the controlled functions, such as height and cross-slope. These assignments must match the implement’s hydraulic hose connections.
- Prepare the selected SCVs for external control as described below, then verify that each function operates the intended valve in the correct direction.
- Complete valve configuration and calibration before automatic operation.
For detailed configuration and calibration instructions, refer to the Level COMMAND Manual.
Operation Notes
To prepare the selected SCVs for automatic control:
- Ensure the required tractor SCVs are enabled and unlocked.
- Move the COMMAND Arm/Engage switch to the middle ON position to arm COMMAND.
- Move each selected SCV’s tractor control lever into the float position to enable external control of that valve.
- Press the momentary side of the COMMAND Arm/Engage switch to engage automatic control once the system is ready.
NOTE: For SCVs configured for COMMAND control, the lever’s float position enables external hydraulic control. It does not place the valve into hydraulic float.
IMPORTANT: To disengage COMMAND automatic control, press the momentary side of the COMMAND Arm/Engage switch. Move the switch to OFF to disarm COMMAND and disable its hydraulic control commands.
Before handing over the installation, verify manual valve operation and demonstrate how to enable, disengage and resume automatic control.